; Plisherrific: rhinestones
Showing posts with label rhinestones. Show all posts

Oct 26, 2015

Happy Haunting - Nubar Arencia, Konad Black Pearl, Bundle Monster BM20 + BM-224


So, today's manicure... has been sitting in my folders for the last four years!
 
[The creepy part is how old these are..]
This was 2011, so pretty much the first Halloween manicure I ever attempted since I got into nail polish in late 2010. =) How's that for a throwback!

[Base: Nubar Arencia]
I obviously hadn't got the hang of colour correcting photos at that point! Bear with the odd pink skintone..

[Base: Nubar Arencia]
My base was the very lovely Nubar Arencia from the Venetian Glass collection. Man, this kinda makes me feel bad because I don't think I've picked it up since doing this mani...

[Base: Nubar Arencia; Stamping: Konad Black Pearl, Bundle Monster BM20 & BM-224]
I think this was also when I first picked up stamping. Here's me going crazy with Konad Black Pearl stamping polish and Bundle Monster plates BM20 (stripes and arrows) and BM-224 (reptile print, haunted house and pumpkin).

[Base: Nubar Arencia; Stamping: Konad Black Pearl, Bundle Monster BM20 & BM-224]
Wow, look at past me! I even added some rhinestones to top it off! Current me feels rather lacking... well, there's just under a week to Halloween, so maybe I'll get my act together in time for it... Hopefully I won't take another four years to post it... =p


Jan 2, 2014

King Under the Mountain - Revlon Chocolate Drizzle, More Nail Polish Coinage

So a group of us went to watch the Hobbit. Oh, yeaaah! DRAGON! :D  Like Ev, I too did a Smaug inspired mani, though it's far less colourful than Ev's! Obviously, the inspiration is dragon scales and treasuuuuuure.

[Base polish: Revlon Chocolate Drizzle
Snake Foil
Tips: More Nail Polish Coinage]
The base polish is Revlon's Chocolate Drizzle, which is a medium to dark chocolate brown with a silver shimmer. On top of that is a brown foil of scales. I love the foil, which I think is meant to be a snake pattern. Snake, dragon, eh, same difference. :P The main colour of the foil are different shades of brown, with gold outlining the scales. The different brown shades give the foil such a nice depth.

I used More Nail Polish's Coinage on the tips, which is such a gorgeous nail polish and perfect for this mani because it has all this gold, silver and red glitter. (The full swatch of Coinage can be found here.) After that, I added a few gold, red and silver rhinestones to the tips as well.

[Base polish: Revlon Chocolate Drizzle
Snake Foil
Tips: More Nail Polish Coinage]
As this was inspired by Smaug, I was hoping to do a mani that looks like dragon scales, with treasure clinging to the underbelly. I think it turned out quite well!

Dec 30, 2013

RAWR!! A Smaug-inspired Manicure - Kleancolor Metallic Purple, Red, Yellow; China Glaze Orange Marmalade


The end (of the year) is nigh! As is my tradition, I go out to the movies with friends on new years eve, so it looks like that's what I'll be doing this year too!

[Testing out the concept...]
This is relevant because today's is a rather old manicure that I put together before watching The Hobbit LAST YEAR (even though Smaug was barely in it...). I was in such a rush but here's the excerpt I used for inspiration:

"There he lay, a vast red-golden dragon, fast asleep...  ...and his long pale belly crusted with gems and fragments of gold from his long lying on his costly bed."

[Draconic underbellies r' us]
So here's my Smaug-inspired manicure! I first created a sponge gradient using the same method used here. The shades used here are Kleancolor Metallic Purple, KC Metallic Red, China Glaze Orange Marmalade and KC Metallic Yellow.

[Glitz and sparkle!]
Using clear polish, I then stuck on various colours and sizes of rhinestones on the tips of my nails before filling in the tips with China Glaze Medallion and Milani Jewel FX Gems! I'm definitely looking forward to seeing Smaug in the second movie... I doubt he'll be quite as tackily glitzy as this mani though..... =p

I guess I'll catch y'all in the new year!! =)

Nov 4, 2013

Jelly and Gems - China Glaze Strawberry Fields, Crystal AB rhinestones


Good morning! Today's manicure was something I came up with to go out to high tea with the girls. I wanted something bright but girly, and of course with some sparkle!

[Spot the Sparkle]
This is what I came up with, a combination of pink and rhinestones...

[Base: China Glaze Strawberry Fields (2 coats); Rhinestones: Crystal AB]
I started with a base of China Glaze Strawberry Fields, a medium bright pink with heavy gold glass flecks running through. This was two coats, I think.

[Base: China Glaze Strawberry Fields (2 coats); Rhinestones: Crystal AB]
I then used some clear polish to stick on some crystal AB rhinestones that I purchased off eBay. They're so colourful and shiny, I love 'em! 

[Base: China Glaze Strawberry Fields (2 coats); Rhinestones: Crystal AB]
I think it would have looked more interesting with a stamped pattern or perhaps some french tips to go with, but I was super rushed for time when I was doing this so I reckon it turned out well enough!


Nov 26, 2012

Floral Eyes - Essie Super Bossa Nova, Konad Special Polish White


A mani which turned out a bit odd! From afar it sorta looks like little monsters with black beady eyes, oh dear...

[Beady little floral eyes!]
 I think I did this one at the beginning of spring and was feeling doing something bright and slightly retro... Hm

[Bottle to nail: Essie Super Bossa Nova (2 coats)]
I started with a base of Essie Super Bossa Nova from the Summer Collection. Who doesn't love some bossa nova! =) Super Bossa Nova is a bright pink creme with a bright fuchsia shimmer.


[2 coats: Essie Super Bossa Nova]
Like most Essies, gorgeous formula and excellent pigmentation. I think I used two coats here but you could get away with one careful coat (depending on the length of your nails).

[Base: Essie Super Bossa Nova (2 coats); Stamping: Konad Special Polish White]
I then stamped over it with a floral pattern from one of my Bundle Monster plates, using Konad Special Polish in White. Then I stuck on small black rhinestones using clear polish... might not have been the best addition, but oh well! I seem to do this alot... there appears to be a great divide between what I imagine when starting a mani... and what appears after I'm done! =S


Feb 27, 2012

Ev's Past Plischtures - Another Catch-up Post


I actually have quite a few pics to get through, but these are some I've edited so far. Usually these manis are older ones where we don't have enough pics, tipwear is horrific or the photos are of low quality so Jme and I feel like they don't deserve their own post all to themselves. I hope you all enjoy them anyway!

Mani #1 - Base: China Glaze Hi-Tek + French tips: LA Colors Black Velvet + Stamping: Ulta3 Waterlily +  two different sizes of clear rhinestones. This is one of my favourite stamping pattern from my Konad plates.
 
Mani #2 - Base: Color Club Pretty in Platinum + French tips: Milani One Coat Glitter Red Sparkle + Stamping: OPI Color So Hot It Berns. A supposedly romantic mani somehow looks like skulls and crossbones instead...

Mani #3 - Base: China Glaze Gr8 + Funky French: Milani One Coat Glitter Silver Dazzle and Gold Glitz. This is what I call my CommBank manicure... =p


Mani #4 - Base: Sally Hansen Nail Prisms in Pink Rose + Stamping: ??? (I don't remember!) + Clear rhinestones. What a terrible manicure... at least the holo is pretty to look at.

Mani #5 - Base: Milani Just Peachy (I think) + French tips: LA Colors Black Velvet + Ribbon nail sticker. I really love this colour combo, and this Milani orange is an absolutely stunning glass fleck.

Well, that's it for this lot. I guess I'll have to go edit more for the next catch-up post... there are so many cool new interesting manis I want to post about first though! Need more time...

Dec 29, 2011

Stripes of Christmas - The Face Shop GL111, China Glaze Emerald Sparkle + Ruby Pumps, Orly Here Comes Trouble

I might have mentioned elsewhere that Christmas is the time where I can leave good taste at the door. I'm still living up to this statement. It's post-Christmas now, but I did wear this mani during Christmas so I'm determined to post this. :)

The Face Shop GL111
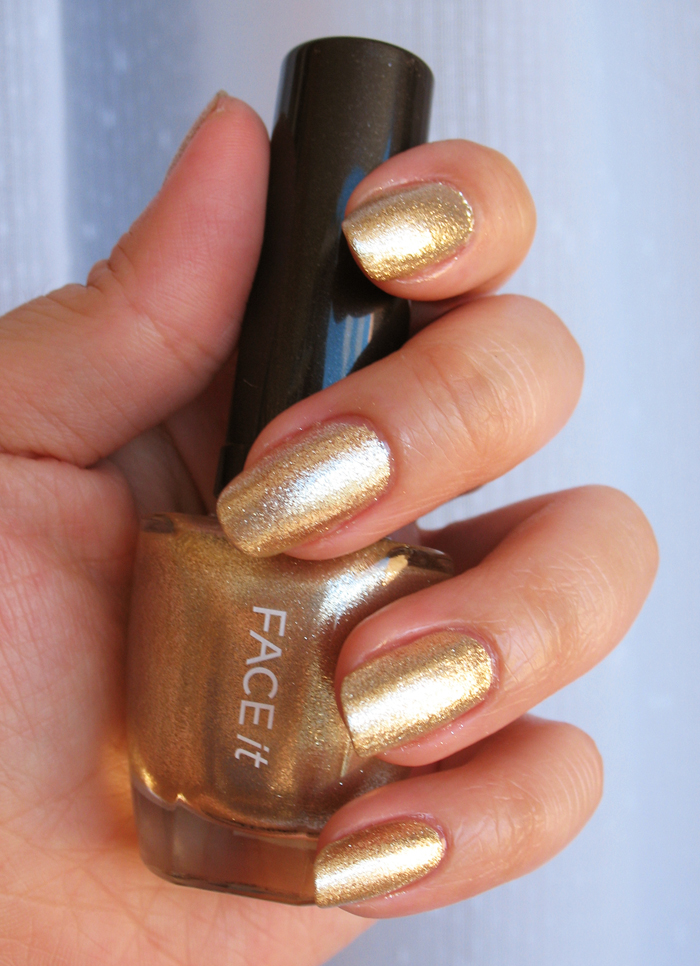
It started out with a new polish swatch. This is The Face Shop's GL111 (from the FACE it collection), which is a Korean brand. It makes me sad that these Korean polishes never come with actual names. In any case, this is a pale gold foil, the same colour as Orly's Luxe, except the 'glitter' is slightly larger in size.

The Face Shop GL111
Isn't this wonderfully shiny and reflective? What you see in the bottle is what you'll get on your nails.

Of course, this is far too demure for the festive mood, which meant I started addng more colours.


The Face Shop GL111, China Glaze Ruby Pumps, China Glaze Emerald Sparkle, Orly Here Comes Trouble
Hahaha, what is this, I don't even know. The red stripe is China Glaze's Ruby Pumps (yes, this is actually Ruby Pumps, unlike last week, when I blogged while half asleep and captioned everything as Ruby Pumps, even though I talked about English Rose in the entry >_<). The green section is Orly Here Comes Trouble, which is different-sized green glitters, layered over China Glaze's Emerald Sparkle. Then I used a round red rhinestone to complete the gaudiness.

The Face Shop GL111, China Glaze Ruby Pumps, China Glaze Emerald Sparkle, Orly Here Comes Trouble
All the nails started out as what you see on my thumbnail. I just got bored of it and added GL111 over it, and then I had to add the green and then well. There you go! How lovely is Here Comes Trouble, by the way? One of my favourite glitters!

The Face Shop GL111, China Glaze Emerald Sparkle, China Glaze Ruby Pumps, Orly Here Comes Trouble
I tried the colours in different order on my right hand. I lack the same control when I paint with my left hand, so any fancy manis on my right hand always look a little shaky, sadly.

The Face Shop GL111, China Glaze Emerald Sparkle, China Glaze Ruby Pumps, Orly Here Comes Trouble
Same as my left, the mani on my right hand originally started as what's on my thumbnail here.

And I like doing this when I have opposing manis on both hands:


When held together like this, they remind me of the stripey hard candies you can buy from The Rocks or various fairs. This looks candylicious! :D

I hope you all had a wonderful holiday!

Dec 22, 2011

O Christmas Tree - China Glaze Emerald Sparkle & Ulta English Rose

It's almost time for Christmas, and end of year festivities have begun for some! Which gives me the opportunity to play around with Christmas manicure ideas. :D

My theme this time round is the Christmas tree, complete with baubles.


[Christmas Tree: China Glaze Emerald Sparkle, Ulta3 English Rose, LA Colors 24k Glitter, round rhinestones]
Minus the ring finger, the others are all supposed to be red Christmas ornaments, done using what is called the reverse half moon manicure. I have seen it called the half moon or crescent manicure as well, which is a little confusing, because the original half moon manicure from the 1920s curves in the opposite direction to your cuticles, and I have always thought the crescent manicure is just another name for the half moon manicure, except starting closer to the cuticle maybe.

[Christmas Tree: China Glaze Emerald Sparkle, Ulta English Rose, LA Colors 24k Glitter, round rhinestones]
I used China Glaze Emerald Sparkle as my base, to represent the tree. And then I used Ulta3 English Rose on top of that for the red. I did that free hand as I'm pretty lazy. I used LA Colors 24k Glitter from the Art Deco line to draw in the gold bauble patterns on the red polish, and then I was done!

[Christmas tree inspired manicure under direct sunlight]
The ring finger is meant to represent a Christmas tree. The base is Emerald Sparkle again, a lovely dark green jelly with green glitter that is a perfect shade for a shiny Christmas tree. I used 24k Glitter to draw in freehand the gold, curved zig-zags to represent gold tinsel. Then I stuck on flat-backed 1.5mm round rhinestones in Christmas bauble colours. Ev had some tips on the best way to stick on rhinestones, so be sure to read that. For longer lasting manis with rhinestones, go over everything with a thick coat of quick dry polish, to keep the rhinestones from catching on edges.

[Christmas Tree: China Glaze Emerald Sparkle, Ulta3 English Rose, LA Colors 24k Glitter, round rhinestones]
I do love the sparkly within the dark green of Emerald Sparkle, which is why it's my favourite Christmas polish. I can use it for so many things!

[Christmas tree inspired manicure, with Ulta3 English Rose in bottle]
Interestingly, while English Rose is opaque and bright red on its own, it's a shimmer which means that layered over Emerald Sparkle, it now looks a darker, antique red instead. In this last picture, I had actually removed the blue baubles on the ring finger to see if just red and gold would look better.

This was a fun Christmas manicure to try out. Anyone wants to show me pictures of your own festive manicure? :D

On that note, Merry Christmas, Happy Hanukkah, Happy Festivus, and Happy Holidays to everyone! Cheers all! Hope you have a great week filled with lotsa eating and celebrating with family and friends!

Dec 19, 2011

Holly-days: NYX Lime Sparkle + NYX Girls Gilded Glitter


Good Monday! We're heading straight for the middle of the silly season, with Christmas parties galore - that means dressing up, nails included! Here's a quick look I did for a casual work lunch we had, filled with delicious goodies.

[In the bottle: NYX Lime (Sparkle)]
Listed as NYX Lime Sparkle on Cherry Culture, the bottle is simply labelled NYX Lime. It is a fantastically shiny kelly green jelly base with tons of gold glitter. Unfortunately, it is a bit sheer, but dry time is not bad so I didn't mind layering it on. Layering with glitter-jelly combinations also makes for gorgeous depth!

[Four coats: NYX Lime (Sparkle)]
Here's four coats of NYX Lime Sparkle. I was so disappointed that I couldn't capture how shiny this was!  Imagine twinkly nails glinting every time you move your hands - magpie heaven!

[Four coats: NYX Lime (Sparkle)]
Another angle to attempt to capture sparkle....

[NYX Lime Sparkle (4 coats) + NYX Girls Gilded Glitter (1 coat) + Rhinestones]
It was already plenty shiny, but I slapped on a coat of NYX Girls Gilded Glitter. Jme has already swatched it here but briefly again, it's basically heaps of pale gold flakies suspended in a clear base. Even more shiny! I then placed three red 3mm rhinestones as holly berries on my ring finger. The leaf was a green triangular rhinestone.

[NYX Lime Sparkle (4 coats) + NYX Girls Gilded Glitter (1 coat) + Rhinestones]
Different angles, and closeups to capture the shine! I love festivities and special occasions (whether I do or do not celebrate them...) because I'll take any excuse for sparkles!

I hope everyone has a great week in the lead-up to Christmas - here's to lots of delicious food, great company and shiny polish!


Dec 12, 2011

Ladybug Spots, Joker Chequers: Zoya Ivanka, Milani Red Sparkle/Gold Glitz, Color Club Wild At Heart, Nubar Verde


I was meant to do a post on water marbling for nails but I've been ill for three weeks now and had absolutely no inclination to write an in-depth dissection of marbling...

Anyway, in celebration of my sister's birthday last Saturday (HI!), I have dug out an old mani that she remembered and mentioned when I made her look at showed her Plisherrific! As a bonus, there's another one after it too. Both look fancy but are easy to achieve!

So the first one, is a ladybird-themed manicure. Super simple and super adorable.

[Ladybug: Milani Red Sparkle, LA Colors Black Velvet; Others: Zoya Ivanka]
Start with a nice leafy green base on all except the ring finger, here I've used Zoya Ivanka. Paint the ring finger in a nice bright red - a bright red creme would work great but in the interest of shiny, I have used Milani One Coat Glitter in Red Sparkle. Red Sparkle has great depth because it's a combination of bright red glitter plus darker red and black glitter.

Once you've done, that using your polish brush or spotting tool, place black spots on the nail randomly. Finish with a straight-across french tip in black and coat with topcoat. All done!

[Ladybug: Milani Gold Glitz, LA Colors Black Velvet; Others: Zoya Ivanka]
For a bit of variation, I used Milani One Coat Glitter in Gold Glitz on my other hand. Again Gold Glitz has great depth due to a combo of gold and orange glitter. Shiny yellowbugs are cute too! Easy peasy!

Next - a simple chequerboard pattern (plus bling). Excuse the messiness and crap pics; these are quite old.

[Chequers: Color Club Wild At Heart, Nubar Verde, LA Colors Black Velvet, red square rhinestones]
Start by painting fingers in alternating colours. I'm using Color Club Wild At Heart (purple holo) and Nubar Verde (green). I love both these colours and should really swatch them alone! Verde especially is a rich mossy green shot through with gold.

After doing the base, cover the upper half of each nail in tape and do the bottom black square. Remove tape and let dry. You can topcoat, before taping off and doing the upper black section, but I usually just freehand it. Add some bling in the centre to hide any unsightly join-ups!

[With flash: Color Club Wild At Heart, Nubar Verde, LA Colors Black Velvet, red square rhinestones]
Another shot with flash so you can see the lovely purple holo in Wild at Heart. This is again another super easy which still looks fancy!

Hope this inspires! I definitely will get around to posting about marbling sometime!