; Plisherrific: Halloween
Showing posts with label Halloween. Show all posts

Oct 31, 2012

Purr-fect Sunset - Halloween Challenge #11: Recreate your favourite!


Haha, both Jme and I picked one of Cathy's Halloween manicures to try out for the last theme: Recreating your favourite from another blogger! At least we picked different ones! =p

[Meow meow...]
The one I picked was for the gradient theme! For two reasons: 1) I've terrible at gradients so I wanted to try out this sponge gradient. I've only done dabbing-style sponge gradients so I wanted to try this one out! You can check out Cathy's How-To here!... and 2) Cats! Who can say no to cats....

[Gradient (Top-bottom): LA Girl Alkaline Blue, Kleancolor Metallic Purple,
China Glaze Orange Marmalade, Kleancolor Metallic Yellow]
I was super impressed by the colour combo used so I followed it pretty closely. The shades I used were LA Girl Metal in Alkaline Blue, Kleancolor Metallic Purple, China Glaze Orange Marmalade and Kleancolor Metallic Yellow! Apologies for the shoddy cleanup... I was rushing this again because I didn't realise how close together the last few challenges were...

[Gradient (Top-bottom): LA Girl Alkaline Blue, Kleancolor Metallic Purple,
China Glaze Orange Marmalade, Kleancolor Metallic Yellow]
This method of sponge gradient is really quick and easy, I was really happy except for the mess I made around my nails. I never EVER do cleanup with my usual manis because I just colour "in the lines", so I didn't have anything handy to do proper cleanup with. =(

[Halloween Challenge #10: Inspired by... Gradient with cats!]

Then I added some cats with Sally Hansen Nail Art Pen in Black, and did a fine crescent tip with LA Girl Blackout. =) It's definitely a bit more cartoon-y then Cathy's version, but it was fun to try out this technique!

PHEW! With this, we've made it through all the Halloween themes! =D YAY!

Completely Batty - Halloween Challenge #11: Recreate your favourite!

Time to recreate my favourite! More Nail Polish's take on the Bats challenge was amazing! It looked so bright and perfectly fitting for Halloween.

[Base: LA Colors Gold Nugget
Tips: Ulta3 Black Satin
Tiny speckles: LA Girl Glitter Addict Uninhibited
Bats: Sally Hansen Nail Art Pen Black/Noir]
I used LA Colors Gold Nugget for the base, which is an orange-gold foil.Then, I sponged on Ulta3 Black Satin at the tips before adding a little of LA Girl Glitter Addict Uninhibited. I drew in the bats using Sally Hansen Black/Noir since I didn't have the same stamping plates. Tada!

I think Cathy's Bats challenge was definitely a lot nicer. But I gave it a shot anyway!


[Base: LA Colors Gold Nugget
Tips: Ulta3 Black Satin
Tiny speckles: LA Girl Glitter Addict Uninhibited
Bats: Sally Hansen Nail Art Pen Black/Noir]
The blurry picture is just to show you how shiny LA Colors Gold Nugget is. I honestly did not remember it being this pretty.

Oct 30, 2012

Halloween Loot - Halloween Challenge #10: Trick or Treat

Unfortunately, I was rather uninspired for this challenge and to be honest...I was rather keen to try on my new polishes rather than do nail art, haha! Anyway, here's my weak attempt at Trick or Treat.


So it's treats all the way! I do apologise for inflicting this terrible nail art on your eyes. :(  I'm much better at eating sweets than drawing them. This was done freehand, but I do wish I had used something else instead of Sally Hansen Black/Noir to draw them because the lines are so thick!

The colours used for the sweets are: Revlon Modern Grace (lavender), Mode Hook Me Up (blue), Mode Glamazon (purple), Mode Sweet Harmony (pink), Orly Heartbreaker (red), Essence Viva La Green (green), and Revlon LilyChrome (silver). I put on a coat of unnamed Borghese polish that consists of multi-coloured glitter for a sprinkling of sweet shininess. The star on my pinky finger was an attempt at another glitter which didn't quite work out...

As for the base:

[Base: Orly Orange Punch
Glitter: Amy's Nail Boutique Pink Lemonade]
I actually wanted to post just the base for Trick or Treat, because I think the base actually looks like delicious hard candy. It's a combo of Orly Orange Punch, which is a bright, bright orange, and two coats of Amy's Nail Boutique Pink Lemonade on top. Pink Lemonade consists of yellow and pink matte glitter. The result looks delicious to me!

Oct 29, 2012

Snowy Sorrow - Halloween Challenge #9: Graveyards

Today's Halloween Challenge theme is Graveyards....!!

[Brrrrr....~!!]
This seems a bit uninspired but I was running out of ideas! =( My other idea was stone angels with black on grey but I was in a rush (again!) and ditched it...

[Bottle to nail: NYX Girls Complex Purple (2 coats)]
I started with a base of NYX Girls in Complex Purple, which is a rich purple shimmer. This is two coats and not completely opaque because I was going to paint over it anyway.

[2 coats: NYX Girls Complex Purple]
Two coats might be okay if you're careful, but probably three is best with this one?? I don't quite remember, but I think that was the case.

[Base: NYX Girls Complex Purple;
Nail art: Nail Pattern Boldness I Believe I Can Fly, LA Girl Blackout]
I then used the blue jelly base from Nail Pattern Boldness I Believe I Can Fly, wiping off the glitter and dabbing the deep blue base on to make the cloudy night sky. Over that, I used my usual black creme LA Girl Blackout to paint in the ground, headstones and bats.

[Base: NYX Girls Complex Purple; Glitter: Femme Fatale Shimmering Snowcap;
Nail art: Nail Pattern Boldness I Believe I Can Fly, LA Girl Blackout]
I thought it might be interesting to have a snowy effect on so I carefully dabbed a thin layer of Femme Fatale Cosmetics in Shimmering Snowcap over the top. I don't think it quite worked like I expected but maybe I'll try out this white-glitter-as-snow idea again sometime!


Oct 26, 2012

Froggy Ferny Cabbage - Halloween Challenge #8: Witches


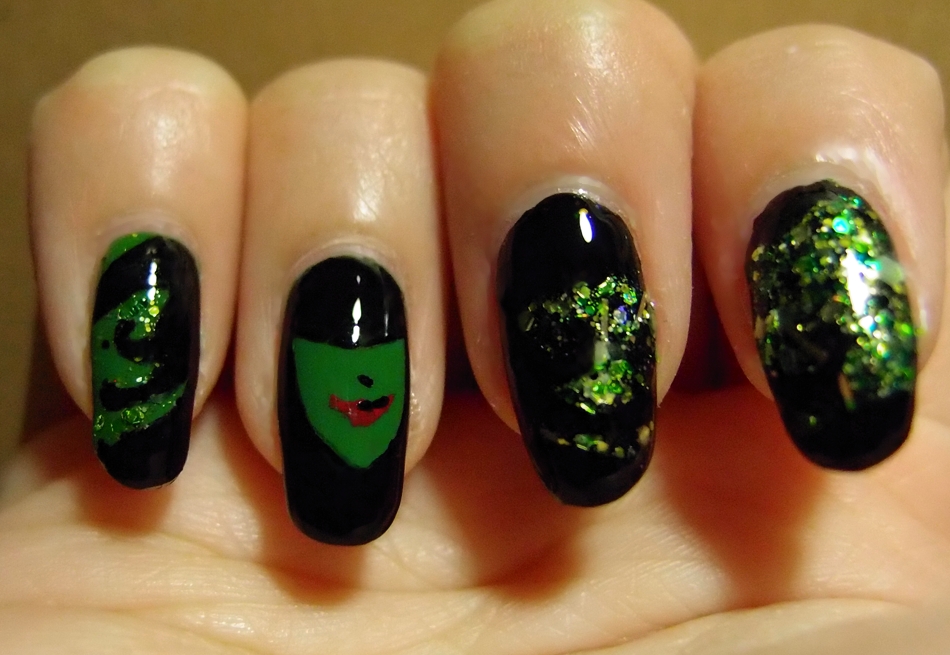
Halloween Challenge #8 is witches! Well, mine is witch, singular. I love love love the iconic image from Wicked with Elphaba and Glinda.... but trying to do positive/negative space with nail polish was a bit beyond my patience and I was in a rush... =(

[... the mani is unnaturally.... GREEN!]
I'd somehow skipped over witches and prepared my mani for the graveyard challenge instead, ending up a bit short on time for this... so Elphaba is all I've got!

[Bottle to nail: China Glaze Starboard (2 coats)]
I started with a base of China Glaze Starboard from the Anchors Away collection. This one is a bit of an odd one! It photographs beautifully vibrant as a rich grassy green, but in actual life, it's a fairly dusty shade.

[2 coats: China Glaze Starboard]
Despite that, it's rich and buttery and is fully opaque in two coats. If you do one careful thick coat, you can get it opaque in one too!

[Base: China Glaze Starboard; Glitter: Femme Fatale Ghoulish Glee;
Nail art: Sally Hansen Black, LA Girl Blackout, Kleancolor Passion Flame]
Sorry, I was rushing it, so no process pics! Briefly, for the ring finger, I blocked in the black with a Sally Hansen nail art pen in Black before colouring in the large black spaces with LA Girl Blackout, a plain black creme. The other fingers, I layered with the gorgeously sparkly Ghoulish Glee from Femme Fatale cosmetics (so gorgeous, it definitely needs a post of its own soon!) before blocking in the black for her hair/hat/cape after. The red was done with Kleancolor Nail to Toe nail art polish in Passion Flame.

Hope you like my Wicked-inspired witchy manicure!


Oct 22, 2012

An October Sprinkle - Halloween Challenge #7: Gradient

Gradient! My favourite and easiest manicure style to attempt, so this challenge was a good one for me.

[Base: Essence Viva La Green
Base green glitter: Nail Pattern Boldness Flipping Out Hard
Top orange glitter: Amy's Nail Boutique Pink Lemonade]
I used Essence Viva La Green as my base coat, but I don't think it was actually needed. Nail Pattern Boldness Flipping Out Hard is so dense that it provided almost full coverage with the first coat. After two coats of Flipping Out Hard, I used very thin coats of Amy's Nail Boutique Pink Lemonade to build up the gradient towards the tips. Pink Lemonade is far less dense in glitter, so it took a lot of coats to get the above look, but it also makes the gradual change in colour easier to achieve.

I went for a green and orange theme because I thought those were rather Halloween-like colours.


[Base: Essence Viva La Green
Base green glitter: Nail Pattern Boldness Flipping Out Hard
Top orange glitter: Amy's Nail Boutique Pink Lemonade]
The last picture is an indoors photo taken under lamp light. It was actually the first picture I took, so I hadn't cleaned up around the edges yet.

What do you think about the manicure? Anyway, a little more on the polishes...

Pink Lemonade is a matte glitter polish consisting of yellow and pink glitter.

Flipping Out Hard is a neon matte glitter polish, consisting of yellow and blue glitter. It has more yellow than blue glitter when compared against the polish that started it all, Nail-Venturous Floam. Check out tomorrow's post to see a semi-comparison. :)

Oct 19, 2012

Silly Bats - Halloween Challenge #6: Bats


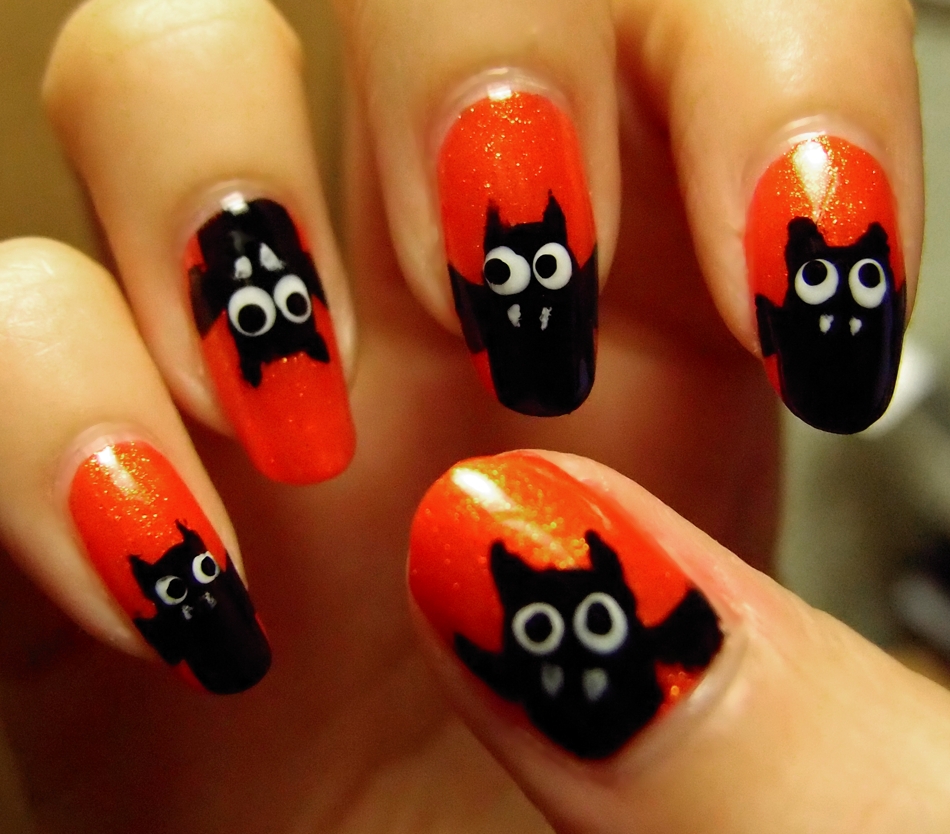
Here's my entry for Halloween challenge #6 - Bats!

[Drivin' ya batty!]
Inspiration from Nail Craze with Dayze! I added fangs because my silly bats didn't quite look batty enough to me.... and GOOGLY EYES, hehehe~ Mine are definitely are on the sillier side, but do check out her blog for her awesome tute!

[Bottle to nail: China Glaze Riveting (2 coats)]
I started with a nice contrasting base of China Glaze Riveting. If you didn't catch my post from yesterday, I had a much longer babble about this gorgeous polish which you can check out here!

[Base: China Glaze Riveting (2 coats); Nail art: LA Girl Blackout + Tropez White Hot]
I then painted the bats on using LA Girl Blackout, a plain black creme. The eyes were done with a dotting tool, using both Blackout and Tropez White Hot, a plain white creme. I added tiny swipes with Tropez White Hot for the fangs!

[Base: China Glaze Riveting (2 coats); Nail art: LA Girl Blackout + Tropez White Hot]
The fun part was dotting on the eyes, so hilarious! =p Also, couldn't resist putting a bat hanging upside down on the accent  finger...

[Base: China Glaze Riveting (2 coats); Nail art: LA Girl Blackout + Tropez White Hot]
Not just that... it works both ways! Who's being batty now? =D


Oct 15, 2012

Walking Dead - Halloween Challenge #5: Zombies

The topic of the day is 'zombies', and in no universe are zombies easy on the eyes (sorry, zombies, but it's true). So I decided to pretty much try for a weird-looking, maybe even gross-looking, manicure.

Here's what I started with:

[Two coats of Nail Pattern Boldness Madam Rose over Orly In The Navy]
Nail Pattern Boldness' Madam Rose is a red and silvery-white matte glitter. With three thin coats, it could probably be opaque on its own. Nail Pattern Boldness really packs their glitter in their bottles! Orly In The Navy is a very dark, almost black, navy blue.


[Top: Sponged Missha SV03
Base: Nail Pattern Boldness Madam Rose over Orly In The Navy]
Then, I sponged on Missha SV03 - a gray creme - randomly over the lot. Alright, I'll admit, in my enthusiasm for this creepy subject, I was going for a zombie's gray patchy skin over rotting flesh. (At first, I was going to do tendons and bone as well, then I decided to leave it a little abstract.)


[Top: Sponged Ulta3 Pacific Fever over Missha SV03
Base: Nail Pattern Boldness Madam Rose over Orly In The Navy]
I added a little green to the gray for more of a rotting look. How does this look? I don't think I quite made it to icky zombie skin and flesh heights, but it did look a little gross in person. It definitely achieved a certain level of ugliness though!

Then I thought it would be interesting to try to make it something that I could actually wear out without getting bombarded by questions about my taste...


[Top: Nyx Enchanted Forest
Middle: Sponged Ulta3 Pacific Fever over Missha SV03
Base: Nail Pattern Boldness Madam Rose over Orly In The Navy]
Glitter hides all flaws, right? Hmmm...not quite in this case, but close enough. This is the sparkly edition of zombies! Perhaps when Twilight vampires turn into zombies...? The glitter is Nyx's Enchanted Forest and it has all sorts of green holo hex suspended in a green jelly base. It's gorgeous, and I love how it looks like it's floating in that second picture above.

Here's the mandatory blurry picture for maximum shininess:

[Top: Nyx Enchanted Forest
Middle: Sponged Ulta3 Pacific Fever over Missha SV03
Base: Nail Pattern Boldness Madam Rose over Orly In The Navy]
So how did I go? 'Zombie' was a rather tough challenge for me, and perhaps I took it a little too literally. /o\

Oct 12, 2012

Pumpkin Parade - Halloween Challenge #4: Jack-O-Lanterns

Day 4 of the 'This is Halloween' nail art challenge! The theme today is Jack-O-Lanterns!

Here's how the final product looks like:

[Nail art: Sally Hansen Nail Art Pen Black/Noir
Revlon Orange Fizz over Kleancolor Metallic Mango]
True to the theme, I hope! Now let's take it from the top!

[Kleancolor Metallic Mango]
I started with two coats of Kleancolor Metallic Mango. It's a gorgeous burnished bright bronze colour, wavering between chrome and foil.


[Top coat: Revlon Orange Fizz
Base coat: Kleancolor Metallic Mango]
Then I added one coat of Revlon Orange Fizz, which is an orange jelly with orange flakes. It didn't change the colour of Metallic Mango, but the flakes added some texture - which is what I wanted for a pumpkin-y look!


[Nail art: Sally Hansen Nail Art Pen Black/Noir
Revlon Orange Fizz over Kleancolor Metallic Mango]
Then with Sally Hansen's Nail Art Pen in Black/Noir, I drew on the pumpkin faces. A coat of glossy quick dry over the lot gave it a shiny look. You can see a little of Orange Fizz's flakes here.

I wanted to try to give each nail a slightly different face, but the middle and ring finger look pretty similar in the end.

Pretty straightforward and simple to do. Do they look like Jack-O-Lanterns or just scary, grinning faces on my nails? :O

Oct 8, 2012

Grim Greening Ghosts - Halloween Challenge #3: Ghosts


I swear this seemed like a better idea in my head! Anyway, here's my attempt for Halloween Challenge #3... GHOSTS!!

[Help! We're blobbbyyy~!!]
I'll try not to talk too much... =p I didn't want to use a plain black base so I decided to use Milani Enchantment from the Black Magic Halloween collection a few years back...

[Bottle to nail: Milani Enchantment (1 coat over black)]
Milani Enchantment is a black jelly with lots of superfine blurple microglitter. It would probably be opaque in 2-3 coats, but in the interest of easy removal, I layered one coat of it over a plain black creme (LA Girl Blackout, as usual).

[1 coat: Milani Enchantment (over black)]
Unfortunately the glitter is so fine that it looks pretty much like a plain black... it would have been sparklier in the sun but it was super rainy when I took these pics so no shiny to see here!

[Bottle: Wet n Wild Fantasy Makers Glow in Dark in Glow]
I then used Wet n Wild Fantasy Makers Glow in Dark polish (in Glow...) and stamped a couple of images on from my Bundle Monster plates: Bats on pinky (BM13), castle on ring (BM224), ghosts on middle and index (BM223).

[Stamping: WnW FM Glow over Milani Enchantment]
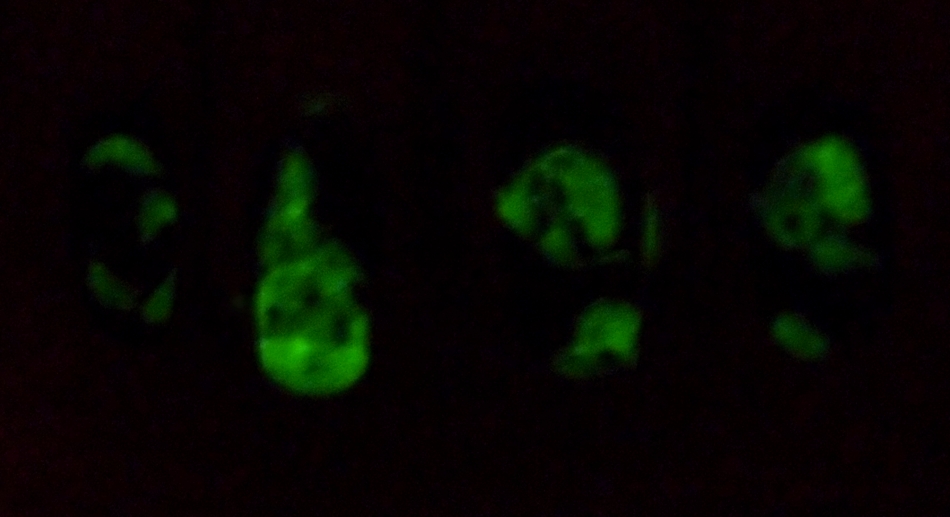
However, because the stamping layer was so thin, I had trouble with the images not glowing for very long after I turned the lights out, oh no! So I had to colour in the pattern a little with a little brush... hence the blobbiness, oh dear...

... and now for magical glowy pics!! =)

[In the dark: Wet n Wild Fantasy Makers Glow in Dark in Glow]
Here's the bottle of polish - isn't it gorgeously glowy!

[In the dark: Wet n Wild Fantasy Makers Glow in Dark in Glow]
And then my nails, complete with blobby ghost close-up!! This was pretty fun despite the troubles... especially trying to force my camera to focus in the dark... I think glow-in-the-dark polish can be really fun! Maybe I'll do a full glow-in-the-dark mani the next time I go watch a movie, hehehehe....