; Plisherrific: Ulta3
Showing posts with label Ulta3. Show all posts

Sep 30, 2019

Manic Mineral - Ulta3 Infamous, Born Pretty Texture-L001, Holo Stamper, Hit the Bottle Snowed In, Spun Gold,


This is a double review in one, so let's get right on to it~!

[Silly string]
Preview of my final finished stamping manicure... 

[Bottle to nail: Ulta3 Infamous (2 coats)]
My base shade from last week - Ulta3 Infamous, a blue jelly shimmer packed with silver microglitter.

[Born Pretty Stamping Plate Texture-L001]
I received this plate from Born Pretty for review. This is plate Born Pretty Texture-L001, and it is a great way of getting crackle or water marbling effects using stamping rather than all that effort and mess! I received this plate in a cardboard sleeve as usual, but this one has a super handy window in the front so you can actually see what plate is stored inside!

[Born Pretty Holo Stamper]
I also gave in to my magpie instincts and picked this super sparkly holo stamper for review. Not only is the squishy head packed with ultra sparkly holo particles, the titanium effect base satisfies the multichrome cravings. It's so gorgeous! It's also holo so you can see what you're stamping.

[Base: Ulta3 Infamous (2 coats); Stamping: Born Pretty Texture-L001;
Stamping polish: Hit the Bottle Snowed In, Spun Gold]
So I had this idea of precious mineral veins so using a white stamping polish (Hit the Bottle Snowed In) I first chose the thinnest crackle pattern and stamped that. Then I stamped over with a gold stamping polish (Hit the Bottle Spun Gold) using a slightly more dense crackle design.

[Base: Ulta3 Infamous (2 coats); Stamping: Born Pretty Texture-L001;
Stamping polish: Hit the Bottle Snowed In, Spun Gold]
Here's the finished product! I think it's not quite what I was going for, but I think it actually could be modified slightly to do a decent effect of sunlight glinting off waves at the beach. What do you think?

The stamper itself was nice and squishy - no issues picking up and transferring patterns. You do have to make sure you have some good lighting handy because the speckles of the holo particles can make your stamping design a bit hard to eye off when you're trying to place it on the nail. It's worth it for how gorgeous the stamper is though. But if that's not your thing, it also comes in a plain version!

If these products interest you, you can check out the stamper here, and the texture plate here at Born Pretty. Our code above will do you a 10% discount off full priced items as well. Happy stamping!


Sep 23, 2019

Deep Splash - Ulta3 Infamous


Great nail polish doesn't have to be expensive... and Ulta3 is definitely one of those brands that tend to deliver on a budget!

[Bottle to nail: Ulta3 Infamous (2 coats)]
The proof is in this lovely shade! This is Ulta3 Infamous, a deep blue jelly shimmer with tons upon tons of silver micro glitter.

[2 coats: Ulta3 Infamous]
The heavy microglitter combined with the base gives amazing depth and sparkle in an otherwise fairly dark shade.

[2 coats: Ulta3 Infamous]
These photos are of two coats, great opacity and dry time. I had no issues at all with this polish. It also dried smooth, but of course a nice layer of glossy topcoat amps up the shine.

[2 coats: Ulta3 Infamous]
Highly recommend this shade - these polishes retails for something like $3 in pharmacies? Such a bargain, gosh~!


Jun 24, 2019

Jungle Party - Ulta3 On The Green, Hit the Bottle Peacock Shimmer, Emeralds are Forever, Nicole Diary-088, -089


It's a bumper double plate review today! 

I have here Nicole Diary stamping plate 088 and 089 for review, provided by Born Pretty. As usual, they come with a protective blue film that I've removed for the photos above. Both plates are botanical-themed, so let's take a closer look.

[Bottle to nail: Ulta3 On The Green (2 coats)]
Just quickly, my base from last week, Ulta3 On The Green, a soft muted pastel green. Perfect for botanicals!

[Base: Ulta3 On The Green (2 coats); Stamping: Hit the Bottle Peacock Shimmer;
Plate: Nicole Diary-088]
Starting with Nicole Diary-088, this plate features a variety of small floral and foliage designs on the top half, and different stripe patterns on the bottom. Using Hit the Bottle Peacock Shimmer (so pretty!), I chose to stamp a variety of patterns from the bottom half of this plate.

[Base: Ulta3 On The Green (2 coats); Stamping: Hit the Bottle Peacock Shimmer;
Plate: Nicole Diary-088]
What do you think? I think they stamped quite well! Also these pattern bands come in a range of widths so there's something to fit each nail!

[Base: Ulta3 On The Green (2 coats); Stamping: Hit the Bottle Emeralds are Forever;
Plate: Nicole Diary-089]
Moving on to Nicole Diary-089, I once again decided to choose a bunch of patterns because they were all so pretty! The stamping polish I used here is Hit the Bottle Emeralds are Forever.

[Base: Ulta3 On The Green (2 coats); Stamping: Hit the Bottle Emeralds are Forever;
Plate: Nicole Diary-089]
Really happy with this plate too, look how well the designs stamped. I also like how nicely the negative space design on my ring finger turned out. Also, banana leaves (I think?) on my thumb, how great is the detail on that!


Overall, I'm pretty impressed with these plates. You can check them out here and here at Born Pretty. As usual, our code above will give you 10% off on non-sale items. =)


Jun 21, 2019

Dreamy Pasture - Ulta3 On The Green


Super quick post on a random day of the week; I've just been so flat-out lately!

[Bottle to nail: Ulta3 On The Green (2 coats)]
This one is Ulta3 On The Green, a really nice dusty pastel green creme polish.


[2 coats: Ulta3 On The Green]
I used 2 coats for this, nice thickness, applied smoothly and dried nice and level. Add a shiny layer of topcoat and you're good to go!

[2 coats: Ulta3 On The Green]
As you can tell, I broke my middle nail pretty badly the other day... you can see how wonky it looks, oh dear...

Anyway, I really like this colour, for a green, it's pretty muted and maybe... worksafe?? I don't know, my perception of 'worksafe' colours has definitely gotten skewed over the years! =D

May 20, 2019

Desert Drive - Hit the Bottle As Black As Night, Chi Chi, Ulta3, Born Pretty Geometry L002


Today I'm going to be showing what I stamped over last week's gradient mani!

[Rolling dunes]
For once, I decided to stamp alternate fingers instead of all of them.

[Born Pretty Geometry L002]
Here's the plate I'm using today, generously provided for review by Born Pretty. This plate is called Geometry - L002 and you can find it on the Born Pretty website here! Look at all those awesome designs. I also really like the Escher-like designs running along the middle of the plate!

[Tip to base: Hit the Bottle Blue Kamikaze, Hit the Bottle Purple Hooter,
Chi Chi Fluoro Pink, Ulta3 Atomic OJ, Hit the Bottle Bumble Bee]
My base from last week is a gradient of Hit the Bottle Blue Kamikaze, Purple Hooter, Chi Chi Fluoro Pink, Ulta3 Atomic OJ, and Hit the Bottle Bumble Bee.

[Stamping polish: Hit the Bottle As Black As Night;
Stamping plate: Born Pretty Geometry L002]
I chose the design fourth from the left on the bottom row because I thought it really suited the sunset landscape theme I had going!

[Stamping polish: Hit the Bottle As Black As Night;
Stamping plate: Born Pretty Geometry L002]
Using a plain black creme stamping polish (Hit the Bottle As Black As Night), I stamped every alternate nail with this design. I'm so impressed by how well the thin parallel lines were picked up!

This is such a great plate! I think all the designs on it are quite useable. You can check it out here, and as usual our code can be used on full priced purchases on Born Pretty. Happy stamping!


May 13, 2019

Sunset Stripe - Hit the Bottle Blue Kamikaze, Purple Hooter, Bumble Bee; Chi Chi Fluoro Pink, Ulta3 Atomic OJ


My natural nails have grown out quite a bit so seeing as I had a bit more real estate to play with, I decided to do a gradient mani!

[Dust storm]
My initial idea was a sponge mani, but after rummaging around, I found that I have a healthy collection of jelly polishes that would work perfectly for a layered gradient.

Here's what I used: From left to right, Hit the Bottle Blue Kamikaze, Hit the Bottle Purple Hooter, Chi Chi Fluoro Pink, Ulta3 Atomic OJ, Hit the Bottle Bumble Bee.

[Tip to base: Hit the Bottle Blue Kamikaze, Hit the Bottle Purple Hooter,
Chi Chi Fluoro Pink, Ulta3 Atomic OJ, Hit the Bottle Bumble Bee]
I started out with a full coat of Hit the Bottle Bumble Bee, then painted the next 4/5 of the nail with Ulta3 Atomic OJ, the next 3/5 with Chi Chi Fluoro Pink, 2/5 with Hit the Bottle Purple Hooter, and finally the last 1/5 with Hit the Bottle Blue Kamikaze.

[Tip to base: Hit the Bottle Blue Kamikaze, Hit the Bottle Purple Hooter,
Chi Chi Fluoro Pink, Ulta3 Atomic OJ, Hit the Bottle Bumble Bee]
I'm quite pleased with this one, it's a bright pop of colour as Sydney is cooling down for autumn/winter. Picking my shades, I was trying for a sunset to night sky gradient. Although the tips turned out a little bit too dark for a gradual gradient, I think it gives a nice accent this way!


May 2, 2019

Endgame - hēhē, Hit the Bottle, MdU, Sally Hansen, Ulta3, OPI, Savvy

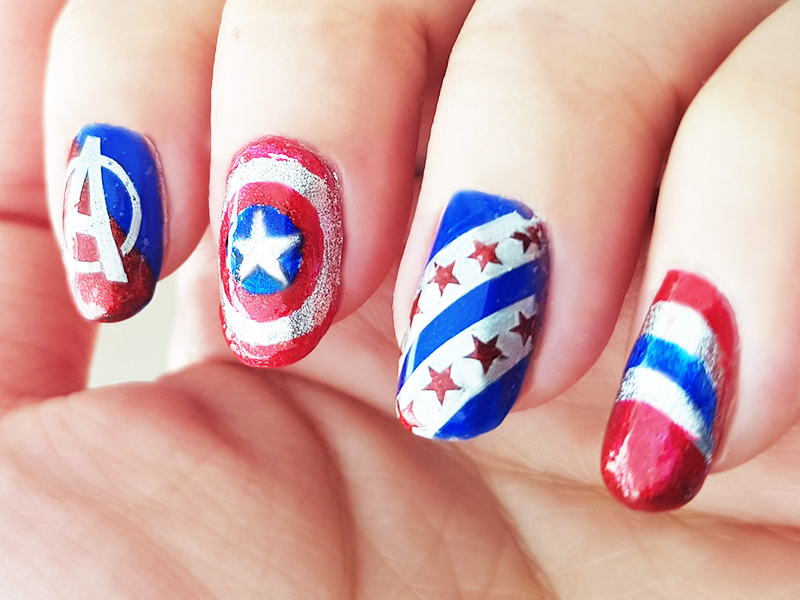
This is a tribute to Avengers: Endgame, the 22nd movie and the climax to the Infinity Wars storyline in MCU. I won't spoil anyone, but I loved the movie! I wore this mani when I went to watch the movie, and I'm so happy that I did this for Endgame.

[Stars & Stripes]
[Red & Gold]

Let me go into more detail with each one now!

[hēhē's Super Hero 001 stamping plate]

[Captain America]
This mani is a tribute to Captain America, all very red, blue and white. The forefinger and ring finger are stamped using hēhē's Super Hero 001 stamping plate. I stamp all of them onto a silicone stamping mat and then...well, I transfer onto my nails, but as you can see, I embarrassingly applied the 'A' incorrectly on my forefinger. It's flipped. /o\ Ah well... For the ring finger, I stamped the stars and stripe twice, and then colour in the red stars.

The shield is not stamped, it's hand drawn. The reason is because the way the stamping plate has the rings and stars, it's not possible to colour them in correctly based on Cap's actual shield. It bothered me the last time I used the Super Hero 001 plate, so I decided to hand draw it this time round. Honestly? REGRET. SO MUCH WORK. Hahaha... it was way too hard getting it kind of circular, next time, I'm just stamping it even if it's incorrect. On my pinkie finger, it's a hand drawn red, silver and blue stripes.

For the base nail polish colours, I used Sally Hansen Right Said Red + Ulta3 English Rose to get that red colour, Sally Hansen Pacific Blue for the blues, and OPI Unfrost My Heart for the silver that I hand drawn. For the forefinger and ring finger, I stamped using Hit the Bottle Chromeo, a chrome silver stamping polish.

[hēhē's Super Hero 002 stamping plate]

[Iron Man]
And now this tribute is to Iron Man, all red and gold. All of it is stamped from hēhē's Super Hero 002 stamping plate. Hey, I got the 'A' correct this time, haha!

The base nail polishes are Sally Hansen Right Said Red + Ulta3 English Rose to get that shade of red, and Savvy's Ginger Ale which is a gold glitter polish. For the stamping polish, I used Hit the Bottle Chromeo, a chrome silver stamping polish for the 'A', MdU Reddish which is a red stamping polish for the middle finger, Hit the Bottle's Spun Gold for the chrome gold on the ring finger, and Hit the Bottle's A Bolt from the Blue for the chrome blue of the arc reactor.  I just really love the Iron Man helmet on the middle finger, very iconic.

Anyway, I got many comments on this in person, which was kind of nice because I really wanted something to commemorate this movie. :)

Jan 3, 2019

Happy New Year! - MdU Black, Sinful Colors' Purple Kraze, Ulta3's Fruit Tingle, Ulta3's Citrus, BK 06, Born Pretty BP-118

Happy new year to everyone! Let's start off 2019 with a bang!

[Fireworks!]
I chose this stamping pattern because I thought it would look a little like fireworks if I added riotous colours. The result is a fun, splash of colours in any case!

[Born Pretty BP-118 stamping plate]
I did all of this on a silicone nail art mat to start off with. First, I put down a clear base on the mat and then left that to dry. Then I stamped down the pattern from Born Pretty's BP-118 stamping plate onto the clear base polish on the mat, using the pattern on the lower leftmost corner of the plate. I used MdU's Black, which is still the best black stamping polish I have ever used. It produces the cleanest, darkest stamped lines of any stamping nail polish I have ever seen.

After stamping, I added a touch of glitter from Maybelline's Gold's Night Out, just because the bottle was sitting on my desk. XD  Then I used a fine brush to paint in the different colours. I've gone into detail on the whole process in a past post here.

[Stamping plate: Born Pretty BP-118
Stamping polish: MdU Black
Nail polish colours: Sinful Colors' Purple Kraze,
 Ulta3's Fruit Tingle, Ulta3's Citrus, BK 06]
You can see the hint of gold glitter in the picture above. I applied too much glitter for the one that went on my thumbnail. Even though it doesn't look like such here, I actually couldn't see what on earth I was painting in for half of that particular nail, which is why it's a little bit of a mess. It does look like a rather pretty mess to me.

The colours used are as such:

  • Sinful Colors' Purple Kraze - a purple creme polish with a pink shimmer that doesn't really show up on the nail and has a satin finish
  • Ulta3's Fruit Tingle - a neon pink creme polish
  • Ulta3's Citrus - a neon yellow creme polish
  • BK 06 - a teal creme glow in the dark polish
For my right hand, I decided to do it all the same colours and forego the glitter for my own sanity. 


[Stamping plate: Born Pretty BP-118
Stamping polish: MdU Black
Nail polish colours: Ulta3's Fruit Tingle, Ulta3's Citrus, BK 06
Yes, I broke the nail on my index finger. :(  Anyway, I do think this looks less like fireworks but it's still a colourful and pretty mani, in my opinion.

Dec 31, 2018

Bling It Up - Ulta3 Jelly, Lacquistry Amazeballz Holo


It's the end of another year! I am totally predictable and always look to the fantastically sparkly Amazeballz by Lacquistry whenever the silly season comes around...

[Bling on!]
Is there any better way to extend your Christmas mani into the new years??? Sparkly discoball polkadot holo flake glitter is totally the way to go!

[2 coats: Ulta3 Jelly]
Once again, here is my lovely base, Ulta3 Jelly, a nice glossy green creme, perfect in two coats!

[Bottle to nail: Lacquistry Amazeballz Holo; Base: Ulta3 Jelly (2 coats)]
Bringing out the big guns, I used a dotting tool to pat on Lacquistry Amazeballz Holo in a polkadot pattern all over my existing base.

[Base: Ulta3 Jelly (2 coats); Dotting: Lacquistry Amazeballz Holo]
Remember a generous layer of topcoat to smooth out any bumps, and you're set!

[Base: Ulta3 Jelly (2 coats); Dotting: Lacquistry Amazeballz Holo]
My photos are taken under diffuse lighting because the sparkle was too bright under direct lighting - it definitely fulfilled all my bling requirements!

Definitely the best way to end another year! Bring on the next!! <3