; Plisherrific: The Face Shop
Showing posts with label The Face Shop. Show all posts

Jun 8, 2017

Glass Leaves - MdU Black, Born Pretty BP-L003, Missha HBR01, The Face Shop GL111, Orly Here Comes Trouble, Maybelline Beaming Blue, LA Girl Groupie

Let's do a combination of things on a silicone nail art mat!

[Glass Leaves]
So first, I painted twenty patches of clear nail polish on the silicone nail art mat. I think having a clear base polish helps with lifting the patches of nail polish off the mat later.

[20 nail patches on silicone nail art mat]
Then I did a hack job creating a gradient mani on twenty patches. I used:

  • Missha's HBR01 - Copper polish with holo microglitter
  • The Face Shop's GL111 - A pale gold foil 
  • Orly's Here Comes Trouble - A gorgeous bright green glitter
  • Maybelline's Beaming Blue - Blue glitter with a gold shimmer
  • LA Girl Groupie - Purple jelly with microglitter

And I played around with the direction of the gradient so they're not consistent.

[Born Pretty's stamping plate BP-L003]
Then I used the pattern I highlighted above from Born Pretty's stamping plate BP-L003 and stamped over those nail patches using MdU's Black stamping polish.

[Stamping: MdU Black, Born Pretty BP-L003
Gradient base: Missha's HBR01, The Face Shop's GL111, Orly's Here Comes Trouble
Maybelline's Beaming Blue, LA Girl Groupie]
Voila! How does it look? I had to double stamp for the bigger patches, which you will see the use for later.


The above are how the nail patches look once peeled off the silicone nail art mat. Not bad, not bad...

When applied on nails, here's what I get:

[Stamping: MdU Black, Born Pretty BP-L003
Gradient base: Missha's HBR01, The Face Shop's GL111, Orly's Here Comes Trouble
Maybelline's Beaming Blue, LA Girl Groupie]

The gradient hack job isn't so bad under the stamping, hey?

I took the photos below using my phone and under brighter artificial lighting, so that you can see how shiny the mani looks.

[Stamping: MdU Black, Born Pretty BP-L003
Gradient base: Missha's HBR01, The Face Shop's GL111, Orly's Here Comes Trouble
Maybelline's Beaming Blue, LA Girl Groupie]
 Overall, I'm very pleased with the result!

And you probably noticed the 20 nail patches, instead of the usual 10. I decided I wanted something more funky on my toe nails as well! I have a bit of a hang up over how my toes look so I dithered quite a bit over whether I should post this photo or not, but decided what the hell. Go easy on my tiny toe nails and stubby toes please.

[Stamping: MdU Black, Born Pretty BP-L003
Gradient base: Missha's HBR01, The Face Shop's GL111, Orly's Here Comes Trouble
Maybelline's Beaming Blue, LA Girl Groupie]
So that's another fun use I found for the silicone nail art mat. Usually, the most exciting thing I might do with my toenails is paint them with funky colours. But with a silicone nail art mat, I can actually do more exciting things like create gradient nail polish and stamped manis for my toenails now. I have done a few toenails mani like this since.

Naturally, it was funner to do during summer, when my feet and toes can often be free from shoes and socks. Not so with this weather on us right now!

May 25, 2017

Painted Weave - Revlon Budding Chrome, The Face Shop GL111, Revlon OceanChrome, Australis Goth Rock

This look I'm sporting today can be achieved with stamping, or with nail art stencils, if you know what I'm talking about. Today, I'm trying out the latter.

[Painted Weave]
What is the proper name for this? Nail art vinyls? Nail art stencil vinyls? Nail art template stickers? Well, as you can see from the photo below, they've used the name 'Nail Art Hollow Sticker'. Sounds weird. I think I prefer nail art stencil vinyls. But in the end, a photo speaks a thousand words:

[Silicone nail art mat and nail art hollow stickers]
I usually don't get very crisp results from nail art vinyls when I use them straight onto my nails. So this time, I thought I would try the nail art stickers on a silicone nail art mat. The stickers were just so much easier to deal with, understandably, when applied on the flat surface of the silicone mat.

[Nail art hollow stickers applied onto the silicone nail art mat]
I cut up the vinyl based on the dotted lines they provided and stuck them onto the silicone nail art mat. I'm only using 6 pieces here because they're pretty large, so I figured that other than my thumbs, the other pieces will cover two nails each.

Side note, I really love the holo on these vinyls. So pretty! Even if they all get painted over in the end!

[Manicure in progress]
I don't actually have in progress photos since I had to move pretty fast. If you do this too slowly and your nail polish dries too much, you end up peeling off your nail polish as well from the mat when you pull off the vinyl.

So here are the steps I went through, with references to the photo above.

  1. Stick the vinyl onto the silicone mat, as shown in (A). Now paint over it to cover the hollow parts. In this case, I painted over it in a gradient of colours  
  2. Peel off the vinyl which leaves only the pattern behind, as you can see in (B)
  3. Paint over the pattern left behind with your base shade, as shown in (C)
  4. Leave it to dry completely. You will know it's completely dry when the patches of nail polish are completely flat against the mat. 
  5. Peel off these nail patches from the mat carefully. Bend the mat to help the peeling off endeavour. 

[Homemade nail art patches/decals]
And voila! I did cut the nail patches into rectangles, so they would look so much prettier for my photos. :)  Then I used a clear base coat on my nails, let it dry enough to be slightly tacky and applied the nail patches on. I used a combination of stretching the nail patches and nail clippers to cut off the excess nail polish.

The nail polish I used for the mani were:

  • Revlon's Budding Chrome - a light peachy chrome nail polish that rather overwhelmed everything
  • The Face Shop's GL111 - a pale gold foil 
  • Revlon's OceanChrome - a teal chrome 
  • Australis' Goth Rock - a near-black maroon nail polish


[Revlon's Budding Chrome, The Face Shop's GL111, Revlon's OceanChrome, Australis' Goth Rock]
I do like using the nail stencil vinyls on the silicone nail art mat. I think the results are a lot neater, with crisper lines. With gradient manis and nail stencil vinyls done straight onto the nails, I often feel like the process is usually rather messy and requires quite a bit of clean up after. With the use of the nail stencil vinyls on silicone nail art mat, the mess was constrained and easier to deal with.

I just really like having these new tools to work with now!

Oct 27, 2014

Sugar Bomb - The Face Shop Trendy Nails Glitter Brilliant GLI015


Jelly and glitter combos are the bomb! In this case a sugary sweet one with an edge.
 
[Bottle to nail: The Face Shop Trendy Nails Glitter Brilliant GLI015 (2 coats)]
Today's polish is The Face Shop Trendy Nails Glitter Brilliant in GLI015. Phew! It comes in a 7ml bottle and as you can see, it's a cool pale pink jelly with magenta, purple and gold squares and hexes.


[2 coats: The Face Shop Trendy Nails Glitter Brilliant GLI015]
Formula was excellent, I needed two coats for my short nails. Nice opacity for the jelly, enough for coverage, not too much that the lower glitter layers are hidden. No fishing around for the glitter either!

[2 coats: The Face Shop Trendy Nails Glitter Brilliant GLI015]
I really like the purple in this combination. At first glance, it looks like it might be a bit tooo stark against the other paler shades, but I think it's just the right pop of colour and contrast!


Sep 25, 2014

Rough Skies - The Face Shop Trendy Nails GL1019


[Trendy Nails GL1019]
The Face Shop calls their newer nail polishes Trendy Nails. This particular colour is just called GL1019 from the Glitter Brilliant collection.

It's obviously a type of 'liquid sand' polish but instead of foil or glittery shades, this is completely matte and pastel. I wasn't sure if it would look too rough but I think this really does make an interesting textured polish like this. Glittery or shiny textured polishes can almost pass as normal while this one really stands out. I kept looking at my nails and thinking it looked like chalky powder of some sort, which entertains me for some reason.

Feb 2, 2012

Red Treasures - L'elan Vital Red Crackle, The Face Shop GL111

I'm still on vacation and will be for awhile yet, but I intend to continue posting new pictures during this holiday.

As I'm travelling, I actually don't have access to my usual nail polish collection, but I did bring along The Face Shop's GL111, because a shiny gold foil goes with most outfits and occasions, in my humble opinion. :P

I'm visiting my parents, and my mum does have a modest collection of nail polishes. One of them is a recent purchase from Cosway, and it's the L'elan Vital Red Crackle.
[L'elan Vital Red Crackle: Click on the picture for a link to the product.]
The L'elan Vital Red Crackle doesn't actually have a product name, but the product number is 92219. This Korean product is a really easy crackle to use. It dries really fast, and cracks beautifully really fast as well. You won't have time for more than one coat, so make it count. As usual, a thicker coat will produce larger cracks, while a thinner coat will give you finer but more cracks. The red actually dries as a dark pink, but if you go over it with a topcoat, it becomes a deep red that matches the polish in the bottle.

[Base: The Face Shop GL111
First coat: L'elan Vital Red Crackle 92219
Tips: The Face Shop GL111]
The quality of my photos are a little dodgy right now, as I try to find the best spot to photograph my nails in this new location. I do miss my balcony and my billowing white curtain!

There are a number ways to do this manicure. I started with a base coat of GL111, the gold foil, and then went over everything with the red crackle. Then I did the French manicure tips with GL111 by free hand. You could also just tape over your tips when applying the red crackle to achieve the same outcome, I believe.

The only difficulty I faced was that I had to start the gold tips further into the nails than I prefer, because of where the red polish had randomly cracked.

[Base: The Face Shop GL111
First coat: L'elan Vital Red Crackle 92219
Tips: The Face Shop GL111]
These pictures were taken about a week after the manicure was applied, so there is some tip wear seen here.

[Photo taken with an iPhone]
Photos with my iPhone are always that little bit blurrier or grainier, but the positives is that the iPhone camera captures shininess so much better due to the slight blurriness in the photos. :P

I have bought a heap load of new polishes here in Penang, so do hang around for more of that next week!

Dec 29, 2011

Stripes of Christmas - The Face Shop GL111, China Glaze Emerald Sparkle + Ruby Pumps, Orly Here Comes Trouble

I might have mentioned elsewhere that Christmas is the time where I can leave good taste at the door. I'm still living up to this statement. It's post-Christmas now, but I did wear this mani during Christmas so I'm determined to post this. :)

The Face Shop GL111
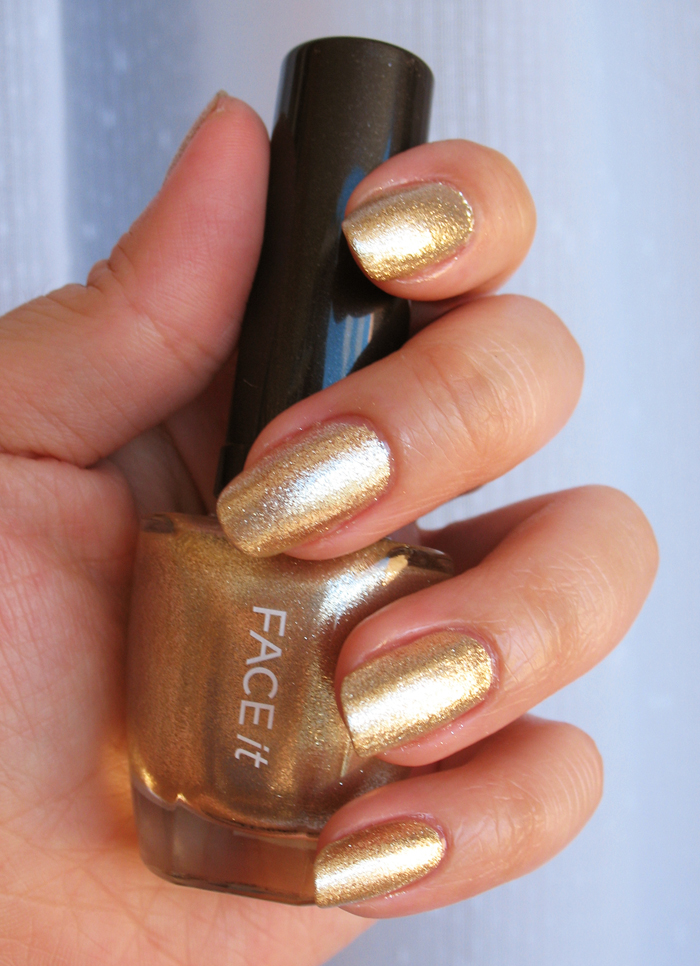
It started out with a new polish swatch. This is The Face Shop's GL111 (from the FACE it collection), which is a Korean brand. It makes me sad that these Korean polishes never come with actual names. In any case, this is a pale gold foil, the same colour as Orly's Luxe, except the 'glitter' is slightly larger in size.

The Face Shop GL111
Isn't this wonderfully shiny and reflective? What you see in the bottle is what you'll get on your nails.

Of course, this is far too demure for the festive mood, which meant I started addng more colours.


The Face Shop GL111, China Glaze Ruby Pumps, China Glaze Emerald Sparkle, Orly Here Comes Trouble
Hahaha, what is this, I don't even know. The red stripe is China Glaze's Ruby Pumps (yes, this is actually Ruby Pumps, unlike last week, when I blogged while half asleep and captioned everything as Ruby Pumps, even though I talked about English Rose in the entry >_<). The green section is Orly Here Comes Trouble, which is different-sized green glitters, layered over China Glaze's Emerald Sparkle. Then I used a round red rhinestone to complete the gaudiness.

The Face Shop GL111, China Glaze Ruby Pumps, China Glaze Emerald Sparkle, Orly Here Comes Trouble
All the nails started out as what you see on my thumbnail. I just got bored of it and added GL111 over it, and then I had to add the green and then well. There you go! How lovely is Here Comes Trouble, by the way? One of my favourite glitters!

The Face Shop GL111, China Glaze Emerald Sparkle, China Glaze Ruby Pumps, Orly Here Comes Trouble
I tried the colours in different order on my right hand. I lack the same control when I paint with my left hand, so any fancy manis on my right hand always look a little shaky, sadly.

The Face Shop GL111, China Glaze Emerald Sparkle, China Glaze Ruby Pumps, Orly Here Comes Trouble
Same as my left, the mani on my right hand originally started as what's on my thumbnail here.

And I like doing this when I have opposing manis on both hands:


When held together like this, they remind me of the stripey hard candies you can buy from The Rocks or various fairs. This looks candylicious! :D

I hope you all had a wonderful holiday!