; Plisherrific: Revlon
Showing posts with label Revlon. Show all posts

Dec 2, 2019

Pink Foil-age - Revlon Perfectly Plum, Born Pretty Texture-L002, Born Pretty Miss Pink


I'm back with a few review items from Born Pretty to try out...

[Purple lightning]
...and they're some great stamping products, as you'll see..!

[Born Pretty Stamping Plate - Texture-L002]
The first is a foliage-themed stamping plate - Born Pretty Texture-L002 which features lots of intricate leaf patterns. The stamping plate comes with a handy cardboard sleeve with a window so you can see the plate itself. As always, there's protective blue film to protect the metal that you need to peel off before using. 

[Bottle to nail: Born Pretty Stamping Polish BP-Q06 Miss Pink]
I'm also trying out an extremely shiny stamping polish from Born Pretty - this one is BP-Q06 Miss Pink. I don't think I have anything quite like this in my stash! It's an extremely sparkly silvery purple foil that stamps like a dream.

[Base: Revlon Perfectly Plum; Stamping: Born Pretty BP-Q06 Miss Pink;
Stamping plate: Born Pretty Texture-L002]
I've done a different pattern on each nail so you can see what it looks like. Love how beautifully the leaf pattern on my middle finger here turned out.

[Base: Revlon Perfectly Plum; Stamping: Born Pretty BP-Q06 Miss Pink;
Stamping plate: Born Pretty Texture-L002]
...and here's another five stamping patterns on my other hand! Unfortunately my nails are quite short at the moment so I couldn't get a lot of each image on the nail. The foil is also so gosh-darn sparkly that it's hard to photograph, but it certainly looks eye-catching in person!

All in all, very easy products to use - great quality at a decent price. So if you're interested, you can check out the stamping plate and polish at Born Pretty. Code above as usual will give you an extra discount off full-priced products!


Nov 27, 2019

Holiday Magic - Revlon Perfectly Plum


It's been a bit crazy, and the mitts went unpainted for a good long while, but I'm trying to ease back into it...

[Bottle to nail: Revlon Perfectly Plum (2 coats)]
Today I have a fairly old one from my stash (I think!) - this is Revlon Perfectly Plum, a red-leaning purple shimmer polish.

[Bottle to nail: Revlon Perfectly Plum (2 coats)]
I thought this one actually works well for the upcoming festive season, although it's a bit unseasonable down under as it's more an autumn shade that the hot summer we're already dipping our toes into...!

[Bottle to nail: Revlon Perfectly Plum (2 coats)]
I was quite pleased that it didn't take too long to dry, and was opaque and even at two coats. Not too bad for a work-safe, not-too-vampy manicure! Not just that, you could add a bit of silver or gold glitter and take it straight to party territory. =)


Apr 30, 2018

Navy Frills - Revlon Colorstay Gel Envy Wildcard, White Lace Water Decal


I thought jazz up last week's manicure as well as get a move on with my ever-increasing stash of water decals....

[Dainty]
...and here's the result! Something nice and simple! To tell the truth, I considered doing a stamp the base shade at first but stamping was just not working out for me that night! So water decals, it was!

[Bottle to nail: Revlon Colorstay Gel Envy Wild Card (2 coats)]
My base shade was Revlon Colorstay Gel Envy in Wild Card, a blue jelly-creme polish.

[Base: Revlon Colorstay Gel Envy Wild Card (2 coats); Water Decal: White lace]
I chose a white lace water decal and carefully cut out sections the width of each nail. Always remember to remove the plastic film over water decals before dunking them in water! After a minute, the decal should slide right off. With small pieces like these, it's easy to get them folded over and hard to position them properly before they stick.

[Base: Revlon Colorstay Gel Envy Wild Card (2 coats); Water Decal: White lace]
Here's some quick tips for water decals:
Get your nails wet so you have a bit of extra time for repositioning. When the decal starts sliding off the backing paper, keep the decal mostly on the backing so it maintains it's shape, leaving an edge free. Place the free edge where you want it on the nail, then hold that in place, and slide the rest of the paper off. Hope that makes sense! It certainly makes things much easier for decal placement!

Remember, topcoat after to keep the decal firmly stuck down!


Apr 23, 2018

Blue Jelly - Revlon Colorstay Gel Envy Wild Card, Diamond Top Coat


I finally got around to using one of the gifts from Jme for my last birthday!

[Bottle to nail: Revlon Colorstay Gel Envy Wild Card (2 coats)]
This was fun to try out! This shade is Wild Card from the Revlon Colorstay Gel Envy Range.

[In the box: Revlon Colorstay Gel Envy 2 Step kit]
This particular shade comes in a set along with the Revlon Colorstay Gel Envy Diamond Top Coat. In combination, this is supposed to give you a gel-like finish while working like a normal polish (ie. no curing!).

[2 coats: Revlon Colorstay Gel Envy Wild Card]
First things first, it's a lovely slightly dusty blue shade. The formula was slightly prone to flooding and was uneven with one coat but evened out nicely with the second coat. However, it tended to bubble, which is not an issue I have encountered for quite a while!

[2 coats: Revlon Colorstay Gel Envy Wild Card]
It's a bit of a combination between a jelly polish consistency and a creme, which gives a nice squishy finish which I assume if where the "gel finish" comes in. Dry time was better than I expected from the formula so that was a nice surprise.

Overall, I don't think it's all that gel-like - you could get the same finish from any creme polish and a good topcoat, but maybe you'd have to wait a bit longer between coats. As a regular polish, it's a nice staple shade, and a good thin topcoat for cremes.


Jul 24, 2017

Minty Fresh - Revlon Parfumerie Wintermint


I'm (very very) slowly working through my "untrieds" box! Here's one from a birthday a while ago....

[Bottle to nail: Revlon Parfumerie Wintermint (2 coats)]
This is Wintermint from the Revlon Parfumerie range, a collection of scented polishes. These come in the cutest ever little "perfume bottle" shape!

[2 coats: Revlon Parfumerie Wintermint]
Wintermint is a frosty mint green shimmer with lots of silver microglitter and small teal hexes. I also feel that the shimmer in the base shade leans slightly gold which warms the shade up a bit.

[2 coats: Revlon Parfumerie Wintermint]
Formula-wise, it was pretty easy to handle - two easy thin coats that dried quickly. However, I'm not really a fan of the slightly frosty finish. It's not streaky by any means, but somehow the combination of glitter and the shimmer base combines to give a faintly dated look. This polish also dries textured, although all the glitter lays nice and flat!

[2 coats: Revlon Parfumerie Wintermint]
Scent-wise, it was a pretty mild minty scent as you'd expect. Nice and fresh (rather than toothpaste-y), which is where the winter part of the name comes in. Quite a pleasant inoffensive scent, but only really detectable if you bring your nails up close for a sniff, and the fragrance had faded pretty much completely by the second day.

Still an interesting combination, but not quite to my taste!

Jul 10, 2017

Nail Foil Topcoat Comparison - OPI, Picture Polish Revolution, Revlon Quick Dry, Born Pretty No Smudge Top Coat


Haven't done a comparison for a while - and here's an interesting one! Top coats!

[Battle bottles]
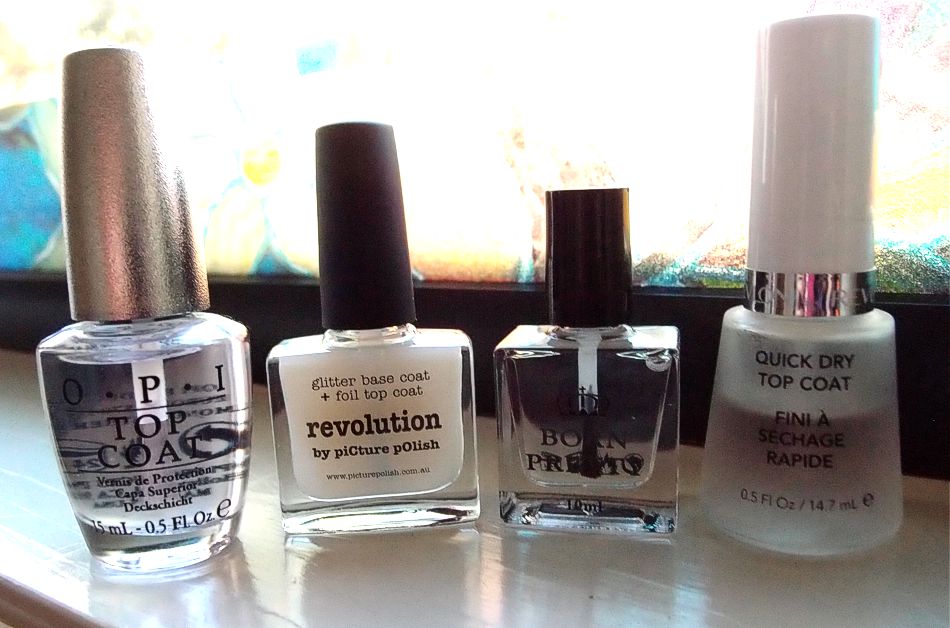
The topcoats I'm trying out today are from left to right: OPI Top Coat, Picture Polish Revolution, Born Pretty No Smudge Top Coat and Revlon Quick Dry Top Coat.

[Born Pretty No Smudge Top Coat]
I recently received the Born Pretty No Smudge Top Coat from Born Pretty for review and I was super excited because in the item description, it is meant to work over stamping designs, holo/chrome powders and nail foil transfers! It comes in a nice weighty rectangular bottle of 10ml volume. The black cap actually comes off, as you can see in the first photo. I found it much easier to use with this off, as that suits my smaller hands better. I think you could leave it on during application if you prefer.

[Fiber Optics Nail Foil Transfer]
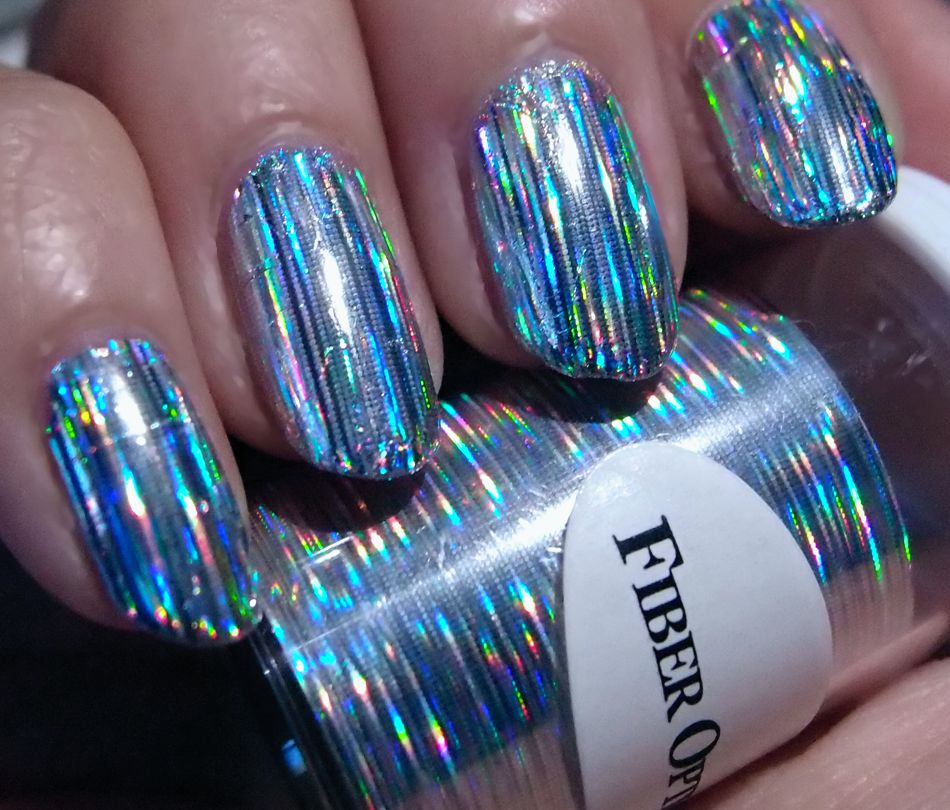
As a challenge, I tried to pick out a super holo nail foil transfer from my collection; this one is called Fiber Optics. I'm not sure I picked the best one for the no-crinkle challenge in the end, but it's certainly super rainbows up in here... Above you can see the process of cutting out appropriately-sized rectangles for each nail...

[2 coats: Color Club Harp On It]
As always, I picked a matching silver holo base since my foil transfer was a silver holo. This lovely is Color Club Harp On It from the Halo Hues collection. Both Jme and I have previously posted about this here and here, but I couldn't resist putting more photos of this beauty up. Ah~~

[Base: Color Club Harp On It (2 coats); Foil: Fiber Optics (pinky)]
I know Harp On It is amazingly bling, but there's just something about holographic nail foil transfers. This photo doesn't even capture it properly but the holo shine with Fiber Optics is on a whole other level.. 

[Nail foil transfer: Fiber Optics]
So obviously, I have to have some photos BEFORE I put topcoat on, before any crinkly catastrophes occur. Check it out! These were so hard to photograph - they seriously look like some crazy techno robot nails under direct lighting.

[Nail foil transfer: Fiber Optics]
Once more before topcoating....

[Topcoat (L-R): Revlon Quick Dry, Born Pretty No Smudge, Picture Polish Revolution, OPI;
Nail foil transfer: Fiber Optics]
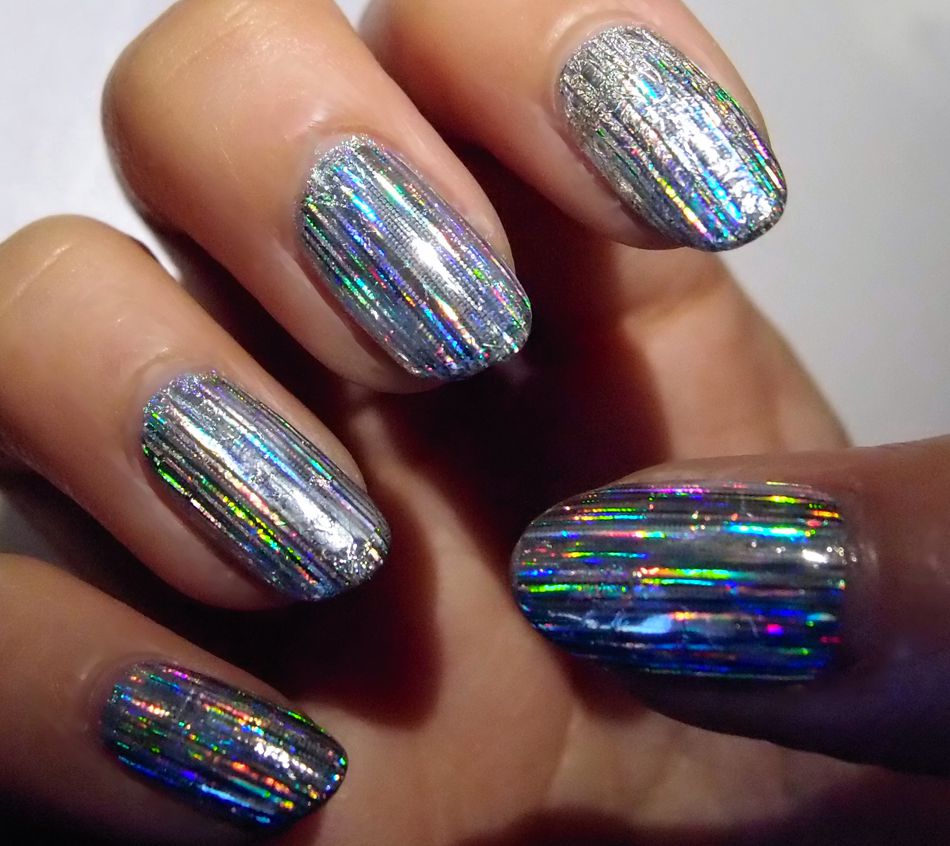
Et voila! So, there were a couple of surprises here. I'll list out what I used and the result..

Pinky: Revlon Quick Dry - I expected a quick-drying polish to leave a crinkly and dull finish but it only crinkled slightly and remained holographic.
Ring: Born Pretty No Smudge - No crinkling, good holo. Bling-addict approved!
Middle: Picture Polish Revolution - My positive control, so to speak. Also no crinkling, good holo!
Index: OPI Top Coat - Whoa, crinkle! Pretty much all crinkled, and patches of dullness. No bueno!

[Topcoat comparison: Revlon Quick Dry (pinky); Born Pretty No Smudge (ring);
Picture Polish Revolution (middle); OPI (index); No top coat (thumb)]
So basically, Revlon works in a pinch. OPI to avoid. Picture Polish Revolution and Born Pretty No Smudge Top Coat are both fine to use but one is also 1/3 the price of the other so if you're trying to save up (for more polish, I assume), then Born Pretty No Smudge Top Coat is the way to go.

I will note though that both topcoats from Born Pretty and Picture Polish feel tacky to the touch a bit longer than the Revlon and OPI. I don't think it's particularly long, I'm probably just used to the Quick Dry!

I mentioned above that I wasn't sure if I picked the most challenging foil transfer design - I truly expected more crinkling to happen! Well, that'll be an experiment for another day.. 

Again, you can purchase the Born Pretty No Smudge Top Coat here, and check out the entire range at Born Pretty. Code above also available for some savings off full priced items!

Jun 15, 2017

Terrible Thursday - Revlon Emerald City, Revlon OceanChrome, Revlon Typhoon, Revlon Blue Lagoon

It's time for Terrible Thursday. I used to post my less than successful manis, which are usually created as a result of bad colour choices or just messing up a technique. So here we go.

[Sea Tiles]
It doesn't look tooooo horrible in this picture, but at the same time, it's not great. The colour choices weren't great because three of the shades don't have enough contrast between them (yeah, there are four colours at work here, could you tell??), and the pattern is a little big for my nails and uneven. The mani on the middle finger is so blah. I'll get into other difficulties and potential tips later.

[Left to right: Revlon Emerald City, Revlon OceanChrome, Revlon Typhoon, Revlon Blue Lagoon]
So my colour choices! From left to right:
  • Revlon Emerald City - A lovely green polish that dries matte
  • Revlon OceanChrome - A teal-ish green chrome polish
  • Revlon Typhoon - A mid-blue almost-chrome polish
  • Revlon Blue Lagoon - A very light blue polish with a light shimmer
It's a Revlon bonanza! 

I have no idea what I was thinking when I chose to use a matte nail polish for nail polish marbling on my silicone nail art mat. Matte polishes dry fast, so this was a spectacularly bad idea. Then, the chrome polish was just a mess for this type of mani. It didn't create sharp lines, just sort of oozed into the other nail polishes around it.


[Nail patches on Born Pretty's silicone nail art mat]
I did so many nail patches because I wanted to apply them to my toenails as well, like I demonstrated last post. But the results weren't that great this time round, to be honest.

This mani is also when I learned that it would be better if I used a base coat first on the silicone nail art mat, and then marble on top of the clear base coat for each patch. If you don't, you'll find that the nail patches have become very thin after they've dried and might tear when you lift them from the silicone nail art mat. Especially as you've dragged a toothpick through the nail polish when you were doing your marbling, which sometimes leaves lines on your nail patches that are easy to tear. A base coat will help hold it all together.

[Revlon Emerald City, Revlon OceanChrome, Revlon Typhoon, Revlon Blue Lagoon]
That last picture doesn't look too bad, but the second last... boy, the pattern is not even visible on the middle finger. Oh well, lesson learned

Anyway, the chrome nail polish doesn't actually look half bad, but I just need to pick a better combination when I'm doing this in the future.

May 25, 2017

Painted Weave - Revlon Budding Chrome, The Face Shop GL111, Revlon OceanChrome, Australis Goth Rock

This look I'm sporting today can be achieved with stamping, or with nail art stencils, if you know what I'm talking about. Today, I'm trying out the latter.

[Painted Weave]
What is the proper name for this? Nail art vinyls? Nail art stencil vinyls? Nail art template stickers? Well, as you can see from the photo below, they've used the name 'Nail Art Hollow Sticker'. Sounds weird. I think I prefer nail art stencil vinyls. But in the end, a photo speaks a thousand words:

[Silicone nail art mat and nail art hollow stickers]
I usually don't get very crisp results from nail art vinyls when I use them straight onto my nails. So this time, I thought I would try the nail art stickers on a silicone nail art mat. The stickers were just so much easier to deal with, understandably, when applied on the flat surface of the silicone mat.

[Nail art hollow stickers applied onto the silicone nail art mat]
I cut up the vinyl based on the dotted lines they provided and stuck them onto the silicone nail art mat. I'm only using 6 pieces here because they're pretty large, so I figured that other than my thumbs, the other pieces will cover two nails each.

Side note, I really love the holo on these vinyls. So pretty! Even if they all get painted over in the end!

[Manicure in progress]
I don't actually have in progress photos since I had to move pretty fast. If you do this too slowly and your nail polish dries too much, you end up peeling off your nail polish as well from the mat when you pull off the vinyl.

So here are the steps I went through, with references to the photo above.

  1. Stick the vinyl onto the silicone mat, as shown in (A). Now paint over it to cover the hollow parts. In this case, I painted over it in a gradient of colours  
  2. Peel off the vinyl which leaves only the pattern behind, as you can see in (B)
  3. Paint over the pattern left behind with your base shade, as shown in (C)
  4. Leave it to dry completely. You will know it's completely dry when the patches of nail polish are completely flat against the mat. 
  5. Peel off these nail patches from the mat carefully. Bend the mat to help the peeling off endeavour. 

[Homemade nail art patches/decals]
And voila! I did cut the nail patches into rectangles, so they would look so much prettier for my photos. :)  Then I used a clear base coat on my nails, let it dry enough to be slightly tacky and applied the nail patches on. I used a combination of stretching the nail patches and nail clippers to cut off the excess nail polish.

The nail polish I used for the mani were:

  • Revlon's Budding Chrome - a light peachy chrome nail polish that rather overwhelmed everything
  • The Face Shop's GL111 - a pale gold foil 
  • Revlon's OceanChrome - a teal chrome 
  • Australis' Goth Rock - a near-black maroon nail polish


[Revlon's Budding Chrome, The Face Shop's GL111, Revlon's OceanChrome, Australis' Goth Rock]
I do like using the nail stencil vinyls on the silicone nail art mat. I think the results are a lot neater, with crisper lines. With gradient manis and nail stencil vinyls done straight onto the nails, I often feel like the process is usually rather messy and requires quite a bit of clean up after. With the use of the nail stencil vinyls on silicone nail art mat, the mess was constrained and easier to deal with.

I just really like having these new tools to work with now!