; Plisherrific: frankenpolish
Showing posts with label frankenpolish. Show all posts

Aug 23, 2012

Getting that Gleam - Orly Rococo A-Go-Go, AnnasArtAsylum 481804

I'm writing this post through a headache, so I hope it makes sense! D:

Warning: Orly's Rococo A-Go-Go will not look like that on your nails:


But it will if you add a coat of colour shifting polish! The colour shifting polish is shown in the bottle below.


Basically, I bought Orly's Rococo A-Go-Go awhile ago and was a little disappointed by how it looked on the nails.

[Orly Rococo A-Go-Go]

While it's a nice deep magenta colour, it lacked the awesome gold shimmer that is very much present in the bottle.


[Orly Rococo A-Go-Go]
Under bright indoor lights, the colour is rich and deep, but the gold shimmer is still sadly lacking. Do ignore the horrid tip-wear.


[Base: Orly Rococo A-Go-Go
Top coat: AnnasArtAsylum 481804 franken]
But a coat of colour shifting (or colour morphing, as it's called by some) franken and it really does look like Rococo A-Go-Go in its bottle. The top coat is a polish I made out of AnnasArtAsylum's 481804 pigments and clear suspension base. The colour shift when layered against black is dark pink-red to gold. When layered over Rococo A-Go-Go, it looks a bit more plummy-red.


[Base: Orly Rococo A-Go-Go
Top coat: AnnasArtAsylum 481804 franken]
Isn't the colour shift astonishing? It's so gorgeous! I couldn't help but take dozens of photos of this mani, and I had to restrain from posting them all. I find that colour shift in duochrome polishes is hard to photograph under indirect natural sunlight, but this one certainly flexes its muscles under any lighting.


[Base: Orly Rococo A-Go-Go
Top coat: AnnasArtAsylum 481804 franken]
Under bright indoor lighting, the colour shift is pretty solid as well.

All I need is more suspension base to make more frankens with the other pigments I bought!

May 10, 2012

Superheroes' Frankenpolishes

Awhile back, before I decided to do an Avengers manicure, I decided to make Avengers inspired frankens instead! These are my rather strange results, which I'm only sharing now:

Capsicle Just A Kid From Brooklyn aka Captain America

Just A Kid From Brooklyn frankenpolish
Inspired by Captain America's shield colours - red, blue and white - I came up with a jelly-ish red polish that is filled with blue and silver-holo hexes of varying sizes. 'Just A Kid From Brooklyn' is a quote from the Captain America movie.


Just A Kid From Brooklyn frankenpolish
The frankenpolish actually dries glossy, but another coat of fast dry topcoat over it made it really, really glossy. It looks like shiny, glazed candy! This took three coats to achieve, and some of the glitter from the first coat did get buried. I think three coats was a bit of an overkill, since the polish was pretty opaque and heavy by two coats.


Just A Kid From Brooklyn frankenpolish
I wondered if it would look less like candy when mattefied, since Captain America frankens shouldn't inspire thoughts of candy. But nope. Still looks like candy to me. Why?? Also, woah, so many coats of polish on at this point...


Genius, Billionaire, Playboy, Philanthropist aka Iron Man

Genius, Billionaire, Playboy, Philanthropist franken
I thought Iron Man would be best represented by something shiny, so this is a mix of red glitter and gold hex glitter in a clear base. 'Genius, Billionaire, Playboy, Philanthropist' is the oft-quoted line Tony Stark uses to describe himself in The Avengers. I thought I should use something familiar, but wow, it's really long for a name.


Ring finger: Genius, Billionaire, Playboy Philanthropist franken over Ulta3 Crystallina
Other fingers: Genius, Billionaire, Playboy, Philanthropist franken over BeautyStyle Rome Red
Even though Rome Red isn't opaque at one coat, two coats of the franken over Rome Red turns the mani opaque. I think its just how much glitter there is in it, even though it doesn't show in the pictures - probably because the glitter isn't very shiny for some reason. I quite like the glitzy gold bits floating in all that red.


Ring finger: Genius, Billionaire, Playboy Philanthropist franken over Ulta3 Crystallina
Other fingers: Genius, Billionaire, Playboy, Philanthropist franken over BeautyStyle Rome Red 
I might take another stab at creating an Iron Man franken. Tony Stark is my favourite character, so it seems like his franken should have waaaaaaaaaaaaay more bling.


Green Rage Monster aka The Hulk

Green Rage Monster franken
How bizarre. I took this photo before shaking the bottle really well and the different greens hadn't mixed together properly. Perhaps that's a good representation of Bruce Banner and the Hulk after all! :P  There's more glitter in the franken than is obvious here. At this point, I finally bought actual spare bottles for my frankenpolishes! :D

The name of the game for this franken is green, green and more green. And a bit of blue and random glitter for the hidden depths within the quiet Dr Banner and his green counterpart. 'Green Rage Monster' is a quote from The Avengers. It's a bit of a cheat, because Tony says it, not Bruce. But the Bruce quote I wanted to use is a teeny bit spoiler-ish so I'm holding back.


Green Rage Monster franken
This is a mid-green polish with the tiniest bit of light green shimmer, and lots of blue and green hexes, with the occasional silver hexes too. There's also small blue matte glitter that stands out against the green base.

Green Rage Monster franken
It's a completely bizarre polish, but I really like the result! :D  Green Rage Monster is my favourite franken of this lot!

I'm already plotting my next Iron Man franken and perhaps Thor franken too!

Apr 23, 2012

Duping Scandalous - Jordana Magenta Magic vs Revlon Scandalous/Facets of Fuchsia


Sorry it's taken me this long to get around to this! I did a little teaser pic of this franken on Twitter a few weeks ago and have only now swatched it properly.

[Bottle to Nail: Magenta Magic franken dupe]
Here it is, bottle to nail! I wasn't going to pay $14 for Revlon Scandalous/Facets of Fuchsia in-store so when I saw Jordana's new collection of glitters (which are completely awesome, I must say!), I noticed this beauty here...

[In the bottle: Jordana Glitters in Magenta Magic]
Jordana Magenta Magic, dense tiny and large hexagonal magenta glitter swimming in a clear base! Only $3 at Cherry Culture for 15ml! I'm not sure why the product page lists it as 6ml, but it's most definitely a large bottle.

[Close-up: Magenta Magic franken dupe of Revlon Scandalous]
The glitter is fairly dense so you don't need much of it at all to dupe Scandalous/Facets of Fuchsia (and Deborah Lippmann Bad Romance!).

Recipe: Fill 1/3 bottle with Magenta Magic, then top up with clear and a couple drops of black, enough to tint the base to a black jelly. That's it!

[Magenta Magic franken dupe: 2 coats except middle finger (black base)]
These are all two layers of my franken without base, except for my stumpy middle finger where I layered it over black to check out the difference. You do lose a bit of the jelly look when you layer it over black so it might not be to your taste!

I've been in a photo-taking rut unfortunately so my apologies for the crappy picture quality. I'm out during the day so the only time I do my nails and take photos are at night by my desk lamp light. =( Oh well, I hope you guys find this useful anyway!

Mar 17, 2012

Jme's "Frankenmarch" Entry - Verily Verdant

You should have already seen Ev's gorgeous FrankenMarch entry right below mine here. It's been so fun doing this, so I really do have to thank Sarah Claire for organising this competition!

Ok, more talking later! Here's my little green Franken polish.

Entry


Blurb

Verily Verdant is the colour of lush, rolling mountains - if your average mountain had countless hidden gems, that is! Blue-toned holographic glitter catches the eye among the bright green hexagonal sparkles. A turn of the hand into the light will reveal a mesmerizing flash of ever-shifting blue, green and gold shades from the fine triochrome bar and hexagonal glitters. All this shininess lie suspended within the mid-green jelly base, giving the polish a layered depth. This franken polish looks stunning on its own and when layered over other colours as well. One layer of Verily Verdant over black allows the green-themed glitter to glow in beautiful contrast.

All my current glittery green polishes are much darker, so my aim with this Franken polish was to create something unmistakeably green that had a variety of glitter in it, especially holo glitter as I don't have anything like that right now. I was trying for something shiny with a green and blue theme, so tell me if you think that worked out fine! :)

Recipe

Time for colourful yumminess!

Whenever I mention 'bottle' here, I'm referring to the bottle of the final product, not the original bottles. I combined the following:

- 1/2 bottle of Mio Piccolo 03 - Blue-toned holographic glitter in different sizes, within a sheer blue base
- 1/4 bottle of Orly Here Comes Trouble - Different sizes of light green hex glitter
- 1/8 bottle of Color Combos CTW 507 - Triochrome hex and bar glitter that shine blue/green/gold
- 1/10 bottle of China Glaze Emerald Sparkle - To set up the green base with additional fine glitter
- 5 drops of LA Girl Idol - To get a medium, slightly bluer green for the base.


Photos
(Click to enlarge pictures!)

[Verily Verdant on nails and in the bottle]
This is my second attempt at a Franken polish, and I hadn't done this before prior to the competition. It's a lot more enjoyable than I expected, and I just want to do moooore now! My first attempt at a Franken didn't turn out too badly either (that one is called Red Carpet Party, and I'll post it here too!).


[Left: Close-up of Verily Verdant in bottle
Right: Bottled Verily Verdant]
The close-up shows the variety of glitter held in the mid-green jelly base. I have light green hex glitter in different sizes, fine gold glitter, holo glitter, an ethereal blue-tinged holo glitter, fine blue-green-gold triochrome bar glitter, and that's just listing them off the top of my head! As you can see from the picture on the right, the blue-ish holo really shines strongly when seen from an angle.


[Two coats of Verily Verdant]
I was hoping and was very pleased that this polish dries with a semi-smooth finish, as opposed to a matte, rough finish that a lot of glittery polishes seem to end up with. Of course, I went over the nails with a glossy fast-dry topcoat in any case, just for the high shine.

You can see my nail line very faintly due to the jelly-ish nature of the polish, but I don't think it's obvious in person. Aaaah, I really do love this shade of green.


[Two coats of Verily Verdant]
It's interesting to see the holo changing on this manicure, depending on the lighting. The above picture is a little more shadowed as you can see. And then...

[Two coats of Verily Verdant]
Angling the nails into the sun suddenly brings out a flare of holo, predominantly the blue holo. It's hard to capture with my camera, because focusing on the nails dims the holo and shiny glitter, but I hope you can see the cool blue shine!


[Top: Two layers of Verily Verdant on nail
Bottom: Close-up of Verily Verdant on nail]
 Look at that blue holo! It's so bright but has this interesting translucent quality to it.


[Verily Verdant under bright lights]
The above photo was taken with my iPhone to capture that blingy shine of the glitter.

With its jelly-ish and glitter-full nature, Verily Verdant looks pretty amazing layered over black as well.

[One layer of Verily Verdant over black]
It's like green-tinged space! The glitter really looks brilliant against black. I'm going to try this over other colours in the future, to see if it spices up colours like blue or white. :D


[One layer of Verily Verdant over black, from different angles]
I just love how different the shine looks from various angles, and how there's always something new to stare at on this manicure.


[Top: One layer of Verily Verdant over black
Below: Close-up]
Seriously, shiny, shiny space!


[One layer of Verily Verdant over black]
The above, dodgy-looking picture was taken with my iPhone, again to show how shiny the glitter is. The first picture shows a greener tinge, while with just the slightest shift of lighting, the blue shine comes through instead.


Phew, that's the end of this lengthy post. Thanks for reading all of that! If you want to see the other gorgeous entries for this competition, you can find them here at Shatter me Claire's blog. If you do like Verily Verdant here, please vote for me there! :D

Mar 16, 2012

Ev's "FrankenMarch" Entry - Awe-bergine


Hello hello, I know I said I was terribly busy and it is true! But I'm squeezing this post in with whatever free time I have. Jme and I entered another competition this week, this time a franken-making competition held by the talented Sarah Claire over at Shatter me Claire!

Before I start, apologies for the picspam - I just had so much to show! Picking which photos to put up was a real doozy... Anyway, I now present you with... Awe-bergine! 

ENTRY:

BLURB:
Awe-bergine is definitely not your run-of-the-mill purple polish. A cool violet lit from within with orange sparkle, it's filled with sparkles and secrets! Blue and gold hints glitter, with green accents at an extreme angle. But look closer and spot the secret strands of sparkle scattered throughout!
So my idea for this was my current obsession with deliciously ugly combinations - in this case, purple and orange. My aim was to produce a rich glittery blue-violet with strong bright orange highlights. All the additional glitter was a bonus!

RECIPE:
I've broken up the recipe a bit more so you can see my rationale...
Main/Base:

Fill 1/3 bottle with Nubar Violet Sparkle >> majority of purple sparkle
+ 10 drops Ulta3 Orchid >> deepens base colour and increases opacity
+ 2 generous scoops of Burning Leaves Reflecks (TKB) >> majority of orange sparkle
Glitter/Highlights:

+ 20 drops Kleancolor Chunky Holo Purple >> adds orange-green duochrome glitter
+ 10 drops Maybelline Gives Me the Chills >> adds subtle orange bar glitter
+ 5 drops OPI Sparkle-icious >> adds hints of blue and gold
Fleck/Shimmer: 
+ 1 scoop of Miranda Star Star Bites (TKB) >> purple-gold duochrome holds the look together.

PHOTOS :
(Do click to enlarge!)

The left is my first photo test in the sun - I was quite pleased with the warm glow contrasting with the cool blue-purple! While actually swatching Awe-bergine, I saw the most gorgeous view of the duochrome particles while looking down at the bottle of polish on my side-table so I snapped that pic on the right (click for maximum shiny goodness!).

I was initially worried that it would be too sheer and only useful as a layering polish...But! Awe-bergine has satisfying coverage at two coats and full coverage at three (also note the length of my nails and the mini bottle brush size).

I also thought all the glitter would make it a gritty nightmare but it applied evenly and dried surprisingly smooth, which I think is due to the jelly base in most of the constituents. YAY! Add topcoat, and it smooths out completely!


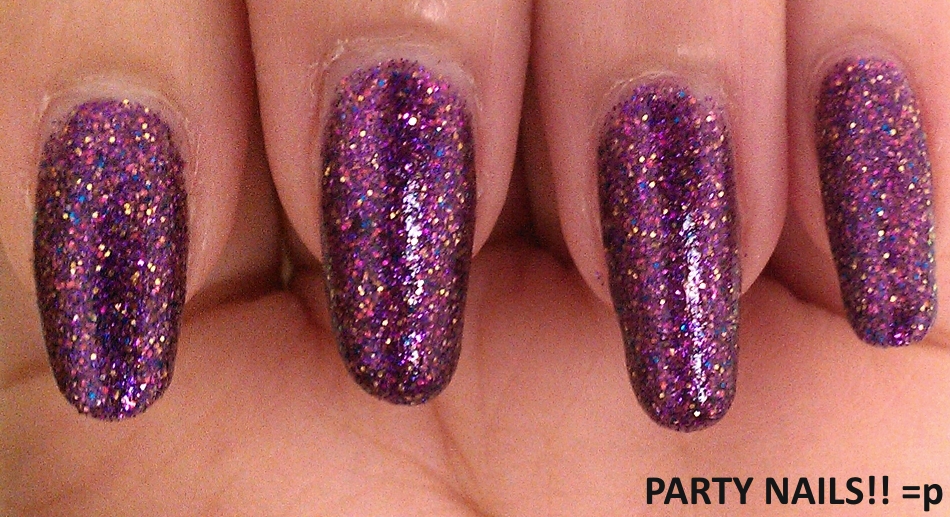
Also... party nails!! Haha, it's a crap picture which I took in the bathroom, but it's so festive without being too overt about it! Now for the macro spam...

Close-ups of glitter in the bottle and how it translates to the nail swatch. I only used 5 fat drops of Sparkle-icious but how dense is that blue and gold! Also, there's actually a great deal of bar glitter in Awe-bergine as you can see in the bottle. On the nail, it's just visible as tiny flashing stripes that add an interesting textured effect to the polish when the light hits it right.

Now since my initial plan was to have a strong orange highlight... how did it work out? Crappy pic, but it turned out pretty good! I put it down to the TKB Reflecks glitter pigment - it's sooo shiny and fine. From afar (thus the unfocused pic), you get a brilliant orange shine.

But not just that, somehow (through magical means I did not predict) in daylight, a strong royal blue shimmer appears. BONUS! =p I even have some pictures where the purple, orange AND blue are visible! Also, there's my little helper cat supervising my swatching technique...

And finally, a crappy unfocused pic as usual from the iDevice... Go go glitterbomb!!

Phew, that's all the frankenspam I've got for you today. Thanks for reading all of that babble! This is only my 5th franken (and miles away from my first few attempts) so I'm a teensy bit proud of myself, haha. I hope it was fun and maybe even informative! =)  I'm excited now to work more with pigments rather than sticking to mixing polishes.

Please do check out the other entries here, and if you liked Awe-bergine, I'd very muchly appreciate it if you voted for me!! Also, do have a look at Jme's breakdown of her entry as well!!