; Plisherrific: french
Showing posts with label french. Show all posts

Apr 2, 2018

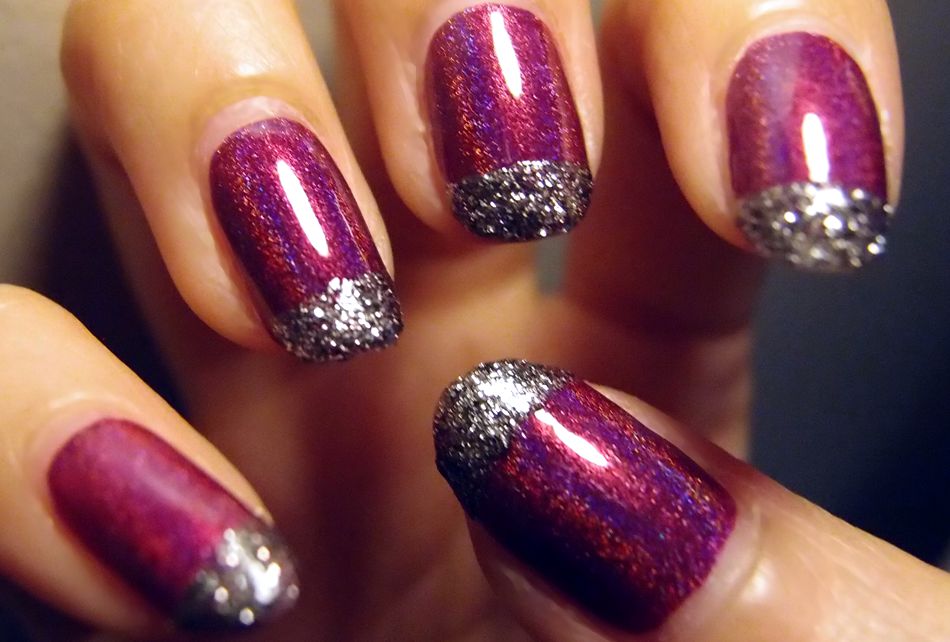
Plum Preserve - Dance Legend Achieve the Zen-ith, Essie Ignite the Night


Something about the combination of basecoat, polish and topcoat didn't quite work out for me last week which is pretty curious as I generally get excellent wear time from Dance Legend polishes...

[Va-va-voom]
So I used a go-to method I haven't had to employ for some time... Pop some glittery tips on!

[Bottle to nail: Dance Legend Achieve the Zen-ith (2 coats)]
My base from last week, the very sexy Achieve the Zen-ith from Dance Legend - a magenta-leaning purple linear holo.

[Bottle to nail: Essie Ignite the Night (tips); Base: Dance Legend Achieve the Zen-ith (2 coats)]
I was uhhmming and ahhhing over whether to do gold or silver tips when I spotted this one in my collection. Essie Ignite the Night - a gorgeous dark silver/gunmetal glitter.

[Base: Dance Legend Achieve the Zen-ith (2 coats); Tips: Essie Ignite the Night]
I think it goes very well with the vampy base shade! I basically taped off the tips and dabbed the glitter polish on to ensure full coverage. Then topcoat topcoat topcoat to smoothen it out!

[Base: Dance Legend Achieve the Zen-ith (2 coats); Tips: Essie Ignite the Night]
Very happy with how this turned out and it's making me think I should pull out my glitter polishes more often (I have A LOT.) =p


Jan 30, 2017

Silver Sunnies - Maybelline Mirror Image, Hit the Bottle As Black As Night, Born Pretty BP-L022


It's summer! It's (too) hot, and (too) bright! So I've combined the two and did this stamping manicure to express my feelings... =p

[Slip, slop, slap]
I was thinking my polish from last week was a bit blinding so when I was looking for something to stamp over it... why not a cutesy sunglasses print!

[Bottle to nail: Maybelline Mirror Image (step 2 + base)]
Quick recap: Maybelline Mirror Image - a super-reflective silver chrome. It's really cool watching it dry after application and get more and more mirror-like...

[Base: Maybelline Mirror Image Step 1 + 2 (1 coat each);
Stamping: Hit the Bottle As Black As Night, Born Pretty BP-L022]
The sunglasses print is from Born Pretty plate BP-L022 and I stamped in a black stamping polish (Hit the Bottle As Black As Night). As I mentioned in my last post, tipwear is pretty horrendous with mirror polishes so I free-handed (badly!) a thin french over the worn tips.

[Base: Maybelline Mirror Image Step 1 + 2 (1 coat each);
Stamping: Hit the Bottle As Black As Night, Born Pretty BP-L022]
Still pretty cute! From afar, you can't quite see the fine outline of the sunnies, and it kinda looks like a dotticure!

Jan 2, 2017

Ring It In - Lacquistry Rediculous, Dance Legend Pretty Top, Dance Legend Amazeballz Holo


It's the new year! Once more around the sun we go! Last year seemed to just rush by and I don't remember much of it somehow even though it was generally alright...! Hopefully 2017 will have lots of memorable moments!

[Lit as]
Here's my sparkly mani that I wore for NYE this time around. Nothing like a good classic red polish and extra holo bling...

[Bottle to nail: Lacquistry Rediculous (1 coat)]
My base is the super-gorgeous Rediculous from Lacquistry - sultry sexy sister in the amazing Amazeballz range. Check out our previous tag for all the loveliness from Lacquistry.

[1 coat: Lacquistry Rediculous]
Rediculous is absolutely amazing, but no surprise there. Full coverage in one coat and lovely glowy shine to boot. Of course, it's a million times better if you add a nice glossy topcoat!

[1 coat: Lacquistry Rediculous]
I think this would absolutely be a go-to for a classic red nail. It's a one-coater, quick drying and just the right amount of bling without tipping into cabaret mode... =p


[Bottle to nail: Dance Legend Pretty Top (tips); Base: Lacquistry Rediculous (1 coat)]
I then did a glitter french using Dance Legend Pretty Top, a glitter topper featuring small and large round glitter in gold and silver holo. I just carefully dabbed it on to get the glitter placement where I wantede.

[Base: Lacquistry Rediculous (1 coat); Tips: Dance Legend Pretty Top]
These photos don't really do the sparkle justice - it's definitely much more eye-catching in real life! The only thing I wasn't quite happy with was that I couldn't get as much glitter coverage on the tip as I wanted because the clear base that Pretty Top uses would have been overly thick on the tips....

[Base: Lacquistry Rediculous (1 coat);
Tips: Dance Legend Pretty Top, Lacquistry Amazeballz Holo]
So, a few days later I very carefully filled in the tips using Lacquistry Amazeballz Holo and it was exactly what I was after. Sorted!

Anyway, now that 2016 is over, I can look back and say I'm vaguely proficient at stamping (I hope!). So what's on the cards for the coming year? I've been meaning to actually use up my ever-growing stockpile of water decals and transfer foils, so I'll keep that in mind in the months to follow! =)

All the best to everyone and thanks for reading our little blog!


Jul 20, 2015

Acid Break - Orly Here Comes Trouble, Konad Black, Bundle Monster BM-208


I'm really getting into stamping this year (finally!). I'm still kinda hopeless at it but I'm getting there!

[Radioactive turtle or something...]
Here's a mani from earlier in the year combining some bright glitter with a black contrast stamp.

[Bottle to nail: Orly Here Comes Trouble (2-3 coats)]
The base is the always gorgeous Orly Here Comes Trouble, a super bright grassy green glitter. Excellent coverage in 2-3 coats, and super twinkly!

[Bundle Monster BM-208]
...which makes it an excellent backdrop for some black shatter stamping! This here is Bundle Monster plate BM-208, and I'm using that pattern on the left there.

[Base: Orly Here Comes Trouble (2-3 coats); Stamping: Konad Pearl Black, BM-208]
I first topcoated my base of Here Comes Trouble and then stamped the design using Konad Pearl Black (?), a deep black with slight shimmer. Then freehanded some tips with the same polish. My nails were pretty short though! So not much of a french tip going on here...

[Base: Orly Here Comes Trouble (2-3 coats); Stamping: Konad Pearl Black, BM-208]
I then topped everything off with a nice shiny layer of topcoat and it's all done! I've been experimenting a lot with stamping but it's a bit frustrating trying to get finer patterns off the plate if you don't use thicker polish. I'm really puzzled that I did some really good stamped manis in previous years just using random polish from my stash....! Definitely gonna work on it, so look out for more stamping in upcoming posts!

Jul 13, 2015

Raspberry Ice - Layla Cherry Diva, Essie Peak of Chic, Essie Hors d'oeuvres


Usually when I combine more than two polishes together, my love for shiny ends up overwhelming any hint of good taste I may have started out with... I'd like to think this is one of my more successful attempts!

[Glitter cupcake]
This here is a combination of three shiny polishes, all in different ways. The base is Layla Softouch Effect in Cherry Diva which I've previously used here. After a few days, I got bored (and also picked up some new polishes I was dying to try out!) so I added a bit more shiny!

[Bottle to nail: Essie Peak of Chic (tips); Base: Layla Cherry Diva]
 I first started out with a glitter gradient french tip of Essie Peak of Chic from the Encrusted Treasures collection. Peak of Chic is a lovely snowy combination of white and silver holographic bar glitter in a clear base. Definitely gonna try it out with some shades of blue for a snowy winter manicure one day!

[Base: Layla Cherry Diva; Tips: Essie Peak of Chic]
This mixture kinda reminds me of a raspberry coconut cupcake or something...


[Bottle to nail: Essie Hors d'oeuvres; Base: Layla Cherry Diva; Bar: Essie Peak of Chic]
I then tipped everything off with a dabbed layer of Essie Hors d'oeuvres from the same collection. So it goes vaguely from least blingy to most blingy as you go from lunula to tip. Or at least that's the idea...

[Base: Layla Cherry Diva; Bar: Essie Peak of Chic; Tips: Essie Hors d'oeuvres]
I did skip topcoat though to preserve the suede-matte finish of the Layla Softouch base. All in all, I think it turned out alright!


May 12, 2015

Fairy Fling - Color Club Sugar Plum Fairy


Today's post features a glitzed-up french manicure that I did a while ago.

[Bottle to nail: Color Club Sugar Plum Fairy (tips)]
This is Color Club Sugar Plum Fairy from the Beyond the Mistletoe collection. I've previously used this as a full mani and you can check out the photos and description here!

[Tips: Color Club Sugar Plum Fairy (2 coats, dabbed)]
This time, I decided to just freehand some french tips with this holo glitter polish and leave it as that. I think it was two careful coats dabbed on. However, because it's quite a thick base and there's so much glitter in it, it does tend to be quite goopy and I had to be quite careful when applying it.

[Tips: Color Club Sugar Plum Fairy (2 coats, dabbed)]
Despite that, I was pretty happy with how it turned out. Of course, this look only really works when you have a bit more free nail real estate!

Feb 23, 2015

Royal Touch - Zoya Blaze, Nails Inc Chelsea Embankment


Happy Monday! Back to work, but when you have glitter and holo in your manicure, it makes things just a little bit better...

[Tips of Fortune]
Here's a quick riff off an existing manicure, just jazzing up the tips with a glitter polish.

[Bottle to nail: Zoya Blaze (3 coats)]
I started off with Zoya Blaze, which is a red holo jelly, deeper in shade than this particular photo suggests. Great formula, you can go for 2-3 coats depending on how dark you want the resulting shade to be. I ended up using three.

[Bottle to nail: Nails Inc Chelsea Embankment; Base: Zoya Blaze (3 coats)]
Then Nails Inc Chelsea Embankment, one of my favourite polishes to do french tips with because of the fine super shiny glitter and great coverage. This was about one to two coats of Chelsea Embankment, carefully dabbed on where I wanted it. 

[Base: Zoya Blaze (3 coats); Tips: Nails Inc Chelsea Embankment]
Top it off with a generous layer of topcoat, and that's it! As usual, perfect for adding sparkle (and hiding tip wear!).


Apr 21, 2014

Fiery Glam - Emily de Moly A Beautiful Mistake, Color Club Gingerbread


There's nothing quite so old-school attention-catching as bright red nails. Even more so when it comes with generous helpings of glitter and holographic goodness!

[Bottle to nail: Emily de Molly A Beautiful Mistake (2 coats)]
This here is A Beautiful Mistake from Emily de Molly. A gorgeous red jelly packed with different sizes of red holographic hexes. The holo doesn't show as clearly as I would like but you do get glimpses of it depending on the angle and lighting.

[2 coats: Emily de Molly A Beautiful Mistake]
Formula was good an the glitter spread evenly. I think this was two coats.

[Base: Emily de Molly A Beautiful Mistake (2 coats); Tips: Color Club Gingerbread]
Being the magpie that I am, I couldn't help adding a bit of glitter to the tips. This is Color Club Gingerbread, a gold and holo glitter combination. I dabbed it on to make a mini glitter gradient. A very bright and festive combination!

Sep 30, 2013

Magical Mélange - Orly Fowl Play, Topshop Nails Gypsy Night, China Glaze Twinkle Lights


Another old manicure featuring glitter tips and a bonus polish comparison!

[Jelly, glitter, flakies, french, oh my!]
The two polishes featured here are not dupes, but they are kinda in a similar vein, with both glitter and colour-shifting flakies in a somewhat jelly base. Sorry for the amazing orange tan my fingers appear to have... =p I think I was trying to get the polish colours as close as possible at the expense of my regular pasty fingers...

[Bottle to nail: Orly Fowl Play]
On my index and ring fingers is Orly Fowl Play, a purple jelly with red-to-green duochrome flakes mixed in with blue, silver and iridescent glitter. This one was a bit thick and takes a while to dry so you have to be careful not to dent it while waiting.

[Bottle to nail: Topshop Nails Gypsy Night]
I picked up Topshop Nails' Gypsy Night when I was in London last year because I just couldn't resist! This is a black jelly base with tons of multicoloured and silver holo glitter as well as red-to-green duochrome flakies. Formula was alright to work with (or at least I don't remember any issues!).

[Index and ring: Orly Fowl Play; Middle and pinky: Topshop Nails Gypsy Night]
These photos show the different glitters and the duochrome shift. I'm not sure which one I like better! In spite of them being pretty similar, they are... still different! If that makes sense....

[Index and ring: Orly Fowl Play; Middle and pinky: Topshop Nails Gypsy Night
Tips: China Glaze Twinkle Lights]


Not being able to leave it alone, I chucked some glitter tips on using China Glaze Twinkle Lights. This polish is wonderfully named as it's a mix of gold, red and green glitter that really twinkles!

To be honest, I started a new job two months ago that (among a host of social commitments) has been keeping me crazy busy. I've only just run out of pre-written scheduled posts and really need to sit down soon to edit a bunch of photos, so fingers crossed, there'll be some "fresher" posts coming up soon!


Jun 24, 2013

Top Tips - Canmake #30


I went through a brief period of not liking strong colours on my nails but still wanting to play around with polish so here's a twist on the french manicure that I ended up using.

[Bottle to nail: Canmake #30 (2 coats)]
I picked up Canmake #30 while I was in Japan last year. This one is an aqua jelly base packed with iridescent glitters of various sizes, mostly shifting between shades of blue and gold. 

[Tips: Canmake #30 (2 coats)]
I used two coats of glitter polish on the free edge of each nail before putting a generous layer of topcoat over the full nail to even things out! My nails look a bit yellow in these photos for some reason but they definitely were fine in real life! It was pretty interesting to have a more "subtle" manicure (in my books, anyways!).

Jan 21, 2013

Glitz Party - Milani Glitzy Stiletto, Color Club Enchanted Holiday


Here's an attention-catching manicure! Sometime in December, I was hit by the Pink Bug! Usually I'm an unconventional colour person but I was really going for the pinks and reds last month. Here's one of my manicures...

[I feel it on my fingers...]
Pink and gold - festive AND girly! Excuse my little stubby nubbin', I had a bad break just before and had to cut them all down soon after. =C

[Bottle to nail: Milani Glitzy Stiletto]
I started with Milani Glitzy Stiletto, a bright pink shimmer with super sparkly fuchsia glass flecks throughout. Formula was thin and even - excellent pigmentation. It's one of those polishes that build up really well.

[2-3 coats: Milani Glitzy Stiletto]
I think this was two coats, possibly three? The colour deepens the more coats you add so it's really up to you. =) It's pretty gorgeous just on its own, and definitely "glitzy"!

[Base: Milani Glitzy Stiletto; Tips: Color Club Enchanted Holiday]
I then freehanded some straight tips with Color Club Enchanted Holiday, a gold glitter polish in a clear base.

[Base: Milani Glitzy Stiletto; Tips: Color Club Enchanted Holiday]
Tada! Simple but oh so flashy. Definitely something to save for the summer months and party nights~ =)