; Plisherrific: Color Club
Showing posts with label Color Club. Show all posts

Feb 7, 2018

Red Snow - BeautyBigBang Red Stamping polish, BeautyBigBang05 Winter Tartan plate, Color Club Pretty in Platinum


We are powering through these reviews for BeautyBigBang! I've been quite happy so far with the products I've tested. Let's keep going and see how the next one goes.

[BeautyBigBang Red Stamping Polish]
For today's review, I have a bottle of Red Nail Stamping Polish (J6415TM-6A) to show you. This polish comes in a black and gold cardboard box with a handy cutout in the front so you can tell what colour it is. You get a total of 9ml of polish, so plenty to play with!

[BeautyBigBang05]
I have already reviewed stamping plate BeautyBigBang05 in my last post, so this time I'm going to pick out a pattern from this Christmas-themed plate to try out in a full manicure.

[Plate to nail: BeautyBigBang05; Base: Color Club Pretty in Platinum;
Stamping: BeautyBigBang Red stamping polish]
Here's what I picked! This is the design in the middle of the bottom row, which is a tesselated snowflake design. I chose this one because it was past Christmas by the time I got this, so I wanted something festive, but not too obvious!

[Base: Color Club Pretty in Platinum;
Stamping: BeautyBigBang Red stamping polish, BeautyBigBang05]
I started with a pearly white base, Color Club Pretty in Platinum (previously reviewed here, gosh, over 5 years ago!). I wanted something faintly snowy, that would show a nice contrast against the red stamping.

[Bottle to nail: BeautyBigBang Red stamping polish;
Base: Color Club Pretty in Platinum; Stamping plate: BeautyBigBang05]
I have to say, I am so happy with this stamping polish! It's such a bright true red, and was really easy to apply to the plate and scrape. The pattern also transferred beautifully.

[Base: Color Club Pretty in Platinum;
Stamping: BeautyBigBang Red stamping polish, BeautyBigBang05]
In addition, the pattern is a very generous size so I even managed to stamp more than one nail at a time by making sure I filled the whole design out when applying polish and scraping.

I'm so pleased with this mani. It was really fuss-free and both the stamping polish and plate worked together beautifully. I'm definitely looking forward to trying out more from BeautyBigBang. You can find this red stamping polish here and the stamping plate here, and as usual, you can use our 10% off code above when shopping at BeautyBigBang. =)

Jul 10, 2017

Nail Foil Topcoat Comparison - OPI, Picture Polish Revolution, Revlon Quick Dry, Born Pretty No Smudge Top Coat


Haven't done a comparison for a while - and here's an interesting one! Top coats!

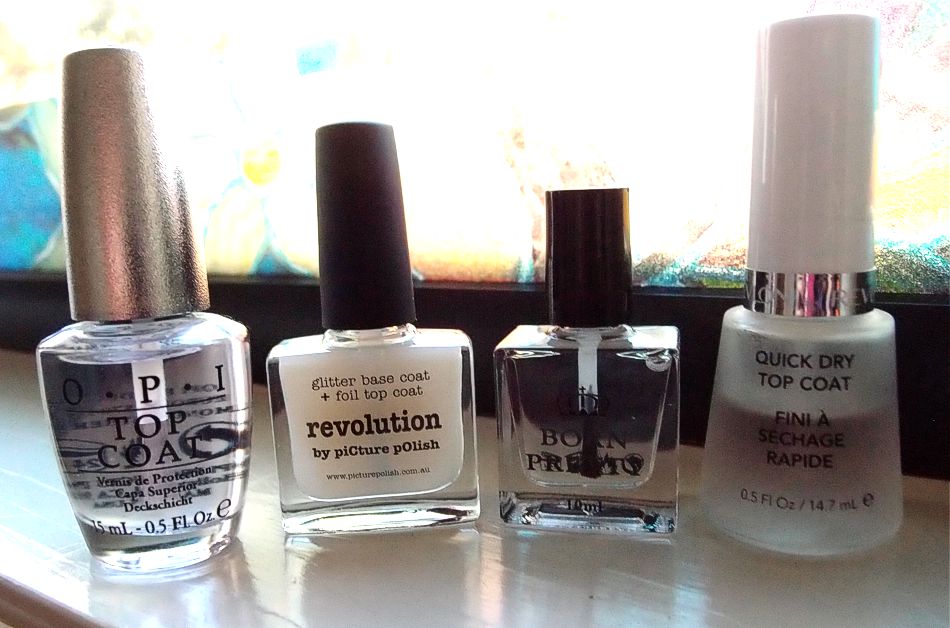
[Battle bottles]
The topcoats I'm trying out today are from left to right: OPI Top Coat, Picture Polish Revolution, Born Pretty No Smudge Top Coat and Revlon Quick Dry Top Coat.

[Born Pretty No Smudge Top Coat]
I recently received the Born Pretty No Smudge Top Coat from Born Pretty for review and I was super excited because in the item description, it is meant to work over stamping designs, holo/chrome powders and nail foil transfers! It comes in a nice weighty rectangular bottle of 10ml volume. The black cap actually comes off, as you can see in the first photo. I found it much easier to use with this off, as that suits my smaller hands better. I think you could leave it on during application if you prefer.

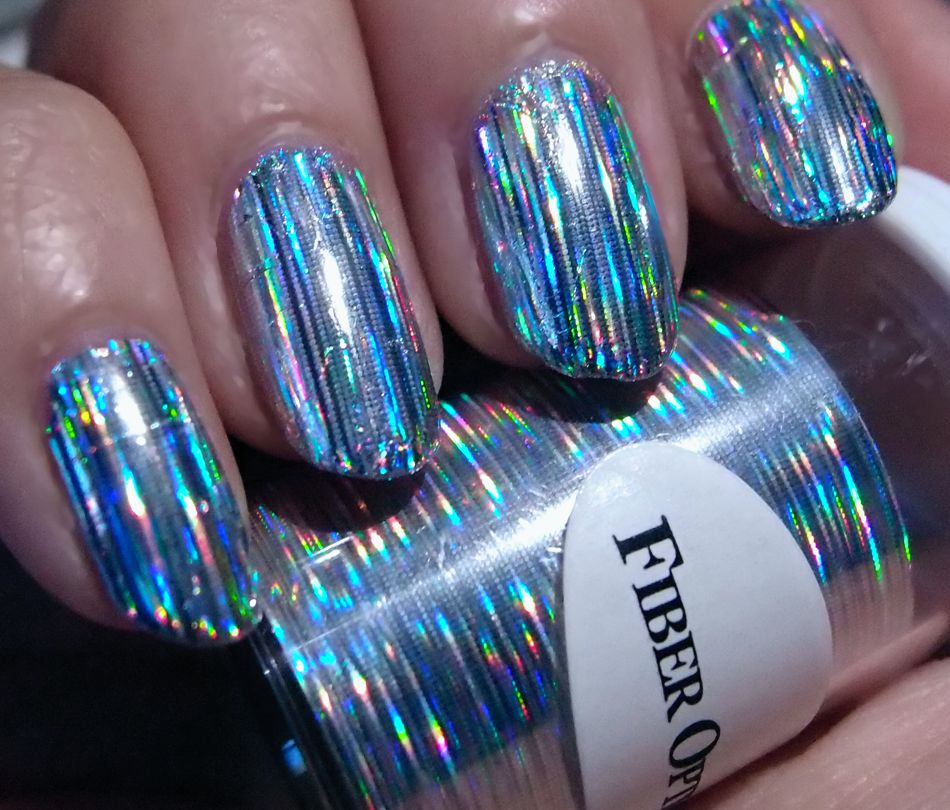
[Fiber Optics Nail Foil Transfer]
As a challenge, I tried to pick out a super holo nail foil transfer from my collection; this one is called Fiber Optics. I'm not sure I picked the best one for the no-crinkle challenge in the end, but it's certainly super rainbows up in here... Above you can see the process of cutting out appropriately-sized rectangles for each nail...

[2 coats: Color Club Harp On It]
As always, I picked a matching silver holo base since my foil transfer was a silver holo. This lovely is Color Club Harp On It from the Halo Hues collection. Both Jme and I have previously posted about this here and here, but I couldn't resist putting more photos of this beauty up. Ah~~

[Base: Color Club Harp On It (2 coats); Foil: Fiber Optics (pinky)]
I know Harp On It is amazingly bling, but there's just something about holographic nail foil transfers. This photo doesn't even capture it properly but the holo shine with Fiber Optics is on a whole other level.. 

[Nail foil transfer: Fiber Optics]
So obviously, I have to have some photos BEFORE I put topcoat on, before any crinkly catastrophes occur. Check it out! These were so hard to photograph - they seriously look like some crazy techno robot nails under direct lighting.

[Nail foil transfer: Fiber Optics]
Once more before topcoating....

[Topcoat (L-R): Revlon Quick Dry, Born Pretty No Smudge, Picture Polish Revolution, OPI;
Nail foil transfer: Fiber Optics]
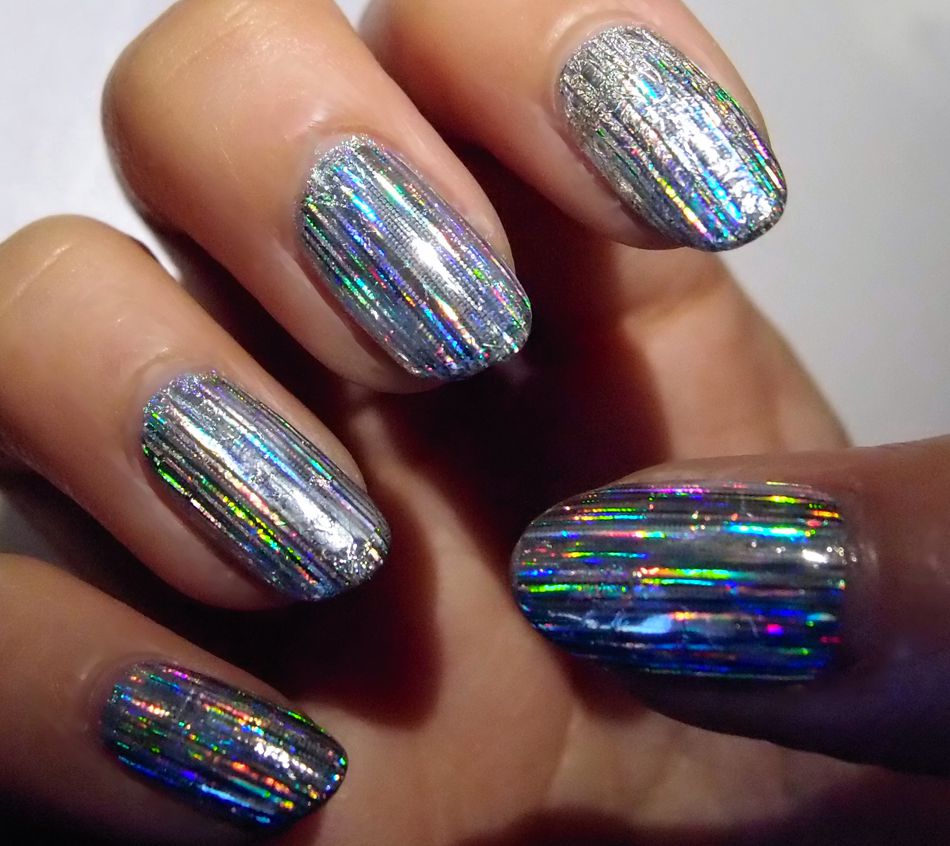
Et voila! So, there were a couple of surprises here. I'll list out what I used and the result..

Pinky: Revlon Quick Dry - I expected a quick-drying polish to leave a crinkly and dull finish but it only crinkled slightly and remained holographic.
Ring: Born Pretty No Smudge - No crinkling, good holo. Bling-addict approved!
Middle: Picture Polish Revolution - My positive control, so to speak. Also no crinkling, good holo!
Index: OPI Top Coat - Whoa, crinkle! Pretty much all crinkled, and patches of dullness. No bueno!

[Topcoat comparison: Revlon Quick Dry (pinky); Born Pretty No Smudge (ring);
Picture Polish Revolution (middle); OPI (index); No top coat (thumb)]
So basically, Revlon works in a pinch. OPI to avoid. Picture Polish Revolution and Born Pretty No Smudge Top Coat are both fine to use but one is also 1/3 the price of the other so if you're trying to save up (for more polish, I assume), then Born Pretty No Smudge Top Coat is the way to go.

I will note though that both topcoats from Born Pretty and Picture Polish feel tacky to the touch a bit longer than the Revlon and OPI. I don't think it's particularly long, I'm probably just used to the Quick Dry!

I mentioned above that I wasn't sure if I picked the most challenging foil transfer design - I truly expected more crinkling to happen! Well, that'll be an experiment for another day.. 

Again, you can purchase the Born Pretty No Smudge Top Coat here, and check out the entire range at Born Pretty. Code above also available for some savings off full priced items!

Mar 10, 2017

Rainbow Wings and Petals - Born Pretty Nail Art DIY Stamping Mat, Australis, Revlon, China Glaze, Mode, Essence, Color Club

It was Mardi Gras around here, with lots of partying on the streets, so I decided to go for rainbow colours on my nails, achieved through dry marbling on the silicone nail art mat!

[Dragon wings on one hand...]
[...flowers on the other.]
When it comes to dry marbling, I don't mean that I did water marbling with nail polish on the surface of a pool of water and then transferred onto a plastic surface to be applied later. In this case, I directly applied nail polish on the silicone nail art mat, and used a toothpick to quickly draw through the streaks of colour to create the effects you usually get from water marbling.

You can see the result of my dry marbling in the picture below. There are two tiny flowers I did for experimentation too.

[Born Pretty Nail Art DIY Stamping Mat]
Here are some tips for dry marbling on a mat:
  1. Experiment, experiment, experiment!
  2. Apply two to three thick coats of nail polish on the silicone mat.
  3. Don't use thin coats or quickdry nail polish or old nail polish that is naturally drying out. You need the nail polish thick and wet enough to work with.
  4. The watery nail polish worked best for me but required more layers.
  5. If you want an effect that closely resembles water marbling, curve the nail polish streaks you're painting down. If you look on the left of the mat, most of the streaks are straight. But towards the right of the mat, you can see that I have started curving my nail polish streaks. It's to create the familiar water marbling flower look.
  6. Leave your nail polish to dry on your silicone nail art mat for a couple hours at least. At first, the nail polish will look very thick on the mat. But as it dries out, the nail polish flattens to the silicone mat. It also becomes very easy to peel off the mat.
  7. Paint your base coat before applying the newly made dry marbling patterns onto your nails. If you press firmly on the edges of your nail bed, you can peel off the excess nail polish easily.
That's all I can think of for the moment!

[Dry marbling: Australis Mexican Madness, Revlon Mad About Mango,
China Glaze Yell-O-Neil, Mode Hook Me UP, Essence Choose Me!, Color Club Eternal Beauty]
Let's run through the nail polishes I used to get this colourful effects. The nail polishes are:
  1. Australis Mexican Madness - Pink creme
  2. Revlon Mad About Mango - Salmon pink creme
  3. China Glaze Yell-O-Neil - Yellow creme with gold shimmer
  4. Mode Hook Me Up - Light blue creme 
  5. Essence Choose Me! - Blue-green-gold shimmer
  6. Color Club Eternal Beauty - Purple holo
The same nail polishes were used on both hands, except the marbling is different, that's all.

[Dry marbling: Australis Mexican Madness, Revlon Mad About Mango,
China Glaze Yell-O-Neil, Mode Hook Me UP, Essence Choose Me!, Color Club Eternal Beauty]
I noticed that the marbling is a lot smaller compared to actual water marbling. That probably just depends on the individual doing the dry marbling and how far apart you want the lines on your pattern.

All in all, I'm very pleased with the results. I always thought water marbling was too messy for me after I tried it out a couple of times. But doing this on a silicone mat? Thumbs up from me! I don't think I need to go into detail about techniques since there are so many videos of water marbling. The same-ish theory applies, only you don't use a bowl of water.

I'm pretty delighted with what can be done with a silicone mat and I'm looking forward to trying it out even more.

Apr 28, 2016

Rainbow Ice - Color Club Harp On It

I found this polish one day and realized I had forgotten how pretty this holographic nail polish is.

[Color Club Harp On It]
This is Color Club's Harp On It, a linear holographic that is just out of this world. How did I forget this one? It's like having rainbows on my nails! Harp On It is also opaque after two or three coats and it's easy to apply.

May 12, 2015

Fairy Fling - Color Club Sugar Plum Fairy


Today's post features a glitzed-up french manicure that I did a while ago.

[Bottle to nail: Color Club Sugar Plum Fairy (tips)]
This is Color Club Sugar Plum Fairy from the Beyond the Mistletoe collection. I've previously used this as a full mani and you can check out the photos and description here!

[Tips: Color Club Sugar Plum Fairy (2 coats, dabbed)]
This time, I decided to just freehand some french tips with this holo glitter polish and leave it as that. I think it was two careful coats dabbed on. However, because it's quite a thick base and there's so much glitter in it, it does tend to be quite goopy and I had to be quite careful when applying it.

[Tips: Color Club Sugar Plum Fairy (2 coats, dabbed)]
Despite that, I was pretty happy with how it turned out. Of course, this look only really works when you have a bit more free nail real estate!

Apr 30, 2015

Happy Hulk - Color Club Holiday Splendour, Maybelline Boom Box Black

I was feeling like the Hulk one day, several months back. I mean, a rather fancy Hulk~

[Base coat: Color Club Holiday Splendor
2nd coat: Maybelline Boom Box Black
3rd coat: Color Club Holiday Splendor]
This is a delicious, green jelly sandwich. I had Maybelline Boom Box Black, a very pretty matte pale green and black hex and bar glitter, sandwiched between Color Club Holiday Splendor, which is a chunky holo in jelly green. Links in the previous sentence are to our previous swatches. This green jelly sandwich looks practically edible with the holo shine and the lovely depth from the various glitters and jelly layers.

Photos below are under fluorescent lighting to better appreciate the shiny.

[Base coat: Color Club Holiday Splendor
2nd coat: Maybelline Boom Box Black
3rd coat: Color Club Holiday Splendor]

Looking at these photos, I rather miss when my nails were longer.

Anyway, I think this has been one happy Hulking success of a mani. ;)


Jan 1, 2015

Starting With A Purple Bang - Nail Pattern Boldness I Believe I Can Fly, Color Club Harp On It, Femme Fatale Sinister Calling & Party Grenade

Happy New Year! :D I hope you guys had a good New Year's Eve!

I decided to usher in the new year with my favourite colour. Purple!


I started with the base, which comprises of many layers of nail polish to achieve the psychedelic purple frenzy below.

[Femme Fatale's Sinister Calling
Nail Pattern Boldness' I Believe I Can Fly
Femme Fatale's Party Grenade]
I started with Femme Fatale's Sinister Calling, a polish that has an amazing mix of purple, blue, black and silver holo glitter. The glitter comes in hex, shards, stars and bar glitter! As if as that wasn't wild enough, I added a coat of Nail Pattern Boldness' I Believe I Can Fly, which has gorgeous metallic blue square glitter in a navy blue jelly base. And then to complete the party attire, I put on Femme Fatale's Party Grenade. As the name would suggest, Party Grenade has a mix of multicoloured hex, square and diamond glitter in a clear base.

All in all, I think the end result came out looking rather nice.

But I wanted to add a little something extra for the New Year.

[Base: Femme Fatale's Sinister Calling, Nail Pattern Boldness' I Believe I Can Fly
and Femme Fatale's Party Grenade
Frame: Color Club's Harp On It]

Using striping tape, I blocked off a 'frame' on each nail and painted strips using Color Club's Harp On It, a silver linear holo. I think it turned out looking rather neat.

I think the mani suits my thumbnail the best because my thumbnail is wider

[Base: Femme Fatale's Sinister Calling, Nail Pattern Boldness' I Believe I Can Fly
and Femme Fatale's Party Grenade
Frame: Color Club's Harp On It]
And that's my nails with a purple party going on inside a silver picture frame. :)


Apr 21, 2014

Fiery Glam - Emily de Moly A Beautiful Mistake, Color Club Gingerbread


There's nothing quite so old-school attention-catching as bright red nails. Even more so when it comes with generous helpings of glitter and holographic goodness!

[Bottle to nail: Emily de Molly A Beautiful Mistake (2 coats)]
This here is A Beautiful Mistake from Emily de Molly. A gorgeous red jelly packed with different sizes of red holographic hexes. The holo doesn't show as clearly as I would like but you do get glimpses of it depending on the angle and lighting.

[2 coats: Emily de Molly A Beautiful Mistake]
Formula was good an the glitter spread evenly. I think this was two coats.

[Base: Emily de Molly A Beautiful Mistake (2 coats); Tips: Color Club Gingerbread]
Being the magpie that I am, I couldn't help adding a bit of glitter to the tips. This is Color Club Gingerbread, a gold and holo glitter combination. I dabbed it on to make a mini glitter gradient. A very bright and festive combination!

Jan 6, 2014

Subtle Sands - Color Club Love 'Em Leave 'Em


Another holo, you say! Oh dearrr... Am I going to run out of holo swatches soon? I think not! =p Gotta love all that rainbow bling~

[Bottle to nail: Color Club Love ' Em Leave 'Em (2 coats)]
This one's an oldie from Color Club's Wild at Heart collection - Love 'Em Leave 'Em. There were quite a few holos from Color Club around that time but with a more subtle flame than the more recent Halo Hues collections.

[2 coats: Color Club Love ' Em Leave 'Em]
Anyway! Love 'Em Leave 'Em is a soft warm gold-beige shade with fairly subtle holographic sparkle all through. It's quite linear but not all that visible except in direct sunlight.

[2 coats: Color Club Love ' Em Leave 'Em]
Formula was thin but covered well in two coats although may possible need three on longer nails. A very nice work-appropriate shade!

Dec 25, 2013

Happy Happy Joy Joy - Mode Vicious Venom, Color Club Wish List Red, Glam Polish Big Bang Theory


HAPPY HOLIDAY-OF-YOUR-CHOICE!! =) Here's a Christmas tree inspired manicure that I slapped together for the silly season.

[Bottle to nail: Glam Polish Big Bang Theory over Mode Vicious Venom, Color Club Wish List Red]
I won't say too much about it, but basically it's a base of 2 coats of Mode Vicious Venom (previously used here) and then Color Club Wish List Red (reviewed here) striped over the top using the tape method.
 
[Base: Mode Vicious Venom (2 coats); Stripes: Color Club Wish List Red (1 coat);
Ring finger: Glam Polish Big Bang Theory (1 coat)]
I then edged the red with LA (previously used here) before topping off the ring finger with a coat of Glam Polish Big Bang Theory! I thought the assortment of round glitters in BBT would look awesome as baubles on the "tree"!

[Base: Mode Vicious Venom (2 coats); Stripes: Color Club Wish List Red (1 coat);
Ring finger: Glam Polish Big Bang Theory (1 coat)]
Hope y'all are having a great time and filling up on yummy food and catch-up time with family and friends! Mwaahhh~!