 |
| [Floral Nail Foil Strips from OMG Nail Strips] |
 |
| [Floral Nail Foil Strips from OMG Nail Strips] |
 |
| [Packaging and Instructions: Floral Nail Foil Strips from OMG Nail Strips] |
Instructions
1. Clean and manicure nails and cuticles prior to applying nail strips
2. Peel nail strips from the flat side of the strip, the rounded side will be placed just above your cuticles.
3. Place the round side of the nail strip at the base of your cuticle. Applying pressure from the middle of the cuticle press around in one direction and then the other.
4. Holding the nail strip at the cuticle base stretch the nail strip over the tip of the nail while smoothing out any creases on the side of the nail.(foils need to be stretched more than polish strips to reduce bubbling)
5. Using a cuticle pusher tuck the nail strip in along the cuticle base.
6. Hold your nail so it is facing up and use a thin fine grain nail file, filing in a (downward only) direction to remove the excess nail strip from the tip and around the sides of your nail.
7. Now that your nail foil is applied use a hair dryer on high heat and your finger to smooth out any remaining imperfections. (for Nail Polish Strips heat is not necessary but you will want to apply two coats of clear coat to increase longevity.)
Now... onto the images!
Prior disclaimer: this is the absolute first time I've ever tried applying nail foil strips so take from that what you will! ;)
 |
| [No topcoat: Floral Nail Foil Strips from OMG Nail Strips] |
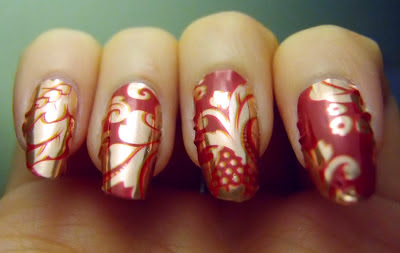
I'm fairly impressed by the design. I couldn't spot any pixels just by eye and the contrast between the golden foil and duller red background looked really good. If you're being nitpicky, the images don't line up perfectly (for example on my ring finger where it looks like there's a closely overlapped shadow of the image), but this is not obvious on the nail.
Size:
As I've mentioned - generous sizing! I actually only used the two biggest strips and the third smallest to do this one hand because I have fairly slim nails so there was plenty to go around. I did leave my nails fairly long so that I could get most of the pattern on it so this is a consideration as well.
 |
| [No topcoat: Floral Nail Foil Strips from OMG Nail Strips] |
Now... I'm a total n00b when it comes to nail foils but I didn't find it very difficult. I did figure out that I should have done a few things better, but I'll get to that later.
On my flatter nails (thumb, middle, ring), applications was super easy. Just line it up and smooth it out from the middle outwards. I just used my nail to smooth it out rather than a cuticle pusher. I then pulled it taut over the free edge and carefully filed off the excess using a glass file.
It was a bit more difficult on my super curved index finger (which I've complained about before!) so there's a lot more wrinkling going on there.
 |
| [With topcoat: Floral Nail Foil Strips from OMG Nail Strips] |
You need topcoat over nail foils to reduce lifting and prolong wear! Jme has mentioned that which topcoat you use matters! I wanted to test it out so if you look at the above photo, I have a quick-dry (Seche Vite) on my thumb and a non-quick dry on the other fingers.
With quick-dry you end up with wrinkling and slight dulling of the golden parts of the foil. The non-quick dry does not change the appearance of the foil.
HOWEVER, you can actually use quick-dry if you want this effect! The gold takes on an antique gold foil look and the textured surface helps a bit in hiding wrinkling from application.
 |
| [Quick-dry topcoat (thumb) vs Non-quick-dry (others] |
Things I've learnt from this:
1) Make sure you cut the strips to the right width for your nail. Or slightly smaller, even, because it makes a big difference in reducing wrinkles!
2) Pull the strips as taut as possible and bend it down over the free edge so it wraps slightly.
3) When filing off the edge, file only downwards in smooth motions, moving from one side of the nail to the other. This helps a lot with preventing lifting.
4) Topcoat matters!
Overall, I think this is a cheap, quick and easy way to get a fancy look on your nails, provided you don't have nails which are too curved. The nail polish strips seem to have better stretch and application (possibly also because wrinkles are more apparent with the foil finish) so that might be an option too!
Personally, I need to figure out how to apply them better on curved nails before I can get practical use off them! I'd appreciate any tips and tricks anyone might have!
Check out OMG Nail Strips (FREE SHIPPING, y'alls!) or their Facebook page to get an idea of what other bloggers have been doing with their nail foil strips! =)


0 comments:
Post a Comment