; Plisherrific: July 2013

Jul 29, 2013

Holo Hunting - Born Pretty Holo Polish #12


I'm back with another polish review from Born Pretty! When I saw their latest holo collection, I was super impressed by the colour range and holo flame visible. Jme and I were lucky enough to be provided with some bottles for review and she previously posted about shade #6, a pretty peach holo, so if you missed it, you can check it out here!

[Bottle to nail: Born Pretty Holographic Polish #12 (2 coats)]
I, on the other hand, went for a dark shade in comparison. Here's Born Pretty Holographic Polish in 12#, an amazing deep green holo. I heard that this is a great sister polish to Glitter Gal's Lizard Belly, another dark green holo polish, but with much more green to it (Lizard Belly is very much a blackened green). I love green, and I love holos - match made in heaven!

[2 coats: Born Pretty Holographic Polish #12 in diffuse (top) and direct (bottom) light]
Shadewise, #12 is not a bright green. My photos are not super accurate unfortunately (the site product photos are fairly accurate) and I'll explain why in a bit. Under diffuse lighting (top photo), you can see the actual base shade which is a slightly dusty hunter green in a blackened blue base. Under direct lighting, the holo flame appears and the middle of the flame (the blue of the rainbow) is very distinct, giving the polish a much bluer/teal cast than the actual deep green polish shade.

[2 coats: Born Pretty Holographic Polish #12]
Application was really good! I was really pleased with this. All these photos are two coats except for on my ring finger which I tried three on. In this photo, it looks like the ring finger has a much deeper colour, making the holographic particles more obvious. However, in real life, it's hard to see any difference between 2 and 3 coats.

[2 coats: Born Pretty Holographic Polish #12]
The polish applied evenly in thin coats and dried extremely shiny! You didn't really need topcoat but I put a layer on anyway because I want this to last on my nails! You can sort of see it from my photos, but shade 12# is not a completely linear holo (that is, having a distinct flame shape). It's kinda a mix between linear and scattered holo, leaning more towards being a linear holographic polish.

These holo polishes normally $12.88 at Born Pretty, but are currently on sale for $5.59, yayyyy!! Check out this shade here, or see all 12(!!) of them here!

Born Pretty stocks lots of awesome nail art supplies as well, so do check out the other things for sale (and on sale!). Have a look at our previous reviews for Born Pretty for ideas. Once again, here's our discount code if you wanna take a little bit off your purchases! ;)

Jul 25, 2013

Treasure Chest - Sinful Colors I Dream In Jewels

Here's another nail polish from Sinful Colors' Diamond Lust collection!

[Top: Two coats of Sinful Colors I Dream In Jewels
Base: Kleancolor Metallic Black]
This is Sinful Colors' I Dream In Jewels. It has gold and red  hex glitter and big silver holo diamond glitter in a clear base. I do like this glitter polish (not just because it has Iron Man colours ahahaha). The gold and red combo goes together nicely of course and the extra diamond glitter gives it an extra zest.

[Sinful Colors I Dream In Jewels with its bottle]
This mani has two coats of I Dream In Jewels over Kleancolor Metallic Black. The gold and red glitter is really dense, but the diamond glitter is definitely a little more sparse, as you can see from the glitter in the bottle. The diamond glitter aren't hard to get out though, you don't actually need to fish for them. You might have to dip the brush back in again if it doesn't have any diamond glitter, but it shouldn't be too hard to get some on the brush.

[Top: Two coats of Sinful Colors I Dream In Jewels
Base: Kleancolor Metallic Black]
Overall, I like this nail polish! It isn't a topcoat eater and it looks really pretty against black. It's not overly complicated and I don't have anything like it yet.

Check out swatches of Gemtastic and Crystal Clear from the same collection done by Ev!

Jul 24, 2013

Deep Blue Sea - Sinful Colors Gemtastic


Here's my second swatch from the Sinful Colors Diamond Lust collection, which I spotted at Kmart last week selling for $4 a bottle. For photos of the 6 polishes available, check this post. I posted swatches of Crystal Clear on Monday so if you missed that, check that out too!

[Bottle to nail: Sinful Colors Gemtastic (1 coat) over black]
Gemtastic is a mix of different shapes of blue glitter in a clear base. There are three glitters of the same shade of blue, in the shape of small hexes, small bars and very fine hexes (?). There's also a lighter blue larger hex glitter in the mix.

[Base: LA Girl Blackout (1 coat); Glitter: Sinful Colors Gemtastic (1 coat)]
These photos are all one coat of Gemtastic over a black creme! This polish is chockers with glitter and you could easily achieve full coverage. However, that would mean you can't see all the detail from all the different shapes.

[Base: LA Girl Blackout (1 coat); Glitter: Sinful Colors Gemtastic (1 coat)]
I didn't really have a problem with glitter placement on this one, it was easy to use although be careful of extra polish running down the brush handle! All the glitter lays flat despite the slight reflective curl in the larger hexes.

[Base: LA Girl Blackout (1 coat); Glitter: Sinful Colors Gemtastic (1 coat)]
In person, it's super sparkly! I've always loved bar glitter but they tend to curl off the nail and stick out. The bars in Gemtastic are tiny enough that there's no problem here though! A very pretty polish that I'm looking forward to trying out with different base shades!

Jul 22, 2013

Space Lasers - Sinful Colors Crystal Clear


As promised, here's the first of my swatches from the Sinful Colors Diamond Lust collection. This super pretty glitter mix is Crystal Clear. Somehow I find the name doesn't quite suit, although I can see how the silver holo glitters and clear base would inspire the name. I think it's the bright blue that really catches the eye in this polish.

[Bottle to nail: Sinful Colors Crystal Clear (1 coat)]
Sinful Colors Crystal Clear is a mix of small silver holographic hex glitter, with large silver holographic diamonds and a ton of fine iridescent bar gltiter that shifts from a bright blue to a more teal shade depending on the angle.

[Base: LA Girl Blackout (1 coat); Glitter: Sinful Colors Crystal Clear (1 coat)]
These photos are all one coat of Crystal Clear over a plain black creme. Great glitter density, but might require a bit of dabbing to get the glitter particles exactly where you want them. I used one thin coat of topcoat but it got soaked up pretty quickly (although the finish is still very shiny) so I'd recommend a thicker topcoat for maximum smoothness.

[Base: LA Girl Blackout (1 coat); Glitter: Sinful Colors Crystal Clear (1 coat)]
It looks really great in person because the fine blue bars really light up the polish. I'm super impressed despite having reservations when I first saw it in the bottle. I don't have anything else like it in my collection, that's for sure. Definitely pick this one up if you can get your hands on it!


Jul 21, 2013

Shopping in Sydney - Sinful Colors Diamond Lust collection


Quick heads up! I was at Kmart two days ago and found that their Sinful Colors stand now stocks the Diamond Lust collection! This is a collection of 6 glitter mixes including holo diamonds and bar glitter! Each bottle retails for $4 (compared to $4.95 at Priceline, which I haven't seen stock these yet anyway). Sorry for the phone pics, but here's a little peek at them! Swatches to be posted throughout the coming week!

[Sinful Colors Diamond Lust: Crystal Clear (left) and Scene Stealer (right)]
On the left is Crystal Clear, a mix of small silver hexes, large silver holo diamonds and a ton of absolutely gorgeous iridescent teal-to-blue bar glitter. I'll be posting swatches of this tomorrow, so watch out! On the right is Scene Stealer, a mix of small orange-gold and pink hexes with large pink(?) holo diamonds. The pink hexes are actually a little bit smaller than the orangey gold ones. 

[Sinful Colors Diamond Lust: Rags to Riches (left) and I Dream in Jewels (right)]
On the left is Rags to Riches, a mix of small green and gold hexes, larger blue holo hexes and large blue holo diamonds. On the right is I Dream In Jewels, a mix of small gold and red-bronze hexes, and large gold holo diamonds. The red-bronze hexes are much tinier than the gold ones.

[Sinful Colors Diamond Lust: Gemtastic (left) and Queen of Deco (right)]
Finally, on the left here is Gemtastic, a super dense mix of three glitters of the same colour (tiny glitter, tiny bars, small hexes) and larger hexes of a slightly lighter blue. This one has no holo/diamond glitters. On the right is Queen of Deco, a mix of small pale purple and silver glitter with pale purple holo diamonds. A bit of a sister-polish to I Dream In Jewels.

I only saw six colours in the display - the collection has 8 colours, missing are Watch It Shine (silver-based) and Shine on Me (pink-based). You can spot these pretty easily by their bottle cap, these are silver instead of the regular black caps on Sinful Colors polishes! Jme and I will have some swatches up throughout the coming week so keep an eye out for that!

Jul 18, 2013

Shifting Meadows - Savvy Galaxy

Savvy Galaxy caught my attention recently, and with the 'buy 2, get 1 free' sale at Priceline, I couldn't resist!

[Galaxy Savvy]
Savvy Galaxy is a blue-green duochrome foil with tiny holo flakes. The colour isn't like the numerous Chanel Peridot or OPI Just Spotted The Lizard dupes, and closer to the China Glaze Deviantly Daring colour. But it does have a stronger duochrome shift than Deviantly Daring.

Unfortunately, the flakes are practically non-existent in Galaxy. You can see occasional glimmers of them, but they're really small, so they hardly stand out sadly. I tried to photograph them here:


The little bits of shiny you see are the flakes.

So is Galaxy worth buying? Well, without the sale, it's only AUD3, so it's rather cheap anyway. If you don't have anything similar, it is plenty pretty. But if you do have something similar and just wanted it for the flakes, I would recommend giving it a pass.


Jul 17, 2013

Neon Schnapple - Nail Pattern Boldness Flipping Out Hard, OPI, Australis


After testing out OPI Who The Shrek Are You and Australis Limited Edition 2 (in Monday's post), here's what I layered over it!

[Bottle to nail: Nail Pattern Boldness Flipping Out Hard (1 coats) over OPI/Australis]
When I did this manicure, I was in the mood for brights! To counter this coooollllldddd weather! So I grabbed Flipping Out Hard from Nail Pattern Boldness to layer over the top!

[Base (2 coats): OPI WTSAY (middle and pinky), Australis Limited Edition 2 (index and ring);
Glitter: Nail Pattern Boldness Flipping Out Hard (1 coat)]
Flipping Out Hard is a combination of neon yellow and blue (matte?) glitter. This is just one coat! You can also build it up to full opacity in 2-3 coats. This is the same colour combination as Nailventurous' Floam, just in different ratios of glitter colours. Jamie has posted an excellent gradient manicure using both Flipping Out Hard and Floam in this post here!

[Base (2 coats): OPI WTSAY (middle and pinky), Australis Limited Edition 2 (index and ring);
Glitter: Nail Pattern Boldness Flipping Out Hard (1 coat)]
This dries pretty gritty though, so slap on the top coat for a shiny perfect finish! You can still vaguely pick out differences in base shade between OPI WTSAY (middle and pinky) and Australis Limited Edition 2 (index and ring). The addition of yellow glitter over the top of the green polishes really make them pull a lot yellower than before!

Jul 15, 2013

Og-really? - Dupe Test: OPI Who The Shrek Are You + Australis Limited Edition 2


It's another dupe test! At first glance, Australis Limited Edition 2 and OPI Who The Shrek Are You (WTSAY) seem to come from the same family of yellowed greens, but when you put them side by side, check it out!

[Bottle to nail: OPI Who The Shrek Are You]
OPI WTSAY definitely pulls a lot more yellow, making Australis Limited Edition 2 look much more grassy then it would look on its own.

[Bottle to nail: Australis Limited Edition 2]
Here's another comparison to the shade in the bottle. It appears that the more lit up part of the bottle resembles OPI WTSAY more, but on the nail, it's definitely a deeper, greener shade.

[1 coat: OPI Who The Shrek Are You vs Australis Limited Edition 2]
With regards to formula... I have to say, I purchasd OPI WTSAY for the unique colour when it first came out, but the formula was a bit hard to work with. At one coat, it's still patchy and somehow watery and gluggy at the same time. Eek! Australis Limited Edition 2 on the other hand was a great creamy formula which covered well in one coat.

[2 coats: OPI Who The Shrek Are You vs Australis Limited Edition 2]
At two coats, the issues with OPI WTSAY smooth out (ha!), and you get a nice glossy finish. Dry time is a bit slower than I'm used to. The colour of Australis Limited Edition 2 deepens nicely with two coats. Dry time is not too bad, but the formula is thick-ish so it's not super fast.

In general, definitely not dupes! OPI WTSAY is hard to work with, but worth if if you're after that unique ogre green! Australis Limited Edition 2 is great if you can pick it up in bargain bins like I did - it's a pretty grassy green shade that's bright without being TOO bright~ =)


Jul 11, 2013

Seaside Glass - OPI Get Your Number

I found some old photos which I quite like, which I somehow forgot to post! So here we go:

[OPI Liquid Sand Get Your Number]
This is OPI's Liquid Sand Get Your Number. I love patting the rough texture on these polishes, which is possibly a strange reason to like a nail polish, but still valid for me. :)  Get Your Number is glittery while still classy. Helps that the blue-greeny holo sand-like glitter is just so pretty too.

I thought I would then try Get Your Number over Revlon Typhoon:

[Top coat: OPI Liquid Sand Get Your Number
Bottom coat: Revlon Typhoon]
It's not as gritty when layered over a blue base polish, but it's still an interesting effect.

This reminds me that I have to try the remaining two OPI Liquid Sand polishes! :D

Jul 8, 2013

Rose Sparks - Savvy Razzle & Dazzle


This is a gorgeous polish I picked up at Priceline just last week! =) Savvy has been coming out with lots of dupes recently and this one, Razzle and Dazzle, looks to be a pretty spot-on dupe of A England She Walks in Beauty.

[Bottle to nail: Savvy Razzle & Dazzle (3 coats)]
In the bottle, the polish looks a bit odd, like clumpy? Unmixed? But don't worry if that's what you see - this is how it's meant to look like! I think it's due to the extremely high density of tiny gold particles in the clear base. As you can tell from the photo, it also looks like some green-gold duochrome action is happening there. In addition to the gold, there's also large and small dusty pink hexes in Razzle & Dazzle.

[3 coats: Savvy Razzle & Dazzle]
You can probably wipe the brush off heaps and use it as a glitter topper, but here I've used it as a full mani. I've shown three coats, but with this nail length, it didn't look very much different from two coats.

[3 coats: Savvy Razzle & Dazzle]
The dusty pink hexes have a tendency to gather towards the tip of the nail as you pull the brush down, so my second and third coats were a mixture of brushstrokes and dabbling the glitter where I wanted it. Not that the formula was difficult to work with - I found it fine to use and dry time was average to quick.

[3 coats: Savvy Razzle & Dazzle]
Straight on, it's most definitely a pale gold with winks of pink, but at an angle as in the photo above, you can see some of green tinge. =) All the glitter laid flat and for three coats (plus topcoat), it actually isn't very thick on the nail at all.

[3 coats: Savvy Razzle & Dazzle]
My closeups sort of make it look patchy? But in real life, it isn't at all. Here's a crappy photo from afar to show you what it looks like. Basically, an EXTREMELY SHINY gold foil polish with hints of pink. If you're worried about patchiness, you could layer a gold foil underneath as well. =)

At only $3, this is a definite bargain! Savvy are certainly making bin-diving at Priceline an awesome experience... ;) Also, if I remember correctly, there's a 3 for 2 sale for Savvy products that began last Thursday. Bonus!


Jul 4, 2013

Hello Holo - Born Pretty Holo Polish #6

Yesterday, Ev posted some really gorgeous nail decals. She did mention that I had my own review in store, and here it is! Born Pretty were nice enough to supply me with a nail polish, and it's a holo too! This is Hologram Effect #6.

[3 coats: Born Pretty Hologram Effect #6]
Now isn't this a lovely sight to see~  Click on the photos for bigger pics!

[Born Pretty Hologram Effect #6]
Rainbow in a bottle! This is the 6ml bottle I received.

[3 coats: Born Pretty Hologram Effect #6]
Ah, look at that rainbowy goodness~ I had to take some of the photos a little out of focus to capture the holo.

I don't usually like light pink nail polishes, but I do like this one a lot. It's work safe while being gorgeous and lovely to look at. The base colour is a pale pink-peach colour, which matched my skintone really nicely. As the colour is rather light and the nail polish is jelly-ish, there's still a visible nail line even after three coats of nail polish. Admittedly, I think you would get better coverage if your nails aren't at this length and the VNL would be far less noticeable on shorter nails, what with all the distracting holographic pretty!

The holographic microglitter are dense and they are almost as good as Color Club's Halo Hues collection. They might actually have the same holo density, but it's harder to see on Born Pretty's because the holo doesn't stand out as much against such a light shade. Application was smooth and easy.

[3 coats: Born Pretty Hologram Effect #6]
I took this photo at work and I thought it came out looking really pretty! My work has really great lighting...

Born Pretty's Holo Polish is their first own brand polish line. As you can see below, they have an interesting range of colours, and I'm actually eyeing a few others to buy for myself.


These holo polishes are currently on sale at Born Pretty, going for $5.59 instead of $12.88. And hey, hey, hey, we have a discount code for you!


Enjoy! :)

Jul 3, 2013

Spinneret Sparkle - Orly Rococo A-Go-Go + Born Pretty Water Decal Review


I'm back with another product review generously supplied by Born Pretty. After our last review on nail studs, Jme and I decided to try some different items so today I've got some water decals to try out! Warning: Long and picture-heavy post ahead!

This one's called the "6pcs Gold Cobweb Lace Nail" and can be found under the "Water Decals Sticker" section. All 6 sets are connected together in one sheet and mine arrived a teensy bit crumpled, but everything was still useable.

Instructions are on the plastic packaging so if you want to hang on to them, make sure not to chuck it out. There are instructions online anyway, much better translated (as you can probably tell!):

1. Paint the background color on the fingernails and dry it out.
2. Remove the film of product,cut out the patter and plunge into water 10-20 seconds.
3. Moisten the fingernails, stick the patter in position.
4. Sop up the water with a paper towel and blow dry.
5. Cap with clear nail polish and blow dry.

Let's take a look at the designs then (click to see them larger)! Note that each set seems to be roughly arranged in rows of 5 decals of appropriate sizes for one hand, which is super useful as you don't have to fuss with sizes for each different nail size.

There were two sets of cobweb-type patterns, with 25 decals each which is a super generous amount! The one on the left has larger partial webs, while the one on the rights has full and partial webs with an adorable little spider on one decal from each set of five.

The left side is a concentric circle design (water-ripples?), the right side has a very pretty scaled pattern which looks like traditional oriental dragon designs. Both these sets have 20 decals each

These two are pretty similar cross-hatch designs with dot/semi-circle edgings. The one on the left is more curved and has 25 decals, while the right side is straight across with 20 decals.

I found it much easier to just chop up the large sheet by pattern and store them that way. Each chopped up section measures roughly 5cm x 6cm. On Monday, I showed you Orly Rococo A-Go-Go, my chosen base colour, so let's get on to water decal application!

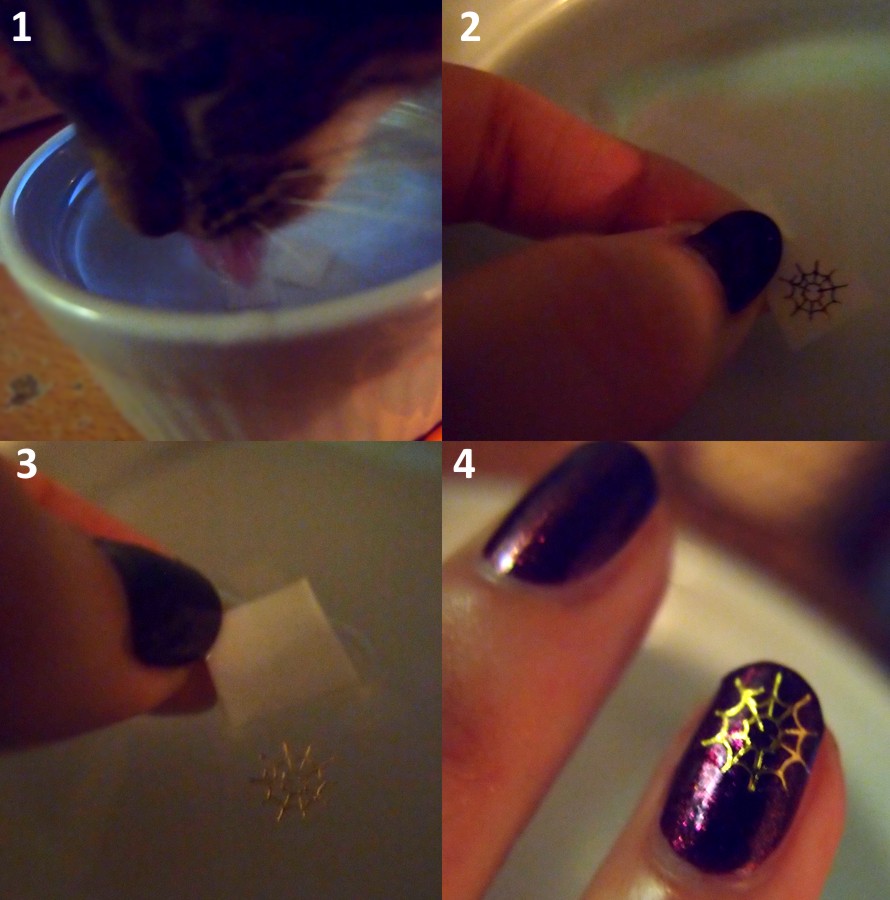
Step 1: Stop kitten from drinking the water!
Step 2: Cut out your desired pattern (does not have to follow design closely - the edge of the film closely follows the pattern so you don't have to worry about that). Soak pattern in water.
Step 3: I used warm water, and in 12-15 seconds, the film slid off easily. Test this by sliding your finger across the surface. These decals are fairly hardy so don't stress too much about destroying it!
Step 4: Dip nail surface in water to wet, and place decal over. I just used fingers and moved it around. It's super easy to reposition, and tough enough not to wrinkle up. Basically, you have A LONG TIME to play around with it. Your playtime ends when all the water has dried or you blot it all off with paper towel.
Step 5: Make sure everything is completely dry, topcoat and you're done!

Here's the spiderweb pattern from the top of the sheet, with the little spider on it. I just used the exact order the row came in. You can't even make out the film from the nail surface after topcoat - I love it!

Now, remember step 5...? Well, my index finger wasn't quite dry, so when I topcoated it, some of the decal actually came off with my topcoat, eek! So do make sure your nail is completely dry before topcoat!

On my other hand, I used the other cobweb pattern. I found this set a bit harder to position because the web "anchors" didn't quite go from one end of my nail to the other. Still very pretty and especially gorgeous against Rococo A-Go-Go.

I love water decals - they just look awesome (especially these metallic gold ones) and are super easy to use. Here's the link again to these particular ones. At $2.99 for 6 different designs, they're definitely a bargain. But wait! There's more! Here's our 10% off code if you'd like to try them out for yourself even cheaper! ;)


In tomorrow's post, Jme's going to show you what she tried out! *drumroll* Check out that packaging - nothing's going to get damaged in there! =) Tune in for more, coming up soon~