; Plisherrific: August 2012

Aug 30, 2012

Summer Drink - Savvy Ginger Ale

I was looking over my photos, and I just realised how few photos I have taken this month! I really have been slacking off with my manis. :(

Here's one of my relatively new polishes from Savvy. It's not summer now, but writing Ginger Ale so many times in this post is making me thirsty for a cool drink on a hot day!

[Savvy Ginger Ale
Ring finger: Ginger Ale over blue polish]
Savvy Ginger Ale looks like a dupe of Sally Hansen Big Money, but I don't actually have Big Money so I can't say how close they are. I do like Ginger Ale in that it's not flashy glittery. It's a subtle champagne gold with lavender glitter. It's almost like foil, and it applies thin and easy with full coverage in two coats.

[Savvy Ginger Ale
Ring finger: Ginger Ale over blue polish]

It looks brighter under my lovely fluorescent lights:

[Savvy Ginger Ale
Ring finger: Ginger Ale over blue polish]
AUD3 for a 10ml bottle. Isn't that value for money? :D

Aug 29, 2012

Lavender Invasion - ORLY Lunar Eclipse, Sally Hansen Be-Jeweled


Mini-Wednesday post! Here's how I updated my mani a while ago - the original one is posted here.
[Base: ORLY Lunar Eclipse + Spectraflair topcoat; Tips/Accent: Sally Hansen Be-Jeweled]
At the time I had just purchased Sally Hansen Gem Crush in Be-Jeweled and was itching to try it out. So I did some quick tips and an accent nail (check out that shrinkage though, eeps) over my existing mani. I did later swatch Be-Jeweled on its own here... and that's it! =)

Aug 27, 2012

Stardust - Mode Gothic Crown


A simple swatch today - I think I've mentioned before, but I've been pretty impressed with some of Mode's offerings. Mode can be found in selected pharmacies for AUD2.45 and they have an impressive colour range. I picked up a couple of glitters and heavy shimmers which have so far not disappointed!

Here's Mode Gothic Crown, a black jelly base absolutely jam-packed with silver glitter.

[Bottle to nail: Mode Gothic Crown (2 coats)]
I am so impressed with this polish - the black does not drown out the sparkle at all and the density of the glitter is amazing. I think this was two coats... Perfect formula, dried fast and SMOOTH!

[2 coats: Mode Gothic Crown]
The interesting thing is the glitter isn't really round or hex - I can't quite make it out but it looks somewhat rectangular? But more irregular-like... It could be what angle you view it at though!

[2 coats: Mode Gothic Crown]
Highly recommend picking this up, along with Mode's Vicious Venom (green glitter, again jam-packed) and Rock Me Sweet (magenta and silver glitter in magenta jelly base)! Also... how sexy is that name! Gothic Crown, mmmm! =D


Aug 23, 2012

Getting that Gleam - Orly Rococo A-Go-Go, AnnasArtAsylum 481804

I'm writing this post through a headache, so I hope it makes sense! D:

Warning: Orly's Rococo A-Go-Go will not look like that on your nails:


But it will if you add a coat of colour shifting polish! The colour shifting polish is shown in the bottle below.


Basically, I bought Orly's Rococo A-Go-Go awhile ago and was a little disappointed by how it looked on the nails.

[Orly Rococo A-Go-Go]

While it's a nice deep magenta colour, it lacked the awesome gold shimmer that is very much present in the bottle.


[Orly Rococo A-Go-Go]
Under bright indoor lights, the colour is rich and deep, but the gold shimmer is still sadly lacking. Do ignore the horrid tip-wear.


[Base: Orly Rococo A-Go-Go
Top coat: AnnasArtAsylum 481804 franken]
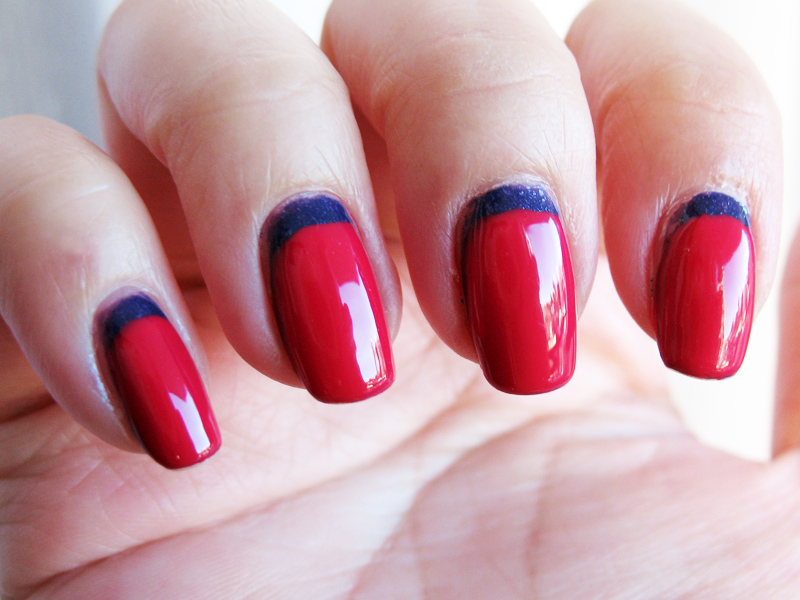
But a coat of colour shifting (or colour morphing, as it's called by some) franken and it really does look like Rococo A-Go-Go in its bottle. The top coat is a polish I made out of AnnasArtAsylum's 481804 pigments and clear suspension base. The colour shift when layered against black is dark pink-red to gold. When layered over Rococo A-Go-Go, it looks a bit more plummy-red.


[Base: Orly Rococo A-Go-Go
Top coat: AnnasArtAsylum 481804 franken]
Isn't the colour shift astonishing? It's so gorgeous! I couldn't help but take dozens of photos of this mani, and I had to restrain from posting them all. I find that colour shift in duochrome polishes is hard to photograph under indirect natural sunlight, but this one certainly flexes its muscles under any lighting.


[Base: Orly Rococo A-Go-Go
Top coat: AnnasArtAsylum 481804 franken]
Under bright indoor lighting, the colour shift is pretty solid as well.

All I need is more suspension base to make more frankens with the other pigments I bought!

Aug 22, 2012

Glitterazzle-dazzle - Milani, Nabi, Canmake, Kleancolor, Picture Polish, Nailventurous


So I often play around with layering glitters so I end up with lots of photos of glitter layering skittles. I tell myself it's to remind me what they look like for the next time I'm looking to layer on some glitz... Although... whether I can correctly remember the combinations might be another matter entirely...

Here's a selection of skittles I've done!

From left to right:
[1] Milani Teal from the One Coat Glitter collection, possibly over Essence Blue Addicted. Excellent depth but formula can be a bit thick.
[2] Picture Polish Mask-a-rade over a black creme (LA Girl Blackout). Mask-a-rade is a combo of three different multichrome glitters. You can sort of see the colour shift in the photo.
[3] Nail-Venturous Floam... no idea over what... O_o;; Floam is a combination of blue and yellow matte glitter.


From left to right:

[1] Nabi Party Mania Glitter over a plain black creme (LA Girl Blackout). Party Mania is a black jelly base with a combo of 3 different-sized hex glitters in blue, gold, silver, yellow and magenta. I somehow didn't get any magenta on this skittle. There's also a sprinkling of large green hexes which I also did not pick up. An interesting one, for sure! Not super dense on the glitter so strictly a layering glitter.

[2] Oh deaar... This is some blue base possibly also Essence Blue Addicted... then topped with Canmake 30, a blue jelly with loads of iridescent glitter (the stuff flashing blue and gold). THEN, topped with a layer of Nabi Lilac Jumbo Glitter... which is a crazy mishmash of three sizes of gold-green duochrome glitter and purple holographic bar glitter.

[3] This is a base of Kleancolor Chunky Holo Scarlet (previously posted here) and then topped with Nabi Lilac Jumbo Glitter like the middle skittle.

Geeeee, that took longer than I expected to type out... My glitter polishes are taking over the collection, oh no! Oh, who am I kidding...MORE LIKE OH, YEAHHHHH~ ;D


Aug 20, 2012

Suede Sweater - OPI Russian Navy Suede, Nails Inc Chelsea Embankment, LA Colors 24K Glitter


Here's some simple nail art for Monday. It's unfortunately not a very long-lasting one on account of the OPI suede polish, but the glitter and suede combo makes for an interesting contrast!

[Base: OPI Russian Navy Suede; Accent: LA Colors 24K Glitter; Tips: Nails Inc Chelsea Embankment]
I started with a base of OPI Russian Navy in their Suede finish. I think this was two coats but you can get away with one careful coat depending on your nail length. I love using mattes when I'm in a hurry because they dry superfast! Too bad about the (lack of) longevity though...

[Base: OPI Russian Navy Suede; Accent: LA Colors 24K Glitter; Tips: Nails Inc Chelsea Embankment]
On the ring finger, I did a crosshatch pattern freehand with LA Colors 24K glitter which is part of their nail art Art Deco range. This is a fine yellow-gold glitter in a clear base.

The last step was freehanding some french tips with Nails Inc Chelsea Embankment. For all intents and purposes, Chelsea Embankment is just any other pale gold glitter in a clear base but for some reason, I really like it! It has a very pure gold shine to it and seems very refined while glittery, possibly due to the fine glitter size.
[Base: OPI Russian Navy Suede; Accent: LA Colors 24K Glitter; Tips: Nails Inc Chelsea Embankment]
I did end up topcoating the accent finger to see what it would look like. The shimmer in the OPI Suedes really comes to life when you add topcoat but as I mentioned earlier, I quite like how it looks with the matte suede and glitter combination without topcoat!


Aug 16, 2012

Royal Temptation - Revlon Royal Cloak, Tropical Temptation

This is a Revlon combo today!

[Revlon Royal Cloak]
Ev had posted pictures of Revlon Royal Cloak before too! My pictures turned out a little darker than it really is in real life. I do like how Royal Cloak looked, to my surprise. It's a dusty purple with very faint, small gray flakes. It just looks that bit more interesting than a regular creme purple.


[Purple: Revlon Royal Cloak
Pink: Revlon Tropical Temptation]
After a couple days, I added Revlon Tropical Temptation over it free-hand, to make a crescent manicure. I do like the colour comination!


[Purple: Revlon Royal Cloak
Pink: Revlon Tropical Temptation]

Hope you liked it!

Aug 13, 2012

Red Galaxy - Flormar Supershine Miracle U12, NYX Girls Dreamy Glitter


Is this another questionable layering experiment? Who knows!! I thought it didn't turn out toooo bad myself...

[I thought it looked vaguely galaxy-like... Emphasis on 'vaguely'...]
I started with a base of Flormar Supershine Miracle U12, an amazingly dense red foil with heavy gold shimmer. You could probably get away with one carefully applied thick coat but I used two to deepen and even out the colour.

[Bottle to nail: Flormar Supershine Miracle U12 (2 coats)]
The upper image with the bottle is under extremely diffuse lighting so the shininess isn't as obvious so I took the second one with a bright source to show the extreme glitteriness you get with this polish!

[2 coats: Flormar Supershine Miracle U12]
I was super impressed with the three Flormar polishes I picked up but ALAS, they shut their physical stall in Parramatta soon after I purchased these and their online store only has limited shades available.

[Base: Flormar Supershine Miracle U12 (2 coats); Glitter: NYX Girls Dreamy Glitter]
I then popped on one coat of NYX Girls Dreamy Glitter, one of my favourite layering glitters, plus a bonus layer of LA Girl Glitters in Uninhibited on the ring finger. I do like testing out strange glitter combinations... but most of the time the results are.... questionable! =p


Aug 10, 2012

Friday Favourites - Ring a ding!

This post is a little bit of a cheat since I'm not featuring any particular nail polish. Instead, I'm featuring my current favourite type of ring: Nail polish rings!

I made all of these and I just want to make moooaaarrr. I'm a bit short on time so I won't write out all the different nail polishes I used, but feel free to leave a comment asking for names if you like any one of these shades in particular. Click to see bigger pictures!


I love these so and have been wearing one almost everyday!

Aug 9, 2012

Flash Red - China Glaze Love Marilyn, Sally Hansen Celeb City

Here's a simple mani, but always a goody to me.

[Two coats of China Glaze Love Marilyn]
This is China Glaze's Love Marilyn from the Eye Candy 3D Glitters collection. Love Marilyn is full of fine red glitter with round silver glitter. It's opaque with two coats.


[Base: China Glaze Love Marilyn
Tips: Sally Hansen Celeb City]
I wear Love Marilyn for a few days, until it chips a little or I get bored - the latter is far more likely. Then I do my tips with Sally Hansen's Celeb City, which is a silver foil. I usually do it free hand.

I love this type of French mani, where I use a duo-coloured glitter bomb as the base, and one of those two colours as my tips. I've done it before in the past, but with a blue and silver theme instead.

Aug 6, 2012

Black and Yellow - China Glaze Yell-O-Neil, Konad Black Pearl, LA Girl Blackout


Yellow polishes are notoriously difficult to find in a good formula. Cremes tend to be fairly goopy but if you manage to find a nice opaque shimmer, it's often worth it! Jme has already posted about China Glaze Yell-O-Neil previously, but here's my take on it (plus some stamping!)...

[Excuse the lobster..]
China Glaze Yell-O-Neil is a lovely sunshiney yellow from the Surf Summer collection (China Glaze Golden Opportunity from the Operation Colour collection is another nice yellow shimmer, but a more muted version). I was trying to find this online but since the collection was released in 2007, it was a bit difficult to find. Luckily, we managed to pick it up at Pro Nail earlier this year. =)

[Bottle to nail: China Glaze Yell-O-Neil (2 coats)]
This was two coats - nail line is just barely visible in this. Check out those shimmer particles! This is such a happy colour. =)

[2 coats: China Glaze Yell-O-Neil]
It's a really good formula too, very even and not streaky. The colour is also very vibrant and opaque once you get two or more coats on. It's like this strange creme/jelly/shimmer mix...

[2 coats: China Glaze Yell-O-Neil]
You can see a bit of colour difference between the nail bed and free nail but I don't find it too bad.

[Base: China Glaze Yell-O-Neil (2 coats); Stamping: Konad Black Pearl; Tips: LA Girl Blackout]
Then I just stamped on a pattern with Konad Special Polish in Black Pearl and freehanded some tips with a plain black creme one-coater (LA Girl Blackout). That's it!