; Plisherrific: March 2012

Mar 31, 2012

Bottled Treasure - More Nail Polish's Coinage, L'oreal Emerald Carat

This is a lovely surprise pressie from Cathy at More Nail Polish. As you may know, my partner-in-crime-and-blogging Ev won Cathy's 'Inspired by' competition, and she was sent three amazing Lynnderella polishes as a prize. Along with these three bottles, Cathy also sent along her own custom nail polish, called Coinage, to be passed on to me. It was such a lovely surprise, and I can't begin to describe how delighted it made me! :D

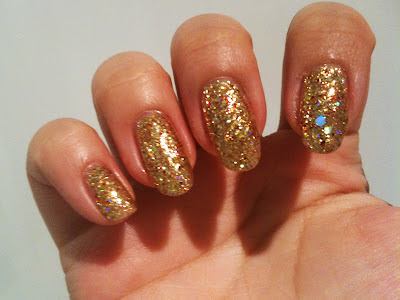
[Two thick coats of More Nail Polish's Coinage]
More Nail Polish's Coinage is so full of glitter, I hardly know where to start. It's really, epically shiny, something a few people took note when I was wearing it. A fellow I just met immediately passed a comment on how shiny it was at a meeting.


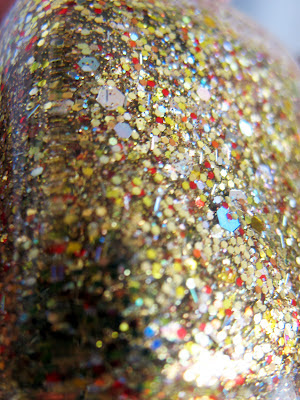
[Close-up of More Nail Polish's Coinage in its bottle]
The clear base is chock-full of gold hex glitter of different sizes and varying shades. There are also silver holo microglitter, large silver holo hex glitter, fine holo bar glitter, and red-copper hex glitter. Running between that all are very fine gold microglitter. It's easy to achieve a shiny, full coverage in two to three coats!


[Two thick coats of More Nail Polish's Coinage]
Coinage is a warm gold, and I think the red-copper glitter stands out and pulls the eye to the nails very well. The above picture captures the shade of gold best, I feel.

If only I hadn't broken the nail on my pinky finger. The uneven lengths is distracting, but I can't bear to cut the others so short.


[Close-up of More Nail Polish's Coinage on nail]
It's easier to see the different glitter in person and up-close. I'm afraid my photos aren't doing this much justice!


[iPhone photo: Two thick coats of More Nail Polish's Coinage]
As usual, I'm including a dodgy looking photo taken with my iPhone, in hopes that you can see some of the shininess that an in-focus shot never quite captures. However, the gold showing up in the iPhone photo is a lot lighter than it really is in person.

I decided to swatch Coinage over a slightly darker colour to see if I could get the fine, gold microglitter to stand out better.


[Base: One coat of L'oreal Resist & Shine Titanium Emerald Carat
Top: Two thin coats of More Nail Polish's Coinage]

Not a bad result at all! L'oreal Resist & Shine Titanium Emerald Carat is a dark bronze shade, with a green sheen and gold microglitter. Rather like a swampy green with a gold hue. It's a rather unusual shade to describe, but so very interesting to wear!

With Coinage layered over Emerald Carat, the overall result is a darker, blingy bronze-gold mani! The above picture is showing up darker than it really is in person, but even in the shade, the holo winks out faintly against the darker base. The big hex glitter flashes between pink-blue-green, so it's nice to capture some of it on photo.


[Base: One coat of L'oreal Resist & Shine Titanium Emerald Carat
Top: Two thin coats of More Nail Polish's Coinage]
This photo is truer to the colour in real life. Isn't it pretty? I don't know if it's my reading choice of late or just my fanciful imagination, but it makes me feel like I'm looking at a speckled golden dragon egg.


[Close-up photo on nail
Base: One coat of L'oreal Resist & Shine Titanium Emerald Carat
Top: Two thin coats of More Nail Polish's Coinage]
Set against a darker base, the close-up of the polish on the nail shows all the different glitter a lot more clearly.


[Base: One coat of L'oreal Resist & Shine Titanium Emerald Carat
Top: Two thin coats of More Nail Polish's Coinage]
And my mandatory iPhone picture for the great shininess!


This blog entry initially caused me a lot of grief, because all the photos I had taken vanished from my camera. I'm not sure what happened, but it's entirely possible that instead of C&P-ing the photos off my camera, I had accidentally pasted them back onto the camera, which will apparently delete the photos instead. So I'm missing all the one-coat, two-coats photos I had taken initially, and had to photograph them all again under poorer light. :(

Oh well, I'll just go stare at my shiny nails to cheer myself up! Thanks again to Cathy for the surprise gift! <3

Mar 30, 2012

Lynderella Loot - Happy HoloDaze!, Gotta Love Brains, She Lived in a Swamp


Hey guys hey guys! I haven't actually talked here about managing to win one of the prize draws in the nail art contest hosted by the wonderful Cathy of More Nail Polish! I have never never really won anything based on luck so I was super duper over the moon about winning the top 8 draw!

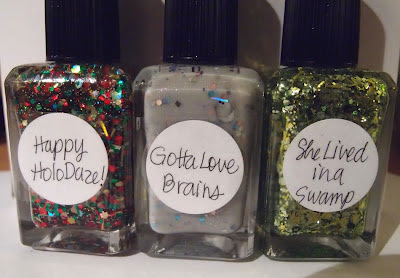
[OMFG LYNDERELLAAAAAA!!!!]
I received my amazing prize parcel early this week... LOOK AT MY LYNDERELLA GOOODIESSS! They are so absolutely gorgeous - just jam-packed with fabulous! My photo does not do them any justice at all!

I was working hard in the labs over at UWA all last week and I actually ran off and hid in a random bathroom so I could incoherently email back as soon as possible! Haha, how embarrassing! Thank you so much again for hosting the competition, Cathy! The entries were all incredible and I'm so so happy that both Jme's entry and mine got into the top 8.

Jme got a lovely surprise in the mail from Cathy as well which I'm sure she'll post about soon. She'll also be helping me swatch these beauties so watch out for our posts about them coming up sooooon! =D

Mar 29, 2012

Oh, A Delicate Flower - English Rose, LA Colors French White

Ev gave me heaps of manicure-related fun things for my birthday, and I have been playing with foils! While I had a number of good results, they are rather hard to photograph. The slightest imperfection just leaps out at me when I use macro. This is the least problematic of my latest attempts!

[Base: LA Colors French White
Top: English Rose foil from Dollarnailart]
Hullo, hullo! Very eye-catching, and I received heaps of questions on how I did it. This resulted in me giving impromptu 'What are foils?' speeches when I wore this.

Sadly, I forgot to clean up the topcoat around the nails, and I accidentally used the same pattern for my pinky finger and my ring finger, oops. O_O  Most of the flower patterns are very large, and cover my entire nail, but I preferred the whites to be more visible, so I cut accordingly of course.


[Base: LA Colors French White
Top: English Rose foil from Dollarnailart]
The English Rose foil is very slightly grey-ish and not entirely opaque on its own. I tried using a very pale grey as the base once, but it made the mani look too faded instead. When applied, the foil also has the faintest white-blue shimmer, which is interesting to see from up-close (right-up-to-your-nose-close is what I'm talking about).

Overall, I loved how this one looked, and I think it's easier to apply than most of the other foils. I'm craving a blue version of this, and will hold out hope that Dollarnailart will read my mind on this matter.

By luck, I found out that the clear topcoat from Blush-amour can be used over foils without causing the usual wrinkling. All my other base coats and topcoats, even the non-quick dry ones, caused some measure of wrinkling.

Oooh, and here's a sweet piece of news! Iroshi gave us a Butterfly Award for our blog! :D  Thanks, Iroshi! It's an honour, and terribly flattering too!
Well, this entry seems so sparse of photos today, so I'll just include a random photo I took...

[A slice of Sydney at dawn]
This is very much a 'G'morning, Sydney' photo. So I'll use it to say: G'MORNING, EVERYONE! And how is your day going? :)

Mar 26, 2012

Burning Bright - Eclipse, WnW, Tropez, Kleancolor Nail to Toe, Sally Hansen Nail Art Pen


I am back from Perth! Yay! I was there for a week to use some exceedingly fancy equipment at UWA. It is a lovely city with equally lovely weather but I'm glad to be back in Sydney, dreary as she is... I will post again soon with all the updates from last week (exciting stuff!!) but first, here's something I rushed out only today as the deadline is in under 24hrs, gosh!

Jme was kind enough to take over the Monday morning post from me so you may have seen her entry to Rebecca Likes Nails' nail art competition! This is a pretty fun one with a range of themes to pick from. I chose gradients and animal print! ROWR!

[Tiger tiger: Gradients and Animal Print]
I've done freehand leopard print nails before here, but not tiger print, so despite my current nubbin nails, I thought I'd go with that this time! What do you think? =) Read on for a b-b-b-b-b-breakdown....!!

[Base: Eclipse 414 (1 coat)]
I started with a base of Eclipse 414, an amazing vermillion creme. This is only one coat! Perfect coverage, perfectly smooth.

[Base: Eclipse 414 (1 coat)]
Eclipse is a Korean brand you can purchase at Asian cutesy stores like Morning Glory (maybe ArtBox, I haven't checked). Their shimmers and glitters are not bad, but the cremes are where they shine!

[Base: Eclipse 414 (1 coat); Sponge gradient: WnW Sunny Side Up, Tropez White Hot]
I then sponged 2/3s of the nail with a golden yolk creme (Wet n Wild Sunny Side Up) and 1/3 to the tip with Tropez White Hot, a white creme. I used the same sponge corner for both, to tint the white slightly yellow from the remaining Wet n Wild Sunny Side Up. Note the different pattern for the thumb.

[Striping: Kleancolor Nail to Toe in Garden of KC, Gold Dipped, Wedding Gown White]
With my trusty Kleancolor Nail to Toe nail art polishes, I striped on some green (Garden of KC), gold (Gold Dipped) and white (Wedding Gown White). Again, the thumb was striped a bit differently.

[Close up: Thumbnail design]
Wave your magic wand around (by which I mean Kleancolor Tuxedo Black and Sally Hansen Nail Art Pen in Black), and voila! There's a kitty stalking through the grass!

An extra tip for using the Sally Hansen nail art pens. Wait wait wait till your base layers are dry! I was in such a rush because I didn't have much time that it was even slower going trying not to dent the polish. Oh well, I'm glad I managed to squeeze this one in! =)

[Tiger tiger: Gradient and Animal Print)
And the final manicure again! I don't have more pics because this mani only really works arranged this way and all my photos were pretty repetitive.

My inspiration for this was actually a stone I bought for my sister from a crystal store at Fremantle Markets - it's called a zebra stone and is an orange-to-white stone with rust red stripes running through it! I thought it looked quite tiger-like rather than a zebra!

Look out  for another post from me soon! PHEW! I've been so stressed the last three weeks or so that it'll be great to wind down for a bit...


Mar 25, 2012

Gradient-licious Candy - Revlon, Zoya, LA Colors

I'm loving all the challenges and competitions being hosted lately, because they inspire all these interesting ideas! This is my entry for Rebecca's nail art competition here. I picked the theme/technique of Gradient and Dots.

[Colours used: Revlon Watermelon Fizz, Orange Fizz, Pineapple Fizz,
Revlon Glimmer Gloss Cherry Fizz, Zoya Tiffany, LA Colors French White]
I have been meaning to try a horizontal gradient, rather than the more commonly seen vertical gradient. I haven't seen an example of this before, so I wasn't sure how it would look, especially on my fairly narrow nails. My original inspiration is actually those colourful Rock Candy that is so popular in Sydney and Melbourne.


[Colours used: Revlon Watermelon Fizz, Orange Fizz, Pineapple Fizz,
Revlon Glimmer Gloss Cherry Fizz, Zoya Tiffany, LA Colors French White]
Doesn't this look like candy? It's so shiny, espeically with the little flakies, and the colours were so bright, I wanted to nom my nails for awhile there! It didn't help that they smelled delicious since most of these were scented polish.

I don't know if it's obvious, but there are actually two different gradients going on here. The top and bottom strips are red to yellow, while the middle strip is pink to red.


[Colours used: Revlon Watermelon Fizz, Orange Fizz, Pineapple Fizz,
Revlon Glimmer Gloss Cherry Fizz, Zoya Tiffany, LA Colors French White]
Let's get into the method. There really is no fancy technique here, but there is a lot of laziness (this seems to be an ongoing theme with my manis).

These are the directions for the index finger:

  1. Tape off section B. Paint a strip of Watermelon Fizz on the rightmost side, a strip of Orange Fizz down the middle, and a strip of Pineapple Fizz on the leftmost side. You will need to overlap them a little, and you might have to go over once or twice more with some of these colours to get a smoother gradient. 
  2. Peel off the tape as soon as you're done. Paint a quick dry top coat over the lot. Go watch half an episode of House, or a full episode of How I Met Your Mother. :D
  3. Tape off section A and C. Paint a strip of Tiffany on the right most side, a strip of Cherry Fizz down the middle, a strip of Watermelon Fizz on the leftmost side. Again, overlap the colours and use your discretion to touch up with the same colours.
  4. Remove tapes at superspeed and layer some dry fast top coat over everything!

Since I wanted the colours to change in gradient from nail to nail as well, I alternated the direction of the gradient on each nail.


[Colours used: Revlon Watermelon Fizz, Orange Fizz, Pineapple Fizz,
Revlon Glimmer Gloss Cherry Fizz, Zoya Tiffany, LA Colors French White]
So, what do you think? Does the horizontal gradient work?

The next time I try this, I'll use stronger, contrasting shades for the middle strip so it looks more obvious.


[Colours used: Revlon Watermelon Fizz, Orange Fizz, Pineapple Fizz,
Revlon Glimmer Gloss Cherry Fizz, Zoya Tiffany, LA Colors French White]
I wanted to use another technique off Rebecca's list so I added the dots. This is the first time I have tried doing structured dots, rather than the occasional, random dots on my nail art. I definitely need more practice. :(

The dots obscure the gradient of the middle strip a little bit, but I think it does add a nice delineation between the different gradients.

I think it will be harder to use the sponging method to create a horizontal gradient, but that's mostly due to my narrow nails. There just isn't that much space. In any case, I do prefer using jelly polishes and painting to create gradients.

Thanks to Rebecca for organising this competition! :D

Mar 22, 2012

Purple Fire - Kleancolor Chunky Purple Holo + LA Girl Hustle

Congratulations to Ev, my fellow blogmate, who won the random draw out of the final eight entries in the "Inspired by" nail art contest organised by Cathy! I feel really amazed and happy to have gotten into the final eight entries with Ev as well! :D  I'm honestly surprised that people liked the Spider-man mani!

And now, on to this beautiful nail polish Ev gave me (one of many) for my birthday:

[Base: Two coats of LA Girl Hustle
Top: Two coats of Kleancolor Chunky Purple Holo]
 AAAAH, HOW PRETTY IS THAT??

Kleancolor's Chunky Holo Purple is a dense orange-green duochrome glitter in a purple jelly base. It will take several coats to build this polish up to full opacity, since its base is so sheer, and I don't think the glitter is dense enough for full coverage. Instead of trying that, I used LA Girl's Hustle from the Disco Brites collection as the base. I think the result is gorgeous, don't you agree?


On its own, Hustle is an undeniably bright purple shade, one of the purplest cremes I have. With two coats of Chunky Holo Purple over Hustle, this mani fairly glows, with the glitter constantly shifting colours depending on the lighting. I love it so much!

[Base: Two coats of LA Girl Hustle
Top: Two coats of Kleancolor Chunky Purple Holo]
 As you can see, the flash of green is quite obvious.

Another interesting thing about Chunky Purple Holo is that it smells vaguely of candy-ish grape, and it has a nicer scent than most nail polish though it isn't very strong or obvious.


[Base: Two coats of LA Girl Hustle
Top: Two coats of Kleancolor Chunky Purple Holo]
One coat of Chunky Holo Purple was probably enough, but I can never resist having more of something nice so I used two coats. Probably overkill, and it does look like there are too many coats now...but a minor issue for the prettiness I had on my nails!


[Base: Two coats of LA Girl Hustle
Top: Two coats of Kleancolor Chunky Purple Holo]
I used my iPhone to try to capture the bright duochrome-ness of Chunky Purple Holo, with some success I think. The reddish-orange glint gives the purple a warm glow, but the green sheen really stands out against purple with its bright contrast. Ah, this combo really makes me gleeful just looking at them again. :)

I still have swatches to post for my plish haul from Malaysia and Singapore, but I just couldn't resist babbling about this one first!

Mar 19, 2012

Lacy Lingerie - Zoya Karina + Konad Special Polish Black Pearl


Anywaaayy, today's post is a somewhat botched attempt a while ago at a lingerie-inspired manicure... well, I'll let you be the judge.

[Bottle to nail: Zoya Karina (2 coats)]
I started with a base of Zoya Karina, a rich red glass fleck. I think this was two coats (maybe three). It's really a gorgeous colour which looks darker in real life than in this photo - but with a light source, it totally lights up with ruby red flecks.

[Zoya Karina: 2 coats]
Sexy stuff... Also, my index finger always frustrates me when I take pictures. It is VERY EXTREMELY CURVED! Not only from side to side, but also from cuticle to tip... it reflects so oddly, argh!

[Base: Zoya Karina (2 coats); Stamp: Konad Special Polish Black Pearl]
Anyway, back to my wannabe lingerie... =p I then stamped over the red with a floral lace pattern using Konad Special Polish in Black Pearl. Stamps always go on a bit matte, but nothing a swish of topcoat can't fix!

[Base: Zoya Karina (2 coats); Stamp: Konad Special Polish Black Pearl; Clear rhinestones]
I then accented my ring finger with clear rhinestones, then topcoated over again to hold them in place.

[Base: Zoya Karina (2 coats); Stamp: Konad Special Polish Black Pearl; Clear rhinestones]
Finished product! Less sexy than I envisioned! Hehe... I think more black is required... perhaps an additional fishnet pattern.... what do you think? ;)

I can't wait to take a break when I get back from Perth! Jme has promised to go plish shopping with me then... my wallet is already crying in anticipation.......


Mar 17, 2012

Jme's "Frankenmarch" Entry - Verily Verdant

You should have already seen Ev's gorgeous FrankenMarch entry right below mine here. It's been so fun doing this, so I really do have to thank Sarah Claire for organising this competition!

Ok, more talking later! Here's my little green Franken polish.

Entry


Blurb

Verily Verdant is the colour of lush, rolling mountains - if your average mountain had countless hidden gems, that is! Blue-toned holographic glitter catches the eye among the bright green hexagonal sparkles. A turn of the hand into the light will reveal a mesmerizing flash of ever-shifting blue, green and gold shades from the fine triochrome bar and hexagonal glitters. All this shininess lie suspended within the mid-green jelly base, giving the polish a layered depth. This franken polish looks stunning on its own and when layered over other colours as well. One layer of Verily Verdant over black allows the green-themed glitter to glow in beautiful contrast.

All my current glittery green polishes are much darker, so my aim with this Franken polish was to create something unmistakeably green that had a variety of glitter in it, especially holo glitter as I don't have anything like that right now. I was trying for something shiny with a green and blue theme, so tell me if you think that worked out fine! :)

Recipe

Time for colourful yumminess!

Whenever I mention 'bottle' here, I'm referring to the bottle of the final product, not the original bottles. I combined the following:

- 1/2 bottle of Mio Piccolo 03 - Blue-toned holographic glitter in different sizes, within a sheer blue base
- 1/4 bottle of Orly Here Comes Trouble - Different sizes of light green hex glitter
- 1/8 bottle of Color Combos CTW 507 - Triochrome hex and bar glitter that shine blue/green/gold
- 1/10 bottle of China Glaze Emerald Sparkle - To set up the green base with additional fine glitter
- 5 drops of LA Girl Idol - To get a medium, slightly bluer green for the base.


Photos
(Click to enlarge pictures!)

[Verily Verdant on nails and in the bottle]
This is my second attempt at a Franken polish, and I hadn't done this before prior to the competition. It's a lot more enjoyable than I expected, and I just want to do moooore now! My first attempt at a Franken didn't turn out too badly either (that one is called Red Carpet Party, and I'll post it here too!).


[Left: Close-up of Verily Verdant in bottle
Right: Bottled Verily Verdant]
The close-up shows the variety of glitter held in the mid-green jelly base. I have light green hex glitter in different sizes, fine gold glitter, holo glitter, an ethereal blue-tinged holo glitter, fine blue-green-gold triochrome bar glitter, and that's just listing them off the top of my head! As you can see from the picture on the right, the blue-ish holo really shines strongly when seen from an angle.


[Two coats of Verily Verdant]
I was hoping and was very pleased that this polish dries with a semi-smooth finish, as opposed to a matte, rough finish that a lot of glittery polishes seem to end up with. Of course, I went over the nails with a glossy fast-dry topcoat in any case, just for the high shine.

You can see my nail line very faintly due to the jelly-ish nature of the polish, but I don't think it's obvious in person. Aaaah, I really do love this shade of green.


[Two coats of Verily Verdant]
It's interesting to see the holo changing on this manicure, depending on the lighting. The above picture is a little more shadowed as you can see. And then...

[Two coats of Verily Verdant]
Angling the nails into the sun suddenly brings out a flare of holo, predominantly the blue holo. It's hard to capture with my camera, because focusing on the nails dims the holo and shiny glitter, but I hope you can see the cool blue shine!


[Top: Two layers of Verily Verdant on nail
Bottom: Close-up of Verily Verdant on nail]
 Look at that blue holo! It's so bright but has this interesting translucent quality to it.


[Verily Verdant under bright lights]
The above photo was taken with my iPhone to capture that blingy shine of the glitter.

With its jelly-ish and glitter-full nature, Verily Verdant looks pretty amazing layered over black as well.

[One layer of Verily Verdant over black]
It's like green-tinged space! The glitter really looks brilliant against black. I'm going to try this over other colours in the future, to see if it spices up colours like blue or white. :D


[One layer of Verily Verdant over black, from different angles]
I just love how different the shine looks from various angles, and how there's always something new to stare at on this manicure.


[Top: One layer of Verily Verdant over black
Below: Close-up]
Seriously, shiny, shiny space!


[One layer of Verily Verdant over black]
The above, dodgy-looking picture was taken with my iPhone, again to show how shiny the glitter is. The first picture shows a greener tinge, while with just the slightest shift of lighting, the blue shine comes through instead.


Phew, that's the end of this lengthy post. Thanks for reading all of that! If you want to see the other gorgeous entries for this competition, you can find them here at Shatter me Claire's blog. If you do like Verily Verdant here, please vote for me there! :D

Mar 16, 2012

Ev's "FrankenMarch" Entry - Awe-bergine


Hello hello, I know I said I was terribly busy and it is true! But I'm squeezing this post in with whatever free time I have. Jme and I entered another competition this week, this time a franken-making competition held by the talented Sarah Claire over at Shatter me Claire!

Before I start, apologies for the picspam - I just had so much to show! Picking which photos to put up was a real doozy... Anyway, I now present you with... Awe-bergine! 

ENTRY:

BLURB:
Awe-bergine is definitely not your run-of-the-mill purple polish. A cool violet lit from within with orange sparkle, it's filled with sparkles and secrets! Blue and gold hints glitter, with green accents at an extreme angle. But look closer and spot the secret strands of sparkle scattered throughout!
So my idea for this was my current obsession with deliciously ugly combinations - in this case, purple and orange. My aim was to produce a rich glittery blue-violet with strong bright orange highlights. All the additional glitter was a bonus!

RECIPE:
I've broken up the recipe a bit more so you can see my rationale...
Main/Base:

Fill 1/3 bottle with Nubar Violet Sparkle >> majority of purple sparkle
+ 10 drops Ulta3 Orchid >> deepens base colour and increases opacity
+ 2 generous scoops of Burning Leaves Reflecks (TKB) >> majority of orange sparkle
Glitter/Highlights:

+ 20 drops Kleancolor Chunky Holo Purple >> adds orange-green duochrome glitter
+ 10 drops Maybelline Gives Me the Chills >> adds subtle orange bar glitter
+ 5 drops OPI Sparkle-icious >> adds hints of blue and gold
Fleck/Shimmer: 
+ 1 scoop of Miranda Star Star Bites (TKB) >> purple-gold duochrome holds the look together.

PHOTOS :
(Do click to enlarge!)

The left is my first photo test in the sun - I was quite pleased with the warm glow contrasting with the cool blue-purple! While actually swatching Awe-bergine, I saw the most gorgeous view of the duochrome particles while looking down at the bottle of polish on my side-table so I snapped that pic on the right (click for maximum shiny goodness!).

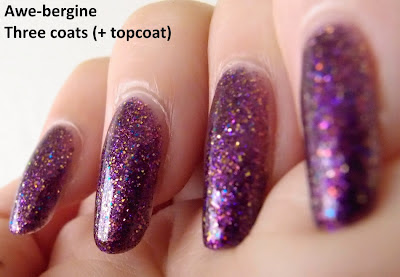
I was initially worried that it would be too sheer and only useful as a layering polish...But! Awe-bergine has satisfying coverage at two coats and full coverage at three (also note the length of my nails and the mini bottle brush size).

I also thought all the glitter would make it a gritty nightmare but it applied evenly and dried surprisingly smooth, which I think is due to the jelly base in most of the constituents. YAY! Add topcoat, and it smooths out completely!


Also... party nails!! Haha, it's a crap picture which I took in the bathroom, but it's so festive without being too overt about it! Now for the macro spam...

Close-ups of glitter in the bottle and how it translates to the nail swatch. I only used 5 fat drops of Sparkle-icious but how dense is that blue and gold! Also, there's actually a great deal of bar glitter in Awe-bergine as you can see in the bottle. On the nail, it's just visible as tiny flashing stripes that add an interesting textured effect to the polish when the light hits it right.

Now since my initial plan was to have a strong orange highlight... how did it work out? Crappy pic, but it turned out pretty good! I put it down to the TKB Reflecks glitter pigment - it's sooo shiny and fine. From afar (thus the unfocused pic), you get a brilliant orange shine.

But not just that, somehow (through magical means I did not predict) in daylight, a strong royal blue shimmer appears. BONUS! =p I even have some pictures where the purple, orange AND blue are visible! Also, there's my little helper cat supervising my swatching technique...

And finally, a crappy unfocused pic as usual from the iDevice... Go go glitterbomb!!

Phew, that's all the frankenspam I've got for you today. Thanks for reading all of that babble! This is only my 5th franken (and miles away from my first few attempts) so I'm a teensy bit proud of myself, haha. I hope it was fun and maybe even informative! =)  I'm excited now to work more with pigments rather than sticking to mixing polishes.

Please do check out the other entries here, and if you liked Awe-bergine, I'd very muchly appreciate it if you voted for me!! Also, do have a look at Jme's breakdown of her entry as well!!