; Plisherrific: July 2012

Jul 30, 2012

Royal Millionaire - Revlon Royal Cloak, China Glaze Marry A Millionaire


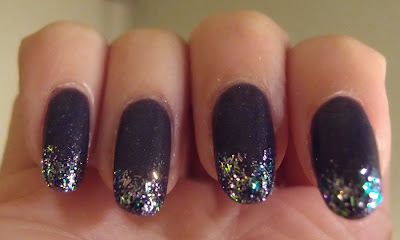
Good morning! Today's post is a purple-themed glitter tip mani. =)

[Combining dustiness with sparkle-arkle!]
I adore China Glaze Marry A Millionaire from the Eye Candy collection but it does end up very busy and all the gorgeous types of glitter sort of gets jumbled up with a full mani. I was looking through my stash for a nice base to use and came up with this!

[Bottle to nail: Revlon Royal Cloak (2 coats)]
[2 coats: Revlon Royal Cloak]
This is Revlon Royal Cloak from the Masquerade collection. It's pretty interesting too! A dusty purple with dense silver flakes. Above is 2 coats of Royal Cloak.

[In the bottle: China Glaze Marry A Millionaire]
And here is China Glaze Marry A Millionaire in all its gorgeous glittery glory! A combination of blue-green-gold multichrome bar glitter and dense lavender glitter.

[Bottle to nail: China Glaze Marry A Millionaire (tips)]
I just layered Marry A Millionaire on my tips in a semi-gradient style, concentrating on the tips.

[Base: Revlon Royal Cloak (2 coats); Tips: China Glaze Marry A Millionaire]
It was marvelously sparkly! Although my photos don't capture that very well. From afar, the glitter colours tend to blend together into a silvery sparkle but the multichrome flashes tint it at different angles. =)


Jul 28, 2012

Mint Lemon - Milani Original, Kleancolor Nail to Toe Candied Honey


A brief Saturday post from me! Here's a nice simple pattern that's easy and looks cute.

[Base: Milani Antique (2 coats); Stripes: Kleancolor Nail to Toe in Candied Honey]
I started with a base of Milani Original. This is a dusty green creme with a lovely hidden shimmer, opaque in two coats. Very similar to Milani Dressmaker (which I also have) but slightly dustier and more green.

I then painted horizontal stripes using Kleancolor Nail to Toe nail art striping polish in Candied Honey, a pastel yellow creme. Top with your favourite topcoat and you're all set!

Have a good weekend all! =)


Jul 26, 2012

Insensibly Lovely - Best Sence 78 and 55

Sometimes, you can unearth the most lovely finds in dollar stores. During one of our rambles through Bankstown, Ev and I found a few interesting Best Sence nail polishes for all of AUD2.50.

[Best Sence 78 in bottle]
[Five coats of Best Sence 78]
Best Sence 78 is a crazy mix of colour shifting glitter in a clear base. The predominant glitter are the gold-to-green glitter and the red-to-gold glitter. There's a sparse scattering of red-to-purple glitter in there too! Since it's in a clear base, it took about a million coats (five to be exact :P) to get the full coverage on my thumbnail above. 


[Top: Two coats of Best Sence 78
Base: Ulta3 Black Satin]
Look how amazing it is against black! My camera rarely ever catches colour shifting glitter so clearly under natural light and with the focus turned on. The colour shift and difference in colour is really obvious. 


[Top: Two coats of Best Sence 78
Base: Ulta3 Black Satin]
You can see the gold, red and green on my nails here. But if I tilt my nails baaaaaack...

[Top: Two coats of Best Sence 78
Base: Ulta3 Black Satin]
Bright green!

I bought Best Sence 55 as well. 

[Two coats of Best Sence 55
Index finger: One coat of Best Sence 78 over 55]

It's not as dramatically awesome as 78, but it's pretty nice for the price. Best Sence 55 is a green polish with a gold shimmer. Shimmers tend to be streaky, but this one has no such problem at all. I was impressed by how smoothly it applied. The gold is subtler on the nails than in the bottle.


[Two coats of Best Sence 55
Index finger: One coat of Best Sence 78 over 55]
These pictures are a month old, so my skin really isn't that dry any more and my nails are longer now. 

If you don't have any place close by that sells Best Sence, I believe they're sold at KKCenterHK too.

Jul 23, 2012

Winter Florals - Transparent Flowers Pink Green Floral, China Glaze For Audrey


A rare instance where I'm posting a mani that's actually on my nails right now!

[We're past mid-winter, aren't we? Springtime soon!]
I was pretty pleased with this floral combination~ =) Transparent foil transfers are fun because you can completely change the look depending on what base colour to pick.

[Bottle to nail: China Glaze For Audrey (1-2 coats)]
I started with a base of China Glaze For Audrey. To be honest, I picked this up because it's just one of those polishes that should be in one's polish collection...

[1-2 coats: China Glaze For Audrey]
It is very pretty though! And I managed to get away with one thick coat or two thin ones. The formula is pretty good and levels quite well even if you don't get your strokes completely even.

I then popped some foil glue on and waited for it to be tacky. The absolute minimum I would wait is 5 minutes. 10 minutes is even better. The longer you wait, the better your chance of transferring the entire pattern without breaks!

[Base: China Glaze For Audrey (1-2 coats); Foil: Gold Floral Meadow]
Tada! Here we go! This is Transparent Flowers Pink Green Floral (!!), a semi-transparent foil with pink, teal, and gold highlights. I've seen it foiled over white and that looks pretty too but I love florals on blue so I wanted to try this combination out!

[Base: China Glaze For Audrey (1-2 coats); Foil: Gold Floral Meadow]
As for topcoat... remember, you can not use quick dry formulas with foil transfers! A cheap, non-wrinkle topcoat that I've found is Essence Gel-look topcoat! Not only that, it dries fairly fast and gives a nice glossy finish. Bonus! I actually ordered some nail foil sealer so I'll let you know how that goes once I receive it.
 
[Base: China Glaze For Audrey (1-2 coats); Foil: Gold Floral Meadow]
One more close-up! Foil transfers don't last very long though! They tend to peel fairly quickly but one way to reduce that is to add a fresh layer of topcoat every day. I usually don't bother... because peeling polish means... NEW MANI TIME! =p


Jul 20, 2012

Lizard-inspired Manicure - LA Splash Sparkling Beach, Nubar Verde, LA Girl Blackout


Jme and I went to watch The Amazing Spiderman in IMAX on Wednesday, how exciting!! =)

I thought it was done really well, and kept to the spirit of Spidey (the comicbook smartarse). We watched it in 3D at IMAX, and I must say, this really is one film that maximised the giant screen experience! Also, how adorable is Andrew Garfield as Spiderman in it? Aaaaaah~!

So, I thought and thought about what mani I should wear to go to the movies but really, Jme's already done TWO AWESOME SPIDEY MANICURES! So I decided not to even try and instead, go for a villainous manicure instead! So here's my villainous Lizard manicure...

[The Lizard Manicure]
... or really any scaley creature... =p Hey, last time I did a Loki-inspired mani and Jme did the Avengers-inspired one... Hmmm, I'm (spidey-)sensing a trend here...

[Bottle to nail: LA Splash Sparkling Beach (2 coats)]
I started with a base of LA Splash in Sparkling Beach. This is a pretty amazing mossy green with heavy gold shimmer/microglitter. It's hard to describe what it is really! Not quite a glitter, not quite a foil or metallic. It does dry a bit gritty but I think the texture really adds to the look. Very densely pigmented and even application.

[2 coats: LA Splash Sparkling Beach]
I got my bottle from a discount store and I don't think it's listed as a current shade. However, eyeballing swatches and descriptions online, it looks pretty similar to LA Splash Komodo Dragon so perhaps this is the old name for it!

[2 coats: LA Splash Sparkling Beach]
I originally thought the heavy gold shimmer reminded me of Nubar Verde but when I compared the bottles, Verde is much greener whereas Sparkling Beach leans more towards the yellow end of the spectrum. Now, on to the stamping!

[Base: LA Splash Sparkling Beach (2 coats); Stamp: Nubar Verde + LA Girl Blackout]
I stamped with a gradient of darker green to black using Nubar Verde and LA Girl Blackout. You can see here that Nubar Verde is a much greener shade. These two photos are pre-top coat but I thought the matte stamp looked pretty cool too! The plate I used was BM-224.

[Base: LA Splash Sparkling Beach (2 coats); Stamp: Nubar Verde + LA Girl Blackout]
And here it is with topcoat added! This is my first time using two different colours to stamp - it's super easy! I'll have to do this more often...

[Base: LA Splash Sparkling Beach (2 coats); Stamp: Nubar Verde + LA Girl Blackout]
I like how the stamp looks slightly raised. =) I got an interesting comment that it looked like spider webs! I hadn't even mentioned it was Spidey-related! This is because they focused on the lighter gold-green and thought it looked like webs stretched across the nail - how interesting!

Back to the movie, I have to say though, OH MY, the amount of bad science depicted. Noooooooo~ The Lizard was interesting as a villain but perhaps more could've been done with exposition. Although so much was spent on Peter acquiring powers that maybe it was "beyond the scope of this project". Wink wink!

Next movie... The Dark Knight Rises! CAN'T WAIT!


Jul 19, 2012

Here comes the Spider-man!

Spider-man! Spider-man! :D :D :D  So we went to watch The Amazing Spider-man starring Andrew Garfield and Emma Stone at IMAX yesterday. It was awesome! Don't expect awesome science or deep plot, but I think the story was cleverly developed, and the acting was stellar. Andrew makes the most adorable, puppy-ish teenager, I can hardly stand it!

I did a Spider-man manicure earlier this year for Cathy's competition, inspired by Andrew's promo pics. I wanted this to be recognisably Spider-man inspired, but different to that first one. I think that first one definitely looked better. >_>


[Dong Dong Crystal Sand 04 and 21
Sally Hansen Nail Art Pen Black/Noir
Glamnails Nail Art Pen Snow White]
This is an indoor photo. I wanted this mani to have bolder lines than the previous one, but I think I probably went a little too bold. Oh well! In case it isn't obvious, the white patches are Spidey's eyes on his Spidey mask. I think I could definitely have done better overall... D:


[Dong Dong Crystal Sand 04 and 21
Sally Hansen Nail Art Pen Black/Noir
Glamnails Nail Art Pen Snow White]

Photos under natural sunlight. 


From a straight on angle, the red glitter comes through the thin layer of black 'webs'. Because of that, I decided the lines weren't dark enough the next day and retraced everything...which ruined it!

[Dong Dong Crystal Sand 04 and 21
Sally Hansen Nail Art Pen Black/Noir
Glamnails Nail Art Pen Snow White]
Now the lines are too thick and uneven, boo. This is a lesson to let your nail art be, and not touch up over and over again. It's a weakness I have. 


But I still wore this mani to the movie. :)  It's the homage that counts, right?

And have a random photo of a ring I really like right now:


Yes, I jumped the bandwagon and started painting rings with nail polish! :D  So shiny, right?? I love wearing rings so getting to make several of different colours is so great! I have so many choices now, mwahaha!

Jul 18, 2012

Rose Redux - English Rose, Color Club Pretty in Platinum


I've been on a photo-editing kick and have got a whole bunch done over the past week. I'm hoping to do at least two posts a week (I don't know how you daily posters do it, but I sure admire you!) with one being a bit longer, and the other more brief. So here's a shorty for ya~ =)

[Foil transfer: English Rose over Color Club Pretty in Platinum]
This is English Rose from Dollarnailart. Jme has already shown this foil transfer before (check out her post here!) but this pattern was actually THE one that got me into foils... I now have a gabajillion foils but no time to try them out!

[2 coats: Color Club Pretty in Platinum]
In Jme's post, she used a white base, but I decided to go with a pearly greyed white, Color Club's Pretty in Platinum. Here it is at two coats.

I then slapped on some foil transfer glue and waiting for about 15 minutes or so till it was tacky. Then I pressed the foil over it and smoothed it down before removing the plastic part. Easy peasy fancy!

[I should've taken more photos...]
A couple of issues I sometimes have with foil transfers...
1) The pattern being too big for the nail... you end up not getting much of the pattern on your nail (see: pinky finger).
2) Most topcoats and all (?) quickdry topcoats will cause the foil to crinkle. Sometimes this will smooth out but most of the time it ruins the shine, so you need to experiment a bit to find out what works!

Ohdear... this "short" post is not very short, is it....?


Jul 16, 2012

Evening Glitz - Jordana Glitters LA City Nights


Hello! Today I have a gorgeous glitter for you from the Jordana Glitters range. This is Jordana LA City Nights!

[Bottle to nail: Jordana Glitters in LA City Nights]
A dense glitter polish consisting of small purple glitter with larger blue glitter in a clear base. This is dense enough to give full coverage at 2 careful coats, but I used 3 anyway for maximum sparkle! It also makes an awesome sparkly polish for pedicures... ;)

[3 coats: Jordana Glitters in LA City Nights]
Isn't the colour combination just gorgeous! The formula is a bit thick, but you do get a good helping of glitter in each swipe so it's worth it. It evens out quite well but you do need a good thick layer of topcoat to get that perfect glossy look. Unfortunately I experienced some tip shrinkage with my quick dry (as you can see).
 
[Close-up: Jordana Glitters in LA City Nights]
A close-up to see the glitter combination... If I remember correctly, Jordana LA City Nights is pretty much an exact dupe of Milani Twinkle (from their One Coat Glitter collection). However, it's also cheaper and the bottle is larger! I'm really liking the prices and selection in the Jordana Glitters range!


Jul 12, 2012

Varying Green Depths - Radioactive, Sea Creature

I was lucky enough to win a giveaway hosted by Osiris and Loki Paint Their Nails! Tara sent me Max Factor Fantasy Fire, Hungry Asian's Sea Creature, a ring made from Sea Creature, and Tara's own frankenpolish recently named Radioactive.

I received an adorable, handmade card along with all of these, which I forgot to photograph! :O  It has a cat in a dress on it, on such lovely paper with pretty patterns. It's so sweet!

Okay, okay, and here's the swatches for Sea Creature and Radioactive:

[Ring finger: Tara's Radioactive
Pinky finger: Four coats of Sea Creature
Index and middle finger: Two coats of Sea Creature over black]
Radioactive is this gorgeous, grassy green with a scatter of holo microglitter. I couldn't quite capture the holo very well - but that's a problem I always have with my camera. It's such a fresh, summery colour, and applies very smoothly. 

The index and middle finger have two coats of Sea Creature over a black base, while the pinky has four thin coats of Sea Creature on its own. Again, I couldn't quite capture how shiny the glitter is. The green microglitter gives the mani such a lovely gleam, and there's a scattering of blue and silver holo-ish medium glitter which is really eye-catching. Interestingly, there's a little pink microglitter among all this green and blue!


[Ring finger: Tara's Radioactive
Pinky finger: Four coats of Sea Creature
Index and middle finger: Two coats of Sea Creature over black]
[Close-up of Sea Creature in its bottle] 
Here's my attempt to capture how shiny Sea Creature is. 


[Ring with Sea Creature against mani]
The ring is fast becoming one of my favourites! It's just so shiny! And I love the three silver bands forming the ring. When I wore this ring with this mani, I received so many comments on how well my ring matched my nails...which was kind of funny. :)


Thank you so much, Tara! :D :D :D  I really love all of these!

Jul 10, 2012

Spotted while Shopping - Savvy dupes Sally Hansen Gem Crush


So I popped by the shops yesterday evening and had a look at  some of the new polishes on the shelves this week! Sorry for the lack of pictures! I dropped by after going for a run and did not have any picture-taking devices handy.

The main point of this post was to mention the Savvy polishes that are currently available for $2.99 in Priceline!  The display was labelled as limited edition but there was plenty of bottles available. There were cremes and shimmers, but the glitters were really noteworthy because they were really shameless dupes of Sally Hansen Gem Crush!


[Savvy Frostbite (L) and Ginger Ale (R)]
I picked up two of them: Frostbite and Ginger Ale; dupes of Sally Hansen Gem Crush Showgirl Chic and Big Money respectively.

[Savvy Frostbite]

The glitter combinations are exactly the same! Frostbite is fine silver glitter with slightly larger blue glitter. Ginger Ale is fine gold glitter with slightly larger palest lavender glitter.

[Savvy Ginger Ale]
I saw dupes for Showgirl Chic, Big Money, Be-Jewelled, Blingtastic and Razzle Dazzler. Who knows if the others were duped too and were just sold out! For $2.99 a bottle, it certainly beats Sally Hansen Gem Crush at $9+! I was pretty amazed at the shamelessness of the dupe though, woooooow!

Priceline also has the new double-ended Essence polishes up and the display I saw was pretty much still completely full. They were mostly a creme polish on one end and a sheer shimmer topcoat on the other. It looks fairly interesting but I bought a bunch of shimmer topcoats while I was in Japan and didn't end up getting any.

Did anyone else pick up any of these dupes? Jme and I will have to do a dupe comparison post one day with the Sally Hansen Gem Crush vs Savvy glitters!


Jul 9, 2012

Pink Ice - Revlon Levitate


I've been so busy since getting back! I will have to sit down one night and go through all my mani photos that I haven't sorted yet over the past few weeks (maybe months??)... Here's a not-so-oldie: Revlon Levitate, a pearly pink with strong icy-cyan shimmer. This was marked as limited edition and I found this in a bargain bin at the markets! Score!

[Bottle to nail: Revlon (3 coats)]
This is 3 coats but you can still see a hint of VNL (visible nail line). It isn't very obvious in real life but the photos make it more obvious.

[Revlon: 3 coats]
It was really difficult to capture the blue flash! In person, it's really very strong, and combines with the pink base around the edges to make a more purple/fuchsia-leaning shimmer. I've filed this under duochrome, but it falls in that strange category of duochrome only due to the contrasting shimmer colour compared to the base!