; Plisherrific: 2012

Dec 27, 2012

Square Stickies - brandless nail stickers

I thought I would be more enthusiastic about Christmas manis but my interest sort of fizzled out last week. So let me just show you a little something I have been meaning to post for awhile.


Nail stickers! I bought these brandless nail stickers off Ebay for $2. I actually have a bunch of them with different patterns and use them once or twice a month, whenever I fancy something shiny and interesting. I have to say, they're pretty good for their price. They're thin, so they're easy to stretch over curvy nails.

I cheat a little when I apply them. I'm too lazy to cut them to the right width (measurement is hard!) so any that are wider than my nails, I stick them on and go over the excess gently with the pointy end of a metal ruler. Then I peel the excess off. For excess over the tips, I just buff off with the rough side of a nail buffer. That's the easiest. In my experience, square/squavol nails are better suited for nail stickers than round nails.


There was a nice holographic shine to the silver bits of these nail stickers, as you can see. I got a lot of nice comments on these ones, with questions on how I did this mani. :P  I didn't take any credit!

Nail stickers, like foils, won't last very long. These ones looked perfect for a day and a half, before they start peeling at the edges a little. I wore these for five days before they peeled too much. Another cheat I do is actually use a nice nail polish underneath the nail stickers, which are similar-ish in colour to the stickers. If they peel too much when I'm outside, I just peel off the stickers entirely and voila, still have a nice mani underneath! :D


You can see from these two pictures that the sides of the sticker on the middle finger have small wrinkles. The downside to not cutting to size and rushing! They're only visible from up-close. Those that fit perfectly without excess sticker will apply more smoothly.

One day, I'll trial Sally Hansen's nail stickers and see if they are much better than these cheapies.

So what do you think about my bargain nail stickers? :)

Dec 24, 2012

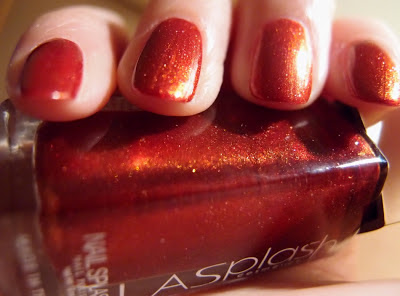
Hidden Treasure - LA Splash Midnight Star, Treasure Chest


Today I have two LA Splash polishes layered over each other to show you...

[Bottle to nail: LA Splash Midnight Star (2 coats)]
I started with a base of LA Splash Midnight Star, which kinda doesn't fit the name, I reckon! This is an old/discontinued colour that I picked up in a rummage bin.

[2 coats: LA Splash Midnight Star]
Lovely formula, one or two coats is great. It's this amazingly glowy warm rust red with larger pieces of gold glitter that gives it a bit of extra blinginess.

[Base: LA Splash Midnight Star; Glitter: LA Splash Treasure Chest (1 coat)]
I then layered over it with one coat of LA Splash Treasure Chest. Now... this is an interesting one! I took a gamble on this and ordered it on Cherry Culture even though the product swatch showed a strange cream/champagne glitter. I'd seen an online swatch of it and it was this gorgeous multicoloured glitter in a red jelly base and guess what... BINGO! =D

[Bottle to nail: LA Splash Treasure Chest (1 coat over LA Splash Midnight Star)]
Here's LA Splash Treasure Chest in the bottle. Look at all those colours! It's amazingly shiny and colourful but unfortunately my photos don't do it justice!

[Base: LA Splash Midnight Star; Glitter: LA Splash Treasure Chest (1 coat)]
Love it when these polish hunt gambles pay off!! =)

Till the next time, Merry Christmas all!


Dec 20, 2012

Xmas Tips - femme fatale, Ulta3, essence, China Glaze

Hello, hello, it's that time of the year again! I thought I would try out Christmas-themed manis. Except I didn't get the colours quite right, oops!

[Base: femme fatale Shimmering Snowcap over Ulta3 Crystallina
Blue-green strip: essence Choose Me!
Red strip: China Glaze Ring In The Red]
My fondness for femme fatale's Shimmering Snowcap results in yet another appearance! One layer of it over Ulta3 Crystallina meant that the gold shimmer from Crystallina came through quite strongly.

I used essence Choose Me! for the strip of blue-green, which turned out bluer than I expected. China Glaze Ring In The Red makes the strip of red. The red was definitely brighter in person, what with all the glitter that my camera is ignoring.


[Base: femme fatale Shimmering Snowcap over Ulta3 Crystallina
Blue-green strip: essence Choose Me!
Red strip: China Glaze Ring In The Red]
That looks a bit better right?


[Base: femme fatale Shimmering Snowcap over Ulta3 Crystallina
Blue-green strip: essence Choose Me!
Red strip: China Glaze Ring In The Red]
And a customary blurry photo so you can better see Crystallina's gold coming through and the glittery red.

Dec 17, 2012

You Jelly! - Color Club Holiday Splendour


A bit of a photo overload in this post today... This is one gorgeous (and appropriately festive!) polish, but oh so difficult to capture!

[Bottle to nail: Color Club Holiday Splendour (2 coats)]
This is Color Club Holiday Splendour from the Beyond the Mistletoe collection from 2011. My photos lean about bluey-teal but it's really more of a green shade.

[Close-up: Color Club Holiday Splendour]
Holiday Splendour contains chunky holographic glitter in a vibrant cool-green jelly base. It is so marvellously blingy! If you like China Glaze Atlantis, this is a green-er version, so I've heard~

[Bottle to nail: Color Club Holiday Splendour (2 coats)]
Application is wonderful, perfect and squishy in two coats. The jelly base is very richly coloured - I was totally impressed.

[2 coats: Color Club Holiday Splendour]
Sorry for the image spam! I tried taking so many photos to capture the gorgeousness of this one but I don't think I succeeded very well. Totally recommend this polish though if you don't already own it~! =)


Dec 13, 2012

Digital Space - Nail Pattern Boldness I Believe I Can Fly

We have posted photos of Nail Pattern Boldness nail polish before, but here's one I don't think we have reviewed yet.

2 coats of Nail Pattern Boldness I Believe I Can Fly over peach nail polish
Nail Pattern Boldness I Believe I Can Fly is a squishy dark blue jelly with silver square glitter and red microglitter. The silver glitter always look like flashy blue-silver because of the dark blue base. I quite love this nail polish! It looks like digital abstract art for some reason and that random bits of red in it just adds to its flavour.

The base of the nail polish will usually come through one coat of I Believe I Can Fly, but in this case, I used a peach coloured base and I Believe I Can Fly was dark enough that it gave the mani a navy blue base colour, and without any visible nail line.

The rest of the photos are taken indoors:

2 coats of Nail Pattern Boldness I Believe I Can Fly over peach nail polish
This nail polish is smooth and easy to apply, no need to fish out any glitter.

Looking at pictures of it... I like it just as much this time round!


Dec 10, 2012

Greeny Gradient - BB Couture Studio 54, LA Girl Purge, ORLY Here Comes Trouble, Mode Vicious Venom, Nubar Meadow Sparkle


Hello hello, today I have five lovely greens to show you today! I combined them together a while ago to make a gradient/ombre skittle manicure~ =)

[Greeny Glitter Gradient Galore]
I've been obsessed with finding the perfect green for a long time (I may just have found it, but that's a post for another day!). So one day when I saw how many bottle I had of just green glitter, I decided to pick a couple to make a gradient...

[The Lineup]
Here's my pick... from left to right: BB Couture Studio 54 for my base colour, LA Girl Glitter Addict in Purge, ORLY Here Comes Trouble, Mode Vicious Venom and Nubar Meadow Sparkle.

[Bottle to nail: BB Couture Studio 54 (2 coats)]
Here's my base colour - BB Couture Studio 54. This is a gorgeous green shimmer in a slightly blued base - a bit of a muted pine green. Not super bright. Formula was good and this was two coats iirc.

[Gradient Skittles (L-R): Nubar Meadow Sparkle, Mode Vicious Venom,
ORLY Here Comes Trouble, LA Girl Purge]

I then popped on varying amounts of glitter polishes on each nail.
Pinky: Nubar Meadow Sparkle. This is a fairly fine pale green. Very neutral shade.
Ring: Mode Vicious Venom. This is a gorgeous green glitter, leaning a bit warmer than my photo suggests. Great coverage.
Middle: ORLY Here Comes Trouble. This one is very similar to Mode Vicious Venom but there are also larger green hexes in the mix so the effect is a whole lot bling-ier. Great colour and coverage.
Index: LA Girl Purge. A mix of large and small kelly green hexes. Love this one too. It's more like a topper so I had to use 2-3 coats to achieve full coverage.

[L-R: LA Girl Purge over LA Girl Blackout, LA Girl Purge over BB Couture Studio 54,
ORLY Here Comes Trouble over BB Couture Studio 54]
I didn't have a darker green glitter so for my thumb, I used a black base coat instead so it would show through a layer of LA Girl Purge (left), giving it a darker shade than the index. =)

[Pinky to index: Nubar Meadow Sparkle, Mode Vicious Venom,
ORLY Here Comes Trouble, LA Girl Purge]
... and here are both hands together! LOL... I took this photo by propping my camera up on the back of my chair and pressing the shutter button.... WITH MY CHIN. =D


Dec 6, 2012

oh my purple! - essence oh my glitter!

Work has been really busy so I'm going to keep this one simple.

This is essence's oh my glitter! which has recently reached Australia's shores.

essence oh my glitter!
oh my glitter! is a mid purple creme with red and blue microglitter. The brush is rather thick so you have to be a little careful with it if you have narrow nails. It was smooth to apply, and opaque in one coat. I used a quick dry top coat and that caused some shrinkage.


essence oh my glitter!
You can see the red shimmer/microglitter better here.

I'm a real purple lover so it's no surprise that I like this and will recommend it. The microglitter isn't super bright and obvious, but it's a nice extra touch to a creme polish. Plus, it's totally worth essence's low cost!

Dec 3, 2012

Dazzle Fox - Revlon Fire Fox, Australis Speck-tacular, Kleancolor Chunky Holo Purple


An old-ish mani, layering with flakies!

[Bottle to nail: Revlon Fire Fox (2 coats)]
I started out with Fire Fox, from Revlon's Matte Suede collection... This is a strange finish, it is matte, but in the more hmmm... rubbery/plasticky-looking way, quite interesting.

[2 coats: Revlon Fire Fox]
It's a bright red, quite festive, so I might pull it out again as Christmas approaches! Good formula and coverage, I think this was maybe two coats?

[Base: Revlon Fire Fox (2 coats); Topper: Australis Speck-tacular, Kleancolor Chunky Holo Purple]
Being incapable of leaving a mani alone, I topped this with Australis Speck-tacular, a multicoloured flakie (thumb/middle/pinky), and Kleancolor Chunky Holo Purple, a orange-to-green duochrome glitter (ring and index).

[Base: Revlon Fire Fox (2 coats); Topper: Australis Speck-tacular, Kleancolor Chunky Holo Purple]
And here's a darker picture which shows the shift better!

I have unfortunately been very very busy lately so apologies for the craptacular posts from me this month. =( I'm really looking forward to 2013 though, fingers crossed, my schedule should clear up heaps in the new year! Yay!!!

Nov 30, 2012

Falling Snow - femme fatale, Revlon, essence

It's snowing! That's what I think about this mani anyway! :D

[femme fatale Shimmering Snowcap over Revlon Peach Nectar
Tips: essence Boho Chic]

So this mani started out looking like this...

[femme fatale Shimmering Snowcap over Revlon Peach Nectar]
This is femme fatale's Shimmering Snowcap layered over Revlon's Peach Nectar. I've already reviewed Shimmering Snowcap yesterday. :)


[femme fatale Shimmering Snowcap over Revlon Peach Nectar
Tips: essence Boho Chic]
I then added essence's Boho Chic to the tips freehand, mainly because I had just bought Boho Chic at that time and I wanted to try it! Boho Chic is a medium peach creme with small gold flakes. It is nowhere as dark as what you see in my photos, but apparently my camera can't photograph it properly against lighter colours.


[femme fatale Shimmering Snowcap over Revlon Peach Nectar
Tips: essence Boho Chic]
This photo came out a little blurry and you can see the blue-gold glitter in Shimmering Snowcap so much better here.

Nov 29, 2012

White on Whte - femme fatale Shimmering Snowcap, Orly Au Champagne

I'm going to review this really gorgeous nail polish!

[femme fatale Shimmering Snowcap over Orly Au Champagne]
This is femme fatale Shimmering Snowcap layered over Orly Au Champagne. Shimmering Snowcap is utterly gorgeous! There is an insane variety of white glitter in this one: hex, diamond, bar, squares of all sizes. Then there's the translucent small blue glitter that shifts from pale blue to bright gold.

The consistency of femme fatale's nail polishes is amazing. Even with the abundance of glitter, the formula isn't gloopy at all and it's easy to get a nice variety of glitter on your nails. I didn't have to pick anything out.


[femme fatale Shimmering Snowcap over Orly Au Champagne + bottle]
I also like the bottle and the classy print on it. :)


[femme fatale Shimmering Snowcap over Orly Au Champagne]
Obligatory blurry photo so you can see the gold squares flashing!

After this, I realised that it might be a little difficult to see the white glitter when paired with a white base. So I did another mani which you'll see tomorrow!

Nov 26, 2012

Floral Eyes - Essie Super Bossa Nova, Konad Special Polish White


A mani which turned out a bit odd! From afar it sorta looks like little monsters with black beady eyes, oh dear...

[Beady little floral eyes!]
 I think I did this one at the beginning of spring and was feeling doing something bright and slightly retro... Hm

[Bottle to nail: Essie Super Bossa Nova (2 coats)]
I started with a base of Essie Super Bossa Nova from the Summer Collection. Who doesn't love some bossa nova! =) Super Bossa Nova is a bright pink creme with a bright fuchsia shimmer.


[2 coats: Essie Super Bossa Nova]
Like most Essies, gorgeous formula and excellent pigmentation. I think I used two coats here but you could get away with one careful coat (depending on the length of your nails).

[Base: Essie Super Bossa Nova (2 coats); Stamping: Konad Special Polish White]
I then stamped over it with a floral pattern from one of my Bundle Monster plates, using Konad Special Polish in White. Then I stuck on small black rhinestones using clear polish... might not have been the best addition, but oh well! I seem to do this alot... there appears to be a great divide between what I imagine when starting a mani... and what appears after I'm done! =S