; Plisherrific: February 2013

Feb 28, 2013

Brushed Black - Kleancolor Metallic Black

Its been a pretty crazy week for us. Let me keep this short, but do check in tomorrow for what I used over this! :)

[Kleancolor Metallic Black]
I bought Kleancolor Metallic Black on a whim, because I love the other Kleancolor Metallics so much. This one does not disappoint!

As it's black, of course it doesn't have the bright vibrancy of the other metallics. But it does it's job rather well as a sort of foil. Application was smooth and I like the finish. This makes for a rather interesting black polish!

Feb 21, 2013

Celebrate the Change - SolarClub Festival

I have Festival here from SolarClub's Ruby Wing collection, a set of color changing polishes. SolarClub is produced by Forsythe Cosmetics, who is the manufacturer of Color Club as well. The bottles used are the same as Color Club's, except the nail polish bottle cap is of an antique gold colour and it has a pretty Ruby Wing polish tag. Very nice~

Now, onwards to the polish!

[Indoors: SolarClub Festival]
Under normal indoor lighting, SolarClub's Festival is this insanely gorgeous, holographic nail polish. Look at those diamonds on my nails, daaaaamn. Festival is a slightly-tinged-lilac silver holographic glitter polish that applies smoothly.


[Under direct sunlight: SolarClub Festival]
Under the direct sunlight, it changes to a deep holographic purple glitter instead. While the colour change happens quickly, you have to be under direct sunlight for it to happen.


[Under the shade while outdoors: SolarClub Festival]
This is after the the nail polish was under direct sunlight. I was in the shade but still outside. At first, I wasn't sure if it had returned to its normal colour, but it's obvious in the photos that it's actually more purple when compared to being completely indoor.

At $10 a bottle, the Ruby Wing polishes are pricier than Color Club's usually cheaper range. Personally, I like it, but I only have one more from the collection. Do you have one and do you think it's worth its price?

Feb 18, 2013

Storm Specks - Essie Fair Game, LA Girl Uninhibited


Here's a fairly old mani I decided to post and get out of the way... I actually have a fair few of those lying around, oh dear...

[Cloudy with a chance of soot?]
Another of my experiments with glitter! I don't think the end result was flashy enough for me, but it was an interesting mani to wear.

[Bottle to nail: Essie Fair Game (2 coats)]
I started with a base of Essie Fair Game from the Resort 2011 collection. It's a steel blue shimmer with a slight frostiness that gives it a pearly finish.

[2 coats: Essie Fair Game]
Excellent coverage and not too brushstrokey if you're careful with it. An interesting moody colour, sort of like storm clouds.

[Base: Essie Fair Game (2 coats); Glitter: LA Girl Uninhibited (1 coat)]
I had LA Girl Glitter Addict in Uninhibited lying around on my desk so I swiped on a layer over the top. Uninhibited is a mix of small and large black hexes in a clear base.

[Base: Essie Fair Game (2 coats); Glitter: LA Girl Uninhibited (1 coat)]
It did appear to sink into the base colour, but a nice glossy topcoat fixed that right up! I think black glitters can be pretty interesting, although they aren't as sparkly and reflective as other colours. =)


Feb 14, 2013

Scattered across the Sky - Femme Fatale Winter Hyacinth

Last week's post was rather long-winded so I'll be less verbose this time round to make up for it! This is an older swatch I found in my folders:

[Outdoors: 3 coats of Winter Hyacinth]
[Indoors: 3 coats of Winter Hyacinth]
Femme Fatale's Winter Hyacinth! I love it! It has a blue jelly base with pink hex glitter of all sizes, white hex glitter and white diamond glitter. The consistency is just right; jelly enough for the glitter to show through in beautiful layers, opaque enough so you can hardly see the nail line. There's a nice distribution of glitter so you don't have to fish for any. And no bubbling in the formula!

Feb 11, 2013

Lushly Luxe - OMG Nail Foil Strips Review

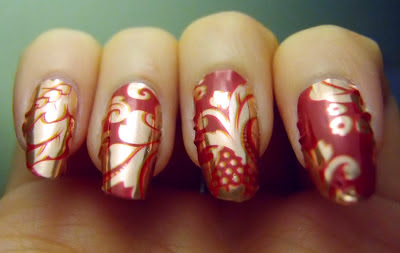
You've probably already seen Jme's review last week of OMG nail polish strips, but today I've got the nail foil strips here to show you. These were sent to us for review and honest opinion. We figured we'd review one of each type so I've picked the Floral Nail Foil strips. You can see the entire selection of nail foils here.Remember, these are nail foil strips, not transfer foils!


[Floral Nail Foil Strips from OMG Nail Strips]
This is a lovely red and gold design that I thought was just perfect for the Lunar New Year on the weekend!


[Floral Nail Foil Strips from OMG Nail Strips]
There are 16 strips per nail foil package and it comes in nice matte black packaging with a window through which you can see the actual contents. The strips are a very generous sizing - the largest is about 2cm across!


[Packaging and Instructions: Floral Nail Foil Strips from OMG Nail Strips]
Instructions are on the back (click the image to zoom in) but I was informed that this was the beta packaging and some additional info will be added which I've noted here:

Instructions
1. Clean and manicure nails and cuticles prior to applying nail strips
2. Peel nail strips from the flat side of the strip, the rounded side will be placed just above your cuticles.
3. Place the round side of the nail strip at the base of your cuticle. Applying pressure from the middle of the cuticle press around in one direction and then the other.
4. Holding the nail strip at the cuticle base stretch the nail strip over the tip of the nail while smoothing out any creases on the side of the nail.(foils need to be stretched more than polish strips to reduce bubbling)
5. Using a cuticle pusher tuck the nail strip in along the cuticle base.
6. Hold your nail so it is facing up and use a thin fine grain nail file, filing in a (downward only) direction to remove the excess nail strip from the tip and around the sides of your nail.
7. Now that your nail foil is applied use a hair dryer on high heat and your finger to smooth out any remaining imperfections. (for Nail Polish Strips heat is not necessary but you will want to apply two coats of clear coat to increase longevity.)


Now... onto the images!
Prior disclaimer: this is the absolute first time I've ever tried applying nail foil strips so take from that what you will! ;) 


[No topcoat: Floral Nail Foil Strips from OMG Nail Strips]
Image quality:
I'm fairly impressed by the design. I couldn't spot any pixels just by eye and the contrast between the golden foil and duller red background looked really good. If you're being nitpicky, the images don't line up perfectly (for example on my ring finger where it looks like there's a closely overlapped shadow of the image), but this is not obvious on the nail.

 
Size:
As I've mentioned - generous sizing! I actually only used the two biggest strips and the third smallest to do this one hand because I have
fairly slim nails so there was plenty to go around. I did leave my nails fairly long so that I could get most of the pattern on it so this is a consideration as well.


[No topcoat: Floral Nail Foil Strips from OMG Nail Strips]
Application:
Now... I'm a total n00b when it comes to nail foils but I didn't find it very difficult. I did figure out that I should have done a few things better, but I'll get to that later. 

On my flatter nails (thumb, middle, ring), applications was super easy. Just line it up and smooth it out from the middle outwards. I just used my nail to smooth it out rather than a cuticle pusher. I then pulled it taut over the free edge and carefully filed off the excess using a glass file.
It was a bit more difficult on my super curved index finger (which I've complained about before!) so there's a lot more wrinkling going on there.
 
[With topcoat: Floral Nail Foil Strips from OMG Nail Strips]
Topcoat:
You need topcoat over nail foils to reduce lifting and prolong wear! Jme has mentioned that which topcoat you use matters! I wanted to test it out so if you look at the above photo, I have a quick-dry (Seche Vite) on my thumb and a non-quick dry on the other fingers.
With quick-dry you end up with wrinkling and slight dulling of the golden parts of the foil. The non-quick dry does not change the appearance of the foil.

HOWEVER, you can actually use quick-dry if you want this effect! The gold takes on an antique gold foil look and the textured surface helps a bit in hiding wrinkling from application.


[Quick-dry topcoat (thumb) vs Non-quick-dry (others]

Things I've learnt from this:
1) Make sure you cut the strips to the right width for your nail. Or slightly smaller
, even, because it makes a big difference in reducing wrinkles!
2) Pull the strips as taut as possible and bend it down over the free edge so it wraps slightly.
3) When filing off the edge, file only downwards in smooth motions, moving from one side of the nail to the other. This helps a lot with preventing lifting. 
4) Topcoat matters!

Overall, I think this is a cheap, quick and easy way to get a fancy look on your nails, provided you don't have nails which are too curved. The nail polish strips seem to have better stretch and application (possibly also because wrinkles are more apparent with the foil finish) so that might be an option too! 

Personally, I need to figure out how to apply them better on curved nails before I can get practical use off them! I'd appreciate any tips and tricks anyone might have!
 
Check out OMG Nail Strips (FREE SHIPPING, y'alls!) or their Facebook page to get an idea of what other bloggers have been doing with their nail foil strips! =)

Feb 7, 2013

Flamingo Camo - OMG Nail Polish Strip Review

Today, I have nail polish strips from OMG Nail Strips, and a few tips on how to apply them (like I'm some professional or something, hah!)

Onwards to the strips! :P

[Camouflage Nail Polish Strip (Pink)]
I rather like how these strips turned out! The nail polish strips were thin and easy to apply. The end product looks nice and smooth. You can see the pixels of the print from up-close, but you have to be pretty close!

A couple more photos before I go on to the tips!

[Camouflage Nail Polish Strip (Pink)]
I think they look pretty spiffy and it's pretty simple to apply for patterns I'm too lazy to produce using nail art.

Ok, here we go with the tips! Strips tend to be very thin, so I recommend using a similar-ish colour as the base coat (something I did not do, and you can see a little green peeking through at the tips of the nails where I stretched the strips a bit too much). You want your base coat to be fairly smooth because this strips are thin!

The instructions at the back of the package says to remove the transparent protective layer first before you apply the sticker to your nails. I find there are actually two methods you could go with:
  1. Per instructions, remove the transparent layer, peel the sticker off its backing and stick it to your nails. This method means it's easier to stretch the strip over your nail and it applies with no wrinkles. The downside is that because the polish strip is so thin, it can be a bit floppy and difficult to align to your nails properly. I accidentally destroyed one strip because I removed it one too many times when trying to get it right. 
  2. Leaving the transparent layer on, apply the sticker to your nail. You can still stretch it a little across your nail. Then remove the plastic layer. With the plastic layer on, the sticker is a little stiffer and easier to align to your nail. The downside is that because it doesn't stretch as much with the plastic on, one or two wrinkles might appear at the edge of your nail. But once you remove the plastic layer, you can actually push out the wrinkles and they should become flat and smooth again. In the last photo above, I used this method on my pinky finger and it's pretty smooth.
The usual tips: Use the edge of a metal ruler to remove any excess on your skin, and the rough side of a buffer to buff off the excess from the tips. 

With nail polish strips, I use a top coat to seal it in so that there are no rough edges and it lasts longer. It won't last long at all without top coat! The instructions also say to use UV top coat, but I don't have any. Quick dry top coats can emphasize the imperfections (if you have a small hole on the strip, it can widen it) and if the top coat tends to bubble, it can make holes in your strip. I used Blush-Amour base coat to seal the strips, and then Jordana Quick Shine Top Coat over the lot for extra gloss and protection. You can test your top coats on the leftover strips to check for negative effect. My nail polish strips lasted five days without any peeling. :D

Alright, I'm done with my essay! This nail polish strip was sent to me for review by OMG Nail Strips. You can find them on their Facebook too.

Feb 4, 2013

Girly Gradient - Winmax Nail Brights 114, 2true Crystal Nail Polish Shade 6, Canmake Colorful Nails 28


Today I've got an uber girly gradient manicure to show you!

[Pinkalicious]
I did this one about mid-last year soon after getting back from my holiday to the UK and Japan. Nail trends in Japan tend to be all about subtle, girly and sparkly nails, so I was a bit inspired by that when I got back!

[Bottle to nail: Winmax Nail Brights 114 (1 coat)]
I started with a base of Winmax Nail Brights 114, a pink/gold flakie polish. The flakies were super dense in this one so I only used one coat. The base is sheer so you end up with a glossy nude-ish finish. I actually tested out my gradient first on my ring finger, so you can see it there darker than the rest.I picked this up in Japan, but you can grab it at Daiso stores in Australia too!

[Base: Winmax 114 (1 coat); Bottle to nail: 2true Crystal Nail Polish Shade 6]
I then dabbed 2true Crystal Nail Polish in Shade 6 over the outer half of the nail. This one's a bright pink-gold duochrome glass fleck.

[Base: Winmax 114 (1 coat); Outer half: 2true Crystal Nail Polish Shade 6]
Very very sparkly - I was really impressed by the three 2true polishes I picked up in London! I need to remember to wear this one on its own too...

[Gradient: Winmax 114, 2true Shade 6; Bottle to nail: Canmake Colorful Nails 28]
Finally I dabbed on Canmake Colorful Nails in 28 on the outer third of the nail. This one is a mix of fine purple flecks and larger opalescent glitter packed into a clear base.

[Gradient (cuticle to tip): Winmax 114, 2true Shade 6, Canmake 28]
Tada! The finished product! I really don't go for manicures like this most of the time because I prefer rich solid colours. It is nice to experiment though!